Brake booster
Exploded View
2WD
MR16DDT, HR16DE

1. Master cylinder assembly 2. Vacuum pipe
3. Brake booster
4. Lock nut
5. Clevis
6. Gasket
 : N·m (kg-m, ft-lb)
K9K
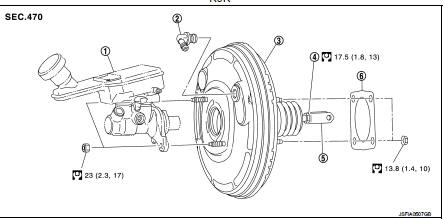
1. Master cylinder assembly 2. Vacuum pipe
3. Brake booster
4. Lock nut
5. Clevis
6. Gasket
 : N·m (kg-m, ft-lb)
4WD
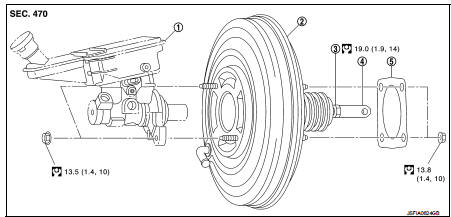
1. Master cylinder assembly 2. Brake booster
3. Lock nut
4. Clevis
5. Gasket
: N·m (kg-m, ft-lb)
Removal and installation
REMOVAL
1. Perform inspection before removal. Refer to BR-113, "Inspection and Adjustment". 2. Remove cowl top and cowl top extension. Refer to EXT-20, "Removal and Installation". 3. Remove brake master cylinder assembly. Refer to BR-108, "Removal and Installation".4. Remove vacuum hose from brake booster.
• MR16DDT: Refer to BR-115, "MR16DDT : Removal and Installation". • HR16DE: Refer to BR-116, "HR16DE : Removal and Installation".• K9K: Refer to BR-117, "K9K : Removal and Installation".
5. Remove low-pressure flexible hose.
• HR16DE: Refer to HA-35, "LOW-PRESSURE FLEXIBLE HOSE : Removal and Installation". • MR16DDT: Refer to HA-91, "LOW-PRESSURE FLEXIBLE HOSE : Removal and Installation".• K9K: Refer to HA.
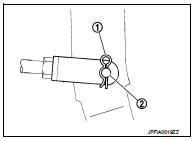
6. Remove snap pin (1) and clevis pin (2). Refer to BR-88, "Exploded View".7. Remove nuts on brake booster and brake pedal assembly.
CAUTION:Hold the brake booster so as to avoid dropping out
.
8. Remove brake booster.
NOTE:If removing brake booster is difficult, remove clevis from brake booster.
9. Remove vacuum pipe from brake booster. (2WD) 10. Perform inspection after removal. Refer to BR-113, "Inspection and Adjustment".
INSTALLATION
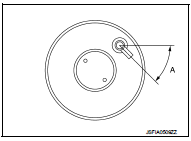
Note the following, and install in the reverse order of removal.• Set vacuum pipe angle (A) as shown in the figure. [2WD (MR16DDT and HR16DE)]
A : 28 – 38°
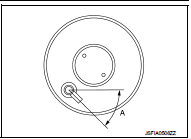
• Set vacuum pipe angle (A) as shown in the figure. [2WD (K9K)]
A : 28 – 38°
• Be careful not to damage brake booster stud bolt threads. If brake booster is tilted during installation, the dash panel may damage the threads. • Never deform or bend the brake tubes when installing the brake booster. • Always use a gasket between the brake booster and the dash panel. • Replace the clevis pin if it is damaged. Refer to BR-90, "Inspection and Adjustment". • Perform the air bleeding. Refer to BR-81, "Bleeding Brake System".• Check each item of brake pedal. Adjust it if the measurement value is not the standard. Refer to BR-77, "Inspection and Adjustment".
Inspection and Adjustment
INSPECTION BEFORE REMOVAL
Air Tight
CAUTION:Check the air tight condition when the master cylinder and the brake booster is installe
d.
1. Check the air tight use a handy vacuum pump.
At vacuum of −66.7 kPa (−500 mmHg, −19.69 inHg, −0.067 bar) Vacuum should decrease within 3.3 kPa (24.8 mmHg, 0.98 inHg, 0.033 bar) for 15 seconds.
2. If the air tight condition cannot be maintained, perform the following operation.
a. Check the no dirt and dust are present on the brake booster and brake master cylinder mating faces.
Clean it if necessary. b. Check the O-ring on the master cylinder. If anything is found, replace the O-ring. Refer to BR-108, "Removal and Installation".c. Check the air tight condition again. If the condition still cannot be maintained, replace the brake booster.
INSPECTION AFTER REMOVAL
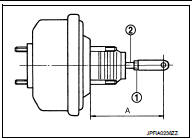
Input Rod Length Inspection 1. Loosen the lock nut (1) and adjust the input rod (2) to the specified length (A).
A : Refer to BR-136, "Brake Booster".
2. Tighten the lock nut to the specified torque.
INSPECTION AFTER INSTALLATION
Operation
Depress the brake pedal several times at 5-second intervals with the engine stopped. Start the engine with the brake pedal fully depressed. Check that the clearance between brake pedal and dash lower panel decreases.
:
A slight impact with a small click may be felt on the pedal when the brake pedal is fully depressed. This is a normal phenomenon due to the brake system operation.
1. Run the engine at idle for 1 minute to apply vacuum to the brake booster, and stop the engine. 2. Depress the brake pedal several times at 5-second intervals until the accumulated vacuum is released to atmospheric pressure. Check that the clearance between brake pedal and dash lower panel gradually increases each time the brake pedal is depressed when performing this operation.
3. Depress the brake pedal with the engine running. Then stop the engine while holding down the brake pedal. Check that the brake pedal stroke does not change after holding down the brake pedal for 30 seconds or more.
ADJUSTMENT AFTER INSTALLATION
Perform the brake pedal adjustment after installing the brake pedal assembly. Refer to BR-77, "Inspection and Adjustmen