C1113, C1145, C1146 yaw rate/side/decel g sensor
DTC Logic
DTC DETECTION LOGIC
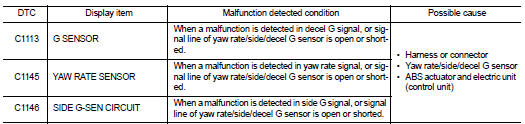
DTC CONFIRMATION PROCEDURE
1.PRECONDITIONINGIf “DTC CONFIRMATION PROCEDURE” has been previously conducted, always turn ignition switch OFF and wait at least 10 seconds before conducting the next test.
>> GO TO 2.
2.CHECK DTC DETECTION With CONSULT-III.
1. Turn the ignition switch OFF to ON.
2. Perform self-diagnosis for “ABS”.
Is DTC “C1113” “C1145” or “C1146” detected? YES >> Proceed to BRC-165, "Diagnosis Procedure".
NO >> INSPECTION END
Diagnosis Procedure
1.CHECK ABS ACTUATOR AND ELECTRIC UNIT (CONTROL UNIT) POWER SUPPLY SYSTEMCheck ABS actuator and electric unit (control unit) power supply system. Refer to BRC-205, "Diagnosis Procedure".
Is the inspection result normal? YES >> GO TO 2.
NO >> Repair or replace error-detected parts.
2.CHECK CONNECTOR 1. Turn ignition switch OFF. 2. Check ABS actuator and electric unit (control unit) harness connector for disconnection or looseness.3. Check yaw rate/side/decel G sensor harness connector for disconnection or looseness.
Is the inspection result normal? YES >> GO TO 4.
NO >> Repair or replace error-detected parts, securely lock the connector, and GO TO 3.
3.PERFORM SELF-DIAGNOSISPerform self-diagnosis for “ABS” again.
Is DTC“C1113”, “C1145” or “C1146” detected? YES >> GO TO 4.
NO >> INSPECTION END
4.CHECK YAW RATE/SIDE/DECEL G SENSOR POWER SUPPLY CIRCUIT1. Turn ignition switch OFF.
2. Disconnect ABS actuator and electric unit (control unit) harness connector.
3. Disconnect yaw rate/side/decel G sensor harness connector.
4. Check continuity between yaw rate/side/decel G sensor harness connector and ABS actuator and electric unit (control unit) harness connector.

Is the inspection result normal? YES >> GO TO 5.
NO >> Repair or replace error-detected parts.
5.CHECK YAW RATE/SIDE/DECEL G SENSOR GROUND SIRCUITCheck continuity between yaw rate/side/decel G sensor harness connector and ABS actuator and electric unit (control unit) harness connector.

Is the inspection result normal? YES >> GO TO 6.
NO >> Repair or replace error-detected parts.
6.CHECK YAW RATE/SIDE/DECEL G SENSOR SIGNAL CIRCUITCheck continuity between yaw rate/side/decel G sensor harness connector and ABS actuator and electric unit (control unit) harness connector.

Is the inspection result normal? YES >> GO TO 7.
NO >> Repair or replace error-detected parts.
7.CHECK YAW RATE/SIDE/DECEL G SENSOR CIRCUITCheck continuity between each terminals of yaw rate/side/decel G sensor harness connector.

Is the inspection result normal? YES >> GO TO 8.
NO >> Repair or replace error-detected parts.
8.CHECK YAW RATE/SIDE/DECEL G SENSOR 1With CONSULT-III.
1. Connect yaw rate/side/decel G sensor harness connector. 2. Connect ABS actuator and electric unit (control unit) harness connector. 3. Turn the ignition switch ON. 4. Select “ABS”, “DATA MONITOR” and “DECEL G-SEN” in order.
5. Move yaw rate/side/decel G sensor as shown in the figure to check the output of before and after moving the sensor.

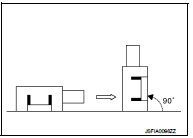
Is the inspection result normal? YES >> GO TO 9.
NO >> Replace yaw rate/side/decel G sensor. Refer to BRC- 235, "Removal and Installation".
9.CHECK YAW RATE/SIDE/DECEL G SENSOR 2 1. Turn ignition switch OFF.2. Connect following terminals between yaw rate/side/decel G sensor and harness connector.
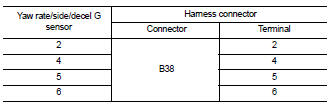
3. Turn ignition switch ON.
CAUTION:Never start the engine.
4. Check voltage between yaw rate/side/decel G sensor harness connector terminals.
CAUTION:Never short out the terminals while measuring voltages.
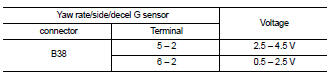
Is the inspection result normal? YES >> Replace ABS actuator end electric unit (control unit). Refer to BRC-233, "Removal and Installation".
NO >> Replace yaw rate/side/decel G sensor. Refer to BRC-235, "Removal and Installation".