Rear Suspension 4WD
Coil spring
In this manual: Rear Suspension 4WD
~1min read
Exploded View
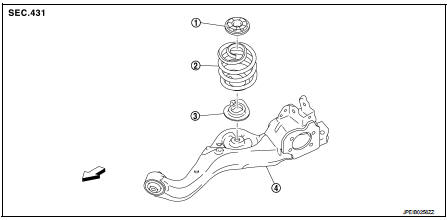
1. Upper rubber seat 2. Coil spring
3. Lower rubber seat
4. Suspension arm
 : Vehicle front
Removal and Installation
REMOVAL
1. Remove tires. Refer to WT-7, "Removal and Installation". 2. Remove wheel sensor and sensor harness. Refer to BRC-86, "REAR WHEEL SENSOR : Removal and Installation" (Without ESP), BRC-227, "REAR WHEEL SENSOR : Removal and Installation" (With ESP).3. Set jack under suspension arm.
CAUTION:• Never damage the suspension arm with a jack.
• Check the stable condition when using a jack.
4. Separate rear shock absorber lower side form suspension arm. Refer to RSU-8, "Removal and Installation". 5. Separate upper link from suspension arm.6. Slowly lower jack, then remove upper rubber seat, coil spring and lower rubber seat from suspension arm.
CAUTION:Operate while checking that jack supporting status is stable.
7. Perform inspection after removal. Refer to RSU-27, "Inspection" INSTALLATION
Note the following, and install in the reverse order of removal.
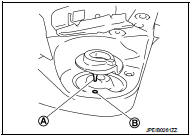
• Install the lower rubber seat a projection (A) is attached as suspension arm mounting hole (B). • Match up lower rubber seat indentions and suspension arm grooves and attach.• Perform inspection after installation. Refer to RSU-27, "Inspection".
Inspection
INSPECTION AFTER REMOVAL
Check lubber seat and coil spring for deformation, crack, and damage. Replace it if necessary.
INSPECTION AFTER INSTALLATION
1. Check wheel sensor harness for proper connection. Refer toBRC-85, "REAR WHEEL SENSOR : Exploded View" (Without ESP), BRC-225, "REAR WHEEL SENSOR : Exploded View" (With ESP).2. Check wheel alignment. Refer to RSU-20, "Inspection".
Was this page helpful?