Rear Suspension 4WD
Lower link
In this manual: Rear Suspension 4WD
~1min read
Exploded View
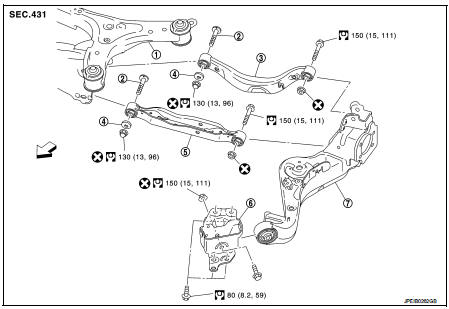
1. Rear suspension member 2. Adjusting bolt
3. Upper link
4. Eccentric disk
5. Lower link
6. Suspension arm bracket 7. Suspension arm
 : Vehicle front
 : Always replace after every
disassembly.
 : N·m (kg-m, ft-lb)
Removal and Installation
REMOVAL
1. Remove tires. Refer to WT-7, "Removal and Installation".2. Set jack under suspension arm.
CAUTION:• Never damage the suspension arm with a jack.
• Check the stable condition when using a jack
.
3. Remove stabilizer link. Refer to RSU-34, "Removal and Installation". 4. Remove eccentric disc, adjusting bolt, mounting bolt, and nut, then remove lower link.5. Perform inspection after removal. Refer to RSU-31, "Inspection".
INSTALLATION
Note the following, and install in the reverse order of removal.
• Perform final tightening of rear suspension member and axle installation position (rubber bushing), under unladen conditions with tires on level ground. • Never reuse lower link mounting nut.• Perform inspection after installation. Refer to RSU-31, "Inspection".
Inspection
INSPECTION AFTER REMOVAL
Check lower link and bushing for any deformation, cracks, or damage. Replace it if necessary.
INSPECTION AFTER INSTALLATION
1. Check wheel alignment. Refer to RSU-20, "Inspection".2. Adjust neutral position of steering angle sensor. Refer to BRC-149, "Work Procedure" (With ESP).
Was this page helpful?