Front Axle :: Unit Disassembly and Assembly. Front Drive Shaft
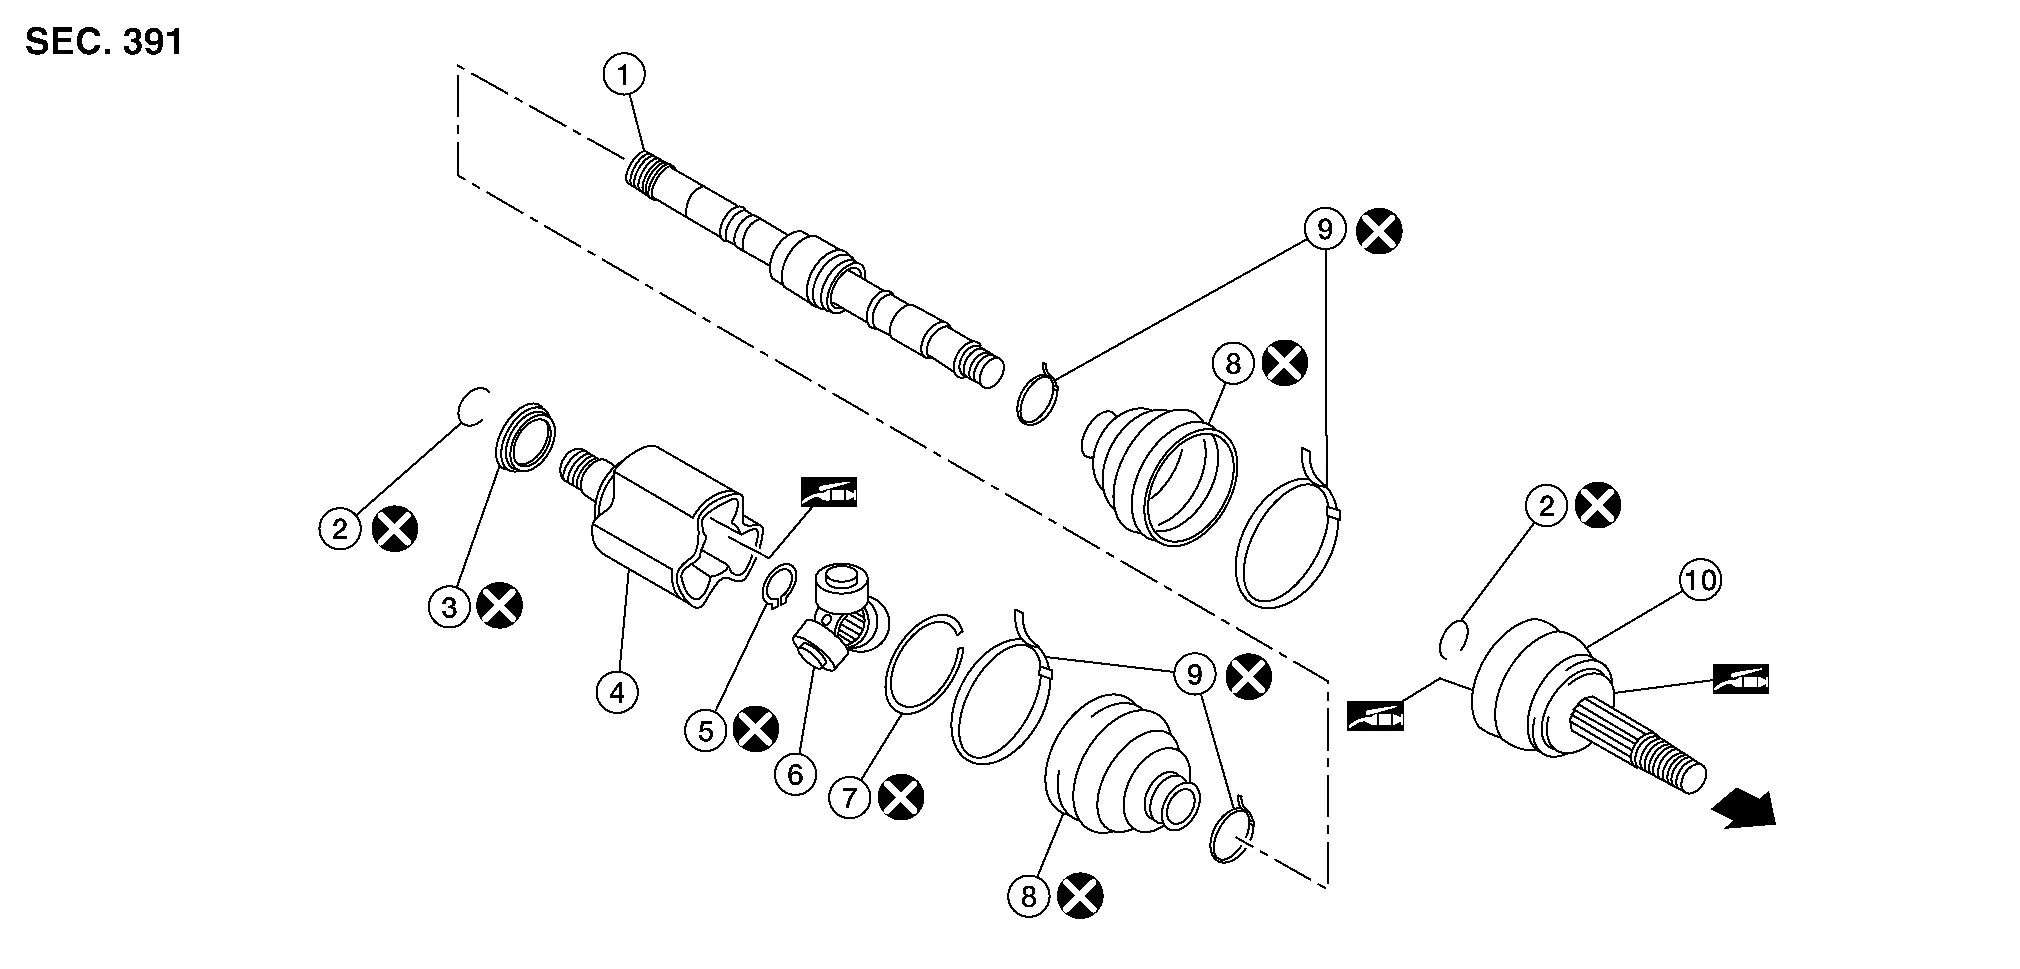
| 1. | Shaft with damper | 2. | Circular clip | 3. | Dust shield |
| 4. | Housing | 5. | Snap ring | 6. | Spider assembly |
| 7. | Stopper ring | 8. | Boot | 9. | Boot band |
| 10. | Joint sub-assembly |  |
Wheel side |  |
Fill with Genuine NISSAN Grease. |
DISASSEMBLY
Transaxle Side
Secure front drive shaft in a vise.
Remove boot bands and slide boot back.
Put matching marks on housing and shaft before separating housing.
Remove stopper ring using a suitable tool.
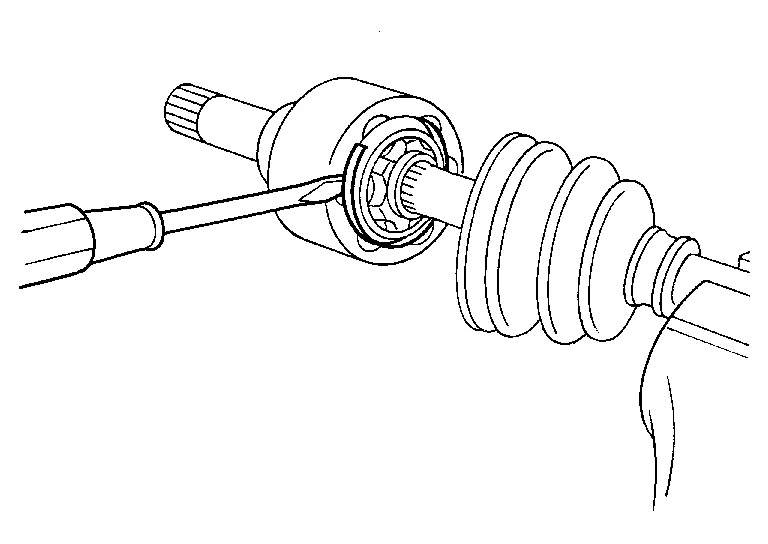
Pull out housing.
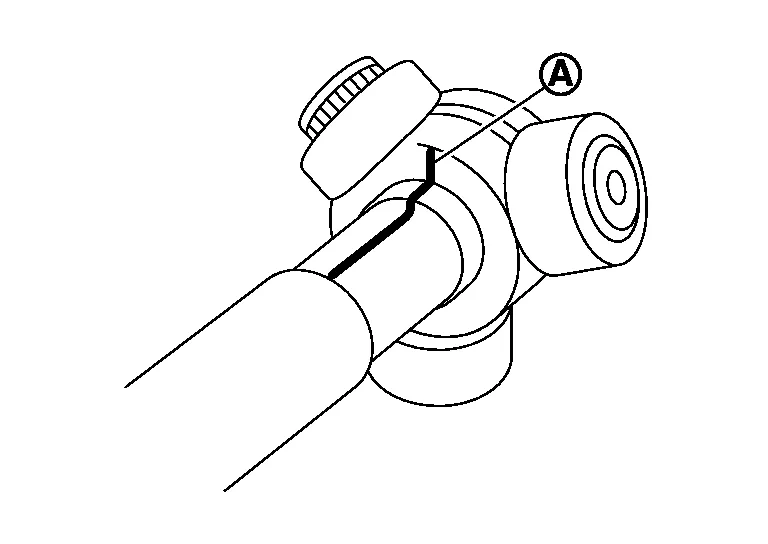
Put matching marks (A) on spider assembly and shaft.
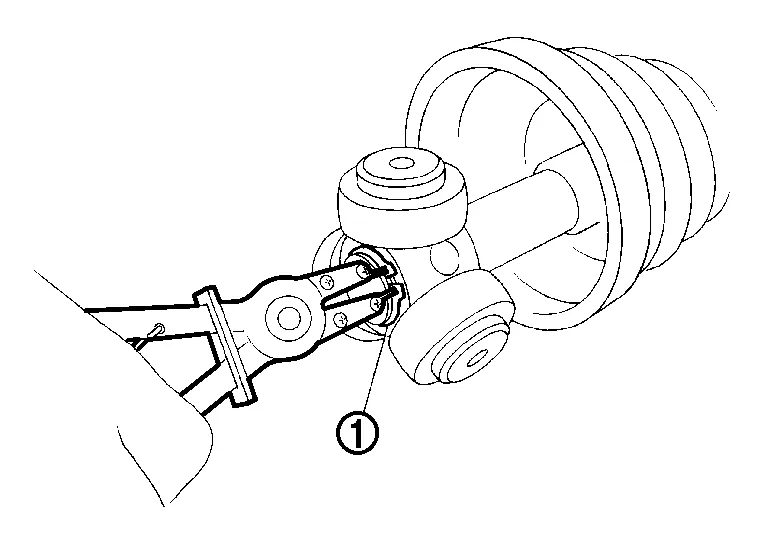
Remove snap ring (1) using a suitable tool.
Remove spider assembly from shaft.
Remove boot from shaft.
Remove circular clip from housing.
Remove dust shield from housing.
Clean old grease off slide joint housing.
Wheel Side
Secure front drive shaft in a vise.
Remove boot bands and slide boot back.
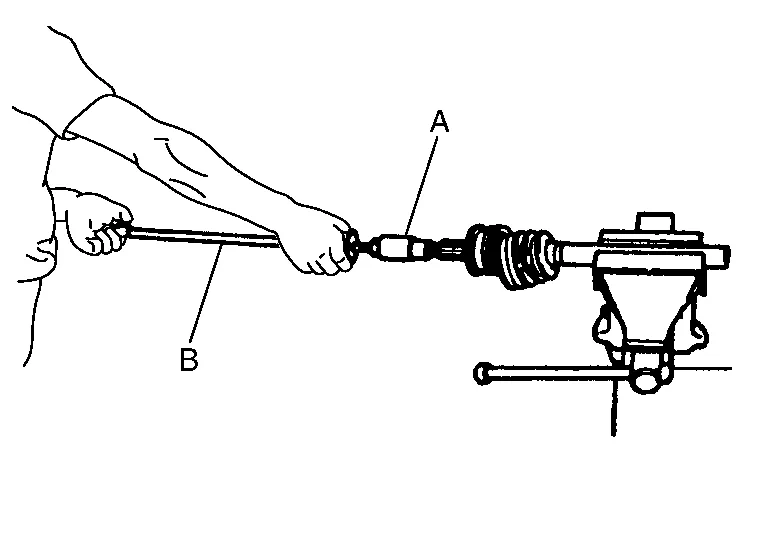
Screw a suitable tool (A) 30 mm (1.18 in) or more into threaded part of joint sub-assembly. Pull joint sub-assembly out of shaft.
Remove circular clip from shaft.
Remove boot from shaft.
While rotating ball cage, clean old grease off joint sub-assembly.
INSPECTION AFTER DISASSEMBLY
Shaft
Check shaft for runout, cracks, or other damage. Replace entire drive shaft if necessary.
Joint Sub-Assembly
Make sure there is no rough rotation or unusual axial looseness.
Make sure there is no foreign material inside joint sub-assembly.
Check joint sub-assembly for compression scars, cracks or fractures.
Housing
Make sure there are no compression scars, cracks or fractures or unusual wear of ball rolling surface.
Make sure there is no damage to shaft screws.
Make sure there is no deformation of boot installation parts.
Ball Cage
Make sure there are no compression scars, cracks, or fractures of sliding surface.
Steel Ball
Make sure there are no compression scars, cracks, fractures or unusual wear.
Inner Race
Check ball sliding surface for compression scars, cracks or fractures.
Make sure there is no damage to serrated part.
ASSEMBLY
Transaxle Side
Install new boot and new small boot band on shaft.
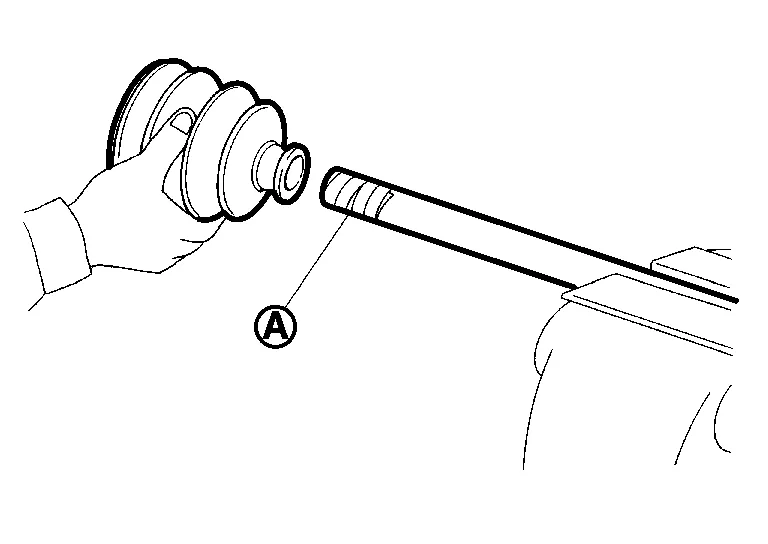
Remove protective tape wound around serrated part of shaft.
Align matching mark (A) on spider assembly (1) with matching mark on shaft (2). Install spider assembly to shaft with chamfer (B) facing shaft.
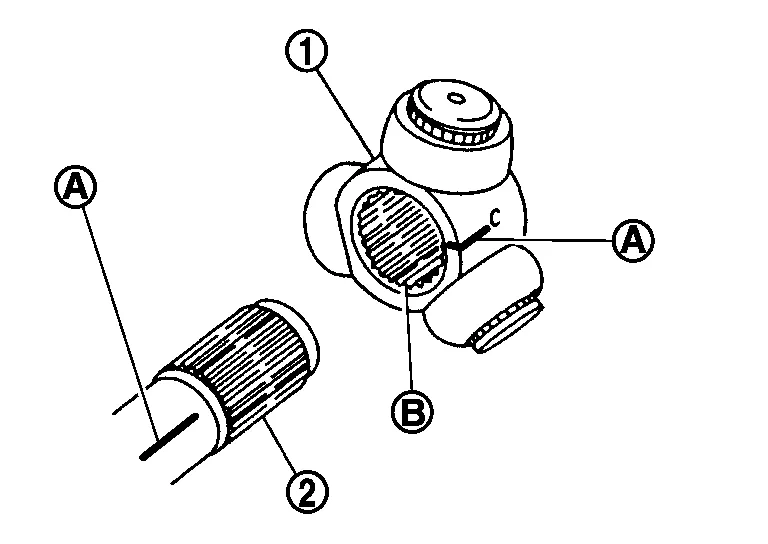
Secure spider assembly onto shaft with snap ring (1) using a suitable tool.
Assemble housing onto spider assembly making sure to align matching marks made during disassembly, and fill with specified amount of new Genuine NISSAN Grease.
| Grease quantity | : Refer to Drive Shaft . |
Install new stopper ring to housing.
After installation, pull shaft to check engagement between housing and stopper ring.
Install boot securely into grooves (indicated by "*" marks) as shown.
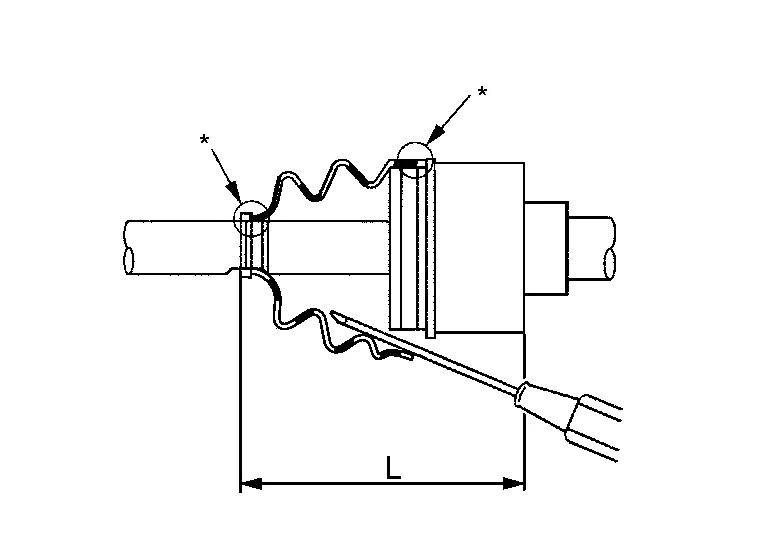
Make sure boot installation length (L) is length specified below. Insert a suitable tool into large end of boot. Bleed air from boot to prevent boot deformation.
| Boot installation length (L) | : Refer to Drive Shaft. |
Install new large and small boot bands securely using Tool.
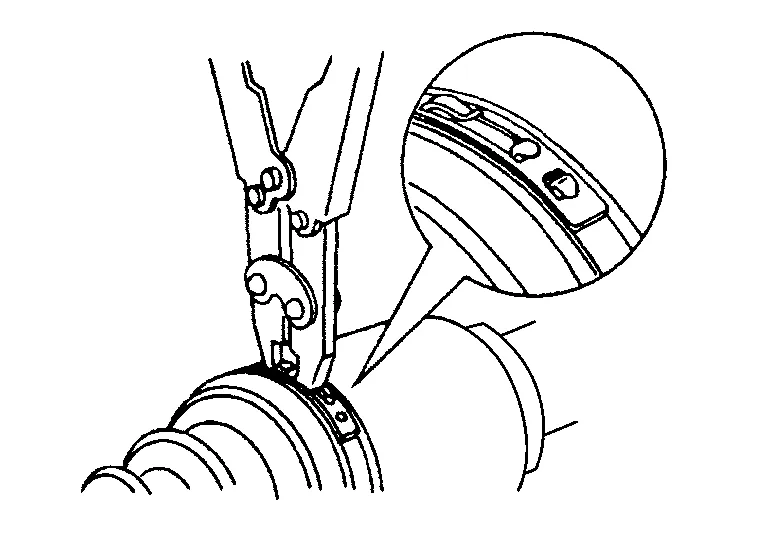
| Tool number | : KV40107300 (J-51751) |
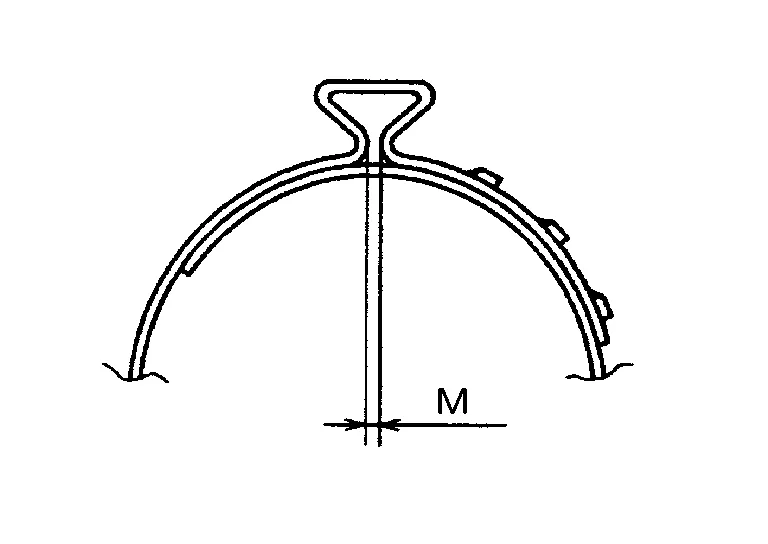
| Dimension (M) | : Refer to Boot Bands. |
Install new dust shield to housing.
Install new circular clip to housing.
After installing slide joint housing and shaft, make sure boot position is correct. If boot position is not correct, remove old boot bands then reposition boot and secure with new boot bands.
Wheel Side
Insert Genuine NISSAN Grease into joint sub-assembly (1) serration hole until grease begins to ooze from ball groove and serration hole.
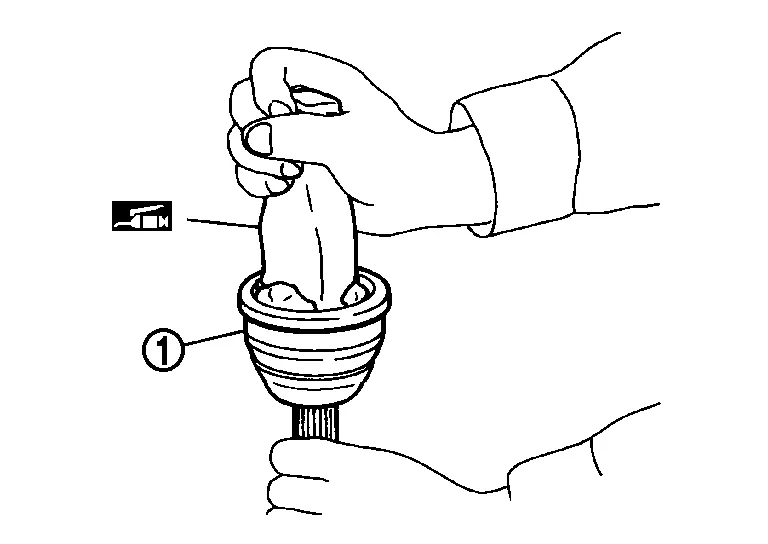
Install new boot and new small boot band on shaft.
Remove protective tape wound around serrated part of shaft.
Attach new circular clip to shaft. Circular clip must fit securely into shaft groove. Attach nut to joint sub-assembly. Use a suitable tool to press-fit.
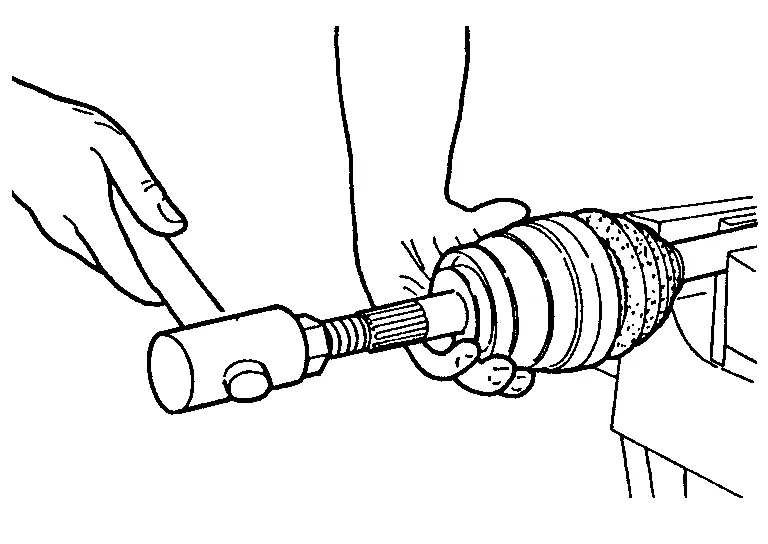
Pull the joint sub-assembly in the axial direction away from transaxle assembly. Confirm that the joint sub assembly cannot be pulled out.
Insert specified amount of new Genuine NISSAN Grease listed below into housing from large end of boot.
| Grease quantity | : Refer to Drive Shaft. |
Install boot securely into grooves (indicated by "*" marks) as shown.
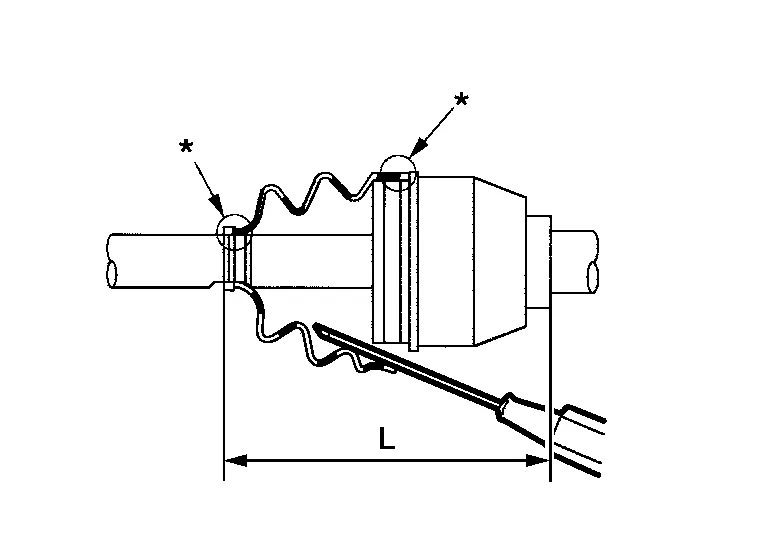
Make sure boot installation length (L) is specified length indicated below. Insert a suitable tool into large end of boot. Bleed air from boot to prevent boot deformation.
| Boot installation length (L) | : Refer to Drive Shaft. |
Install new large and small boot bands securely using Tool.
| Tool number | : KV40107300 (J-51751) |
| Dimension (M) | : Refer to Boot Bands. |
Attempt to rotate boot to check whether or not boot bands are securing boot. If boot is not secure, remove boot bands, reposition boot, and install new boot bands.
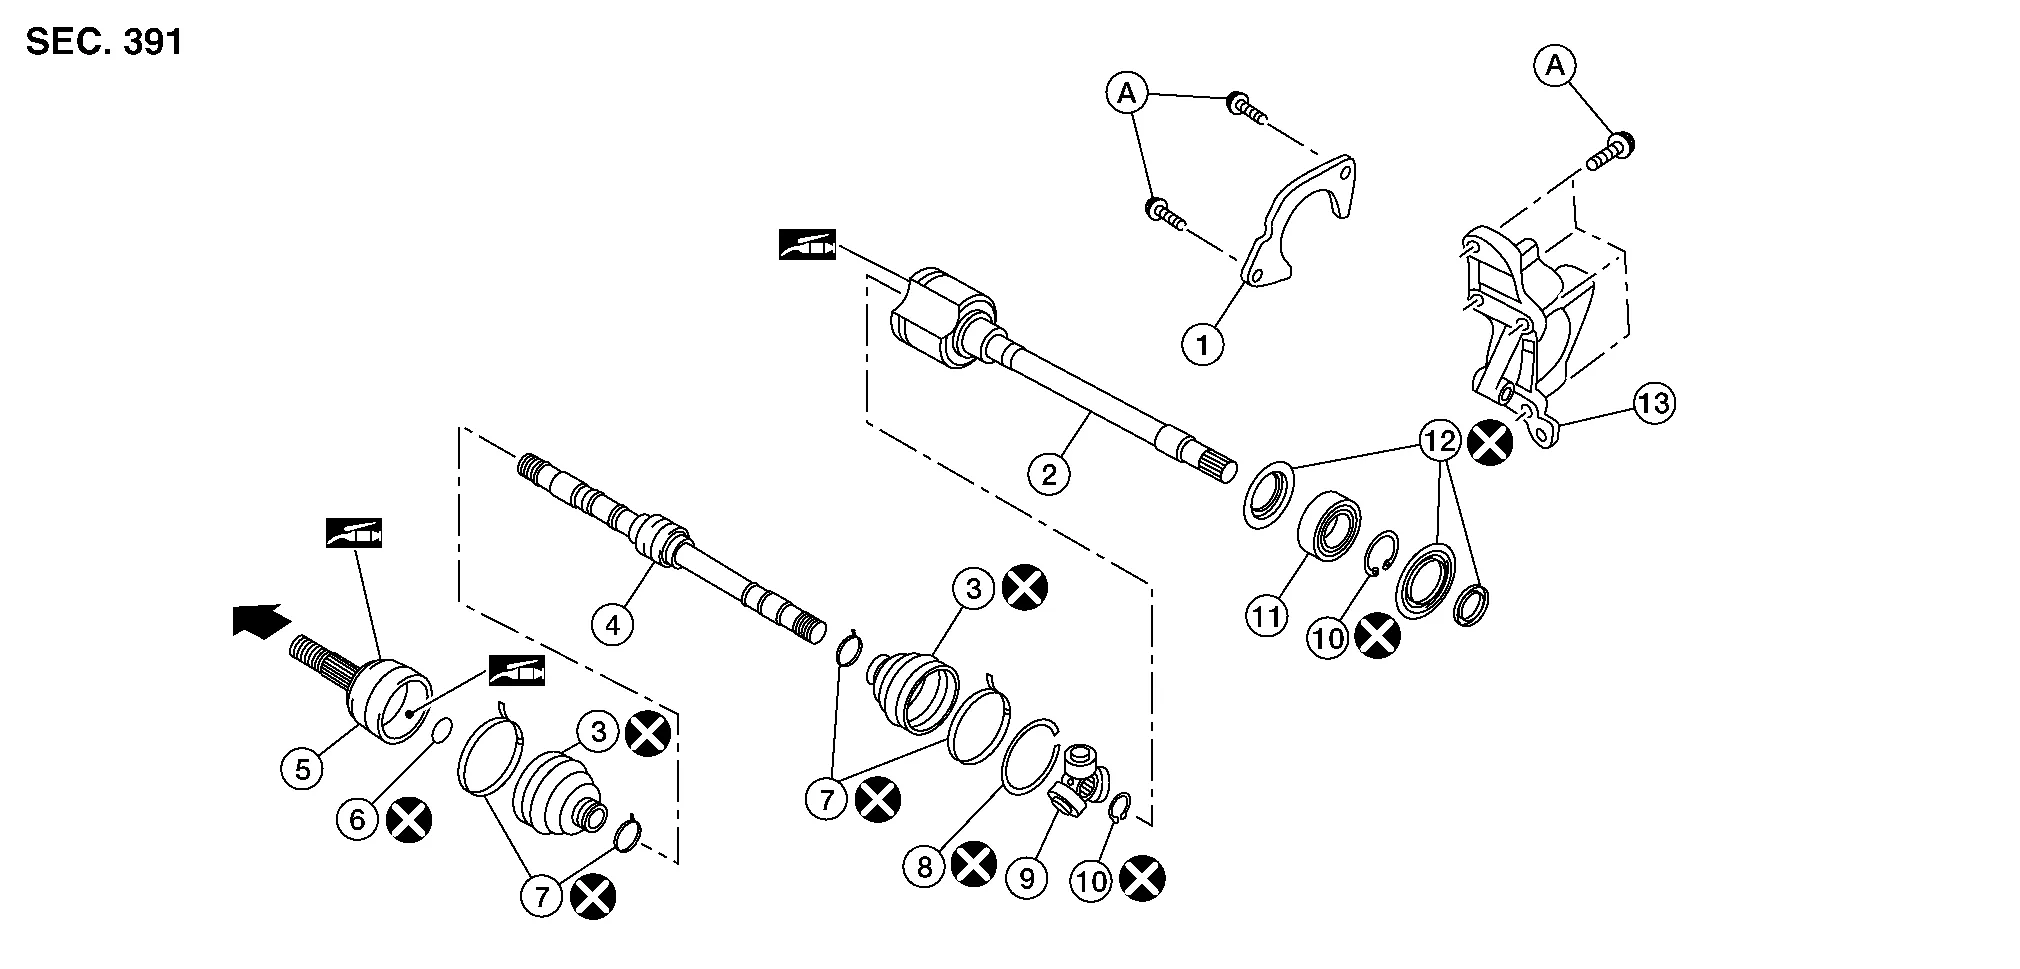
| 1. | Support bearing retainer | 2. | Housing | 3. | Boot |
| 4. | Shaft with damper | 5. | Joint sub-assembly | 6. | Circular clip |
| 7. | Boot band | 8. | Stopper ring | 9. | Spider assembly |
| 10. | Snap ring | 11. | Support bearing | 12. | Dust shield |
| 13. | Support bearing bracket | A. | Refer to Removal and Installation. | |
Wheel side |
|
Fill with Genuine NISSAN grease. |
DISASSEMBLY
Transaxle Side
Secure shaft in a vise.
Remove boot bands and slide boots back.
Put matching marks on housing and shaft before separating housing.
Remove stopper ring using a suitable tool.
Pull out housing.
Put matching marks (A) on spider assembly and shaft.
Remove snap ring (1) using a suitable tool.
Remove spider assembly from shaft.
Remove boot from shaft.
Remove circular clip from housing.
Remove dust shield from housing.
Clean old grease off housing.
Support Bearing
Remove dust shield from housing using a suitable tool.
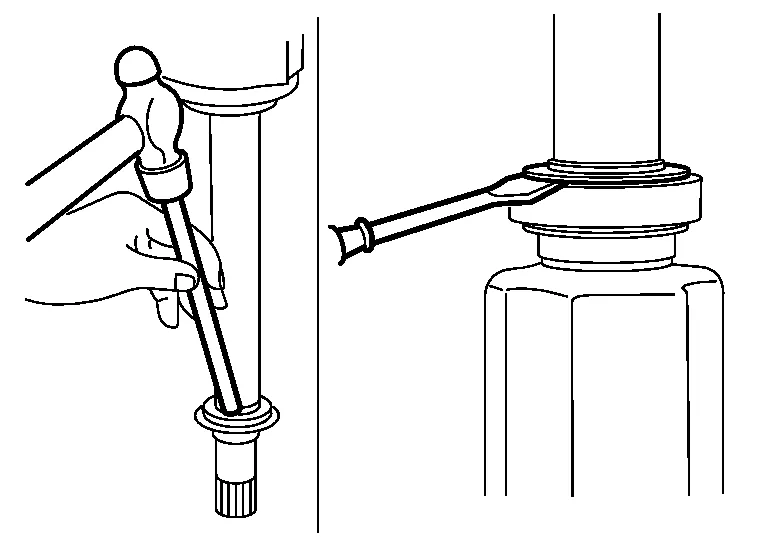
Remove snap ring (1) using a suitable tool.
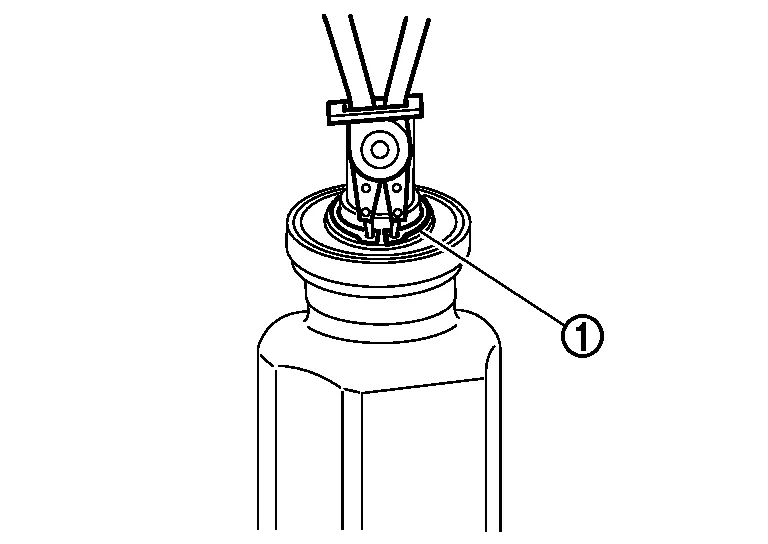
Press support bearing off housing using a suitable tool.
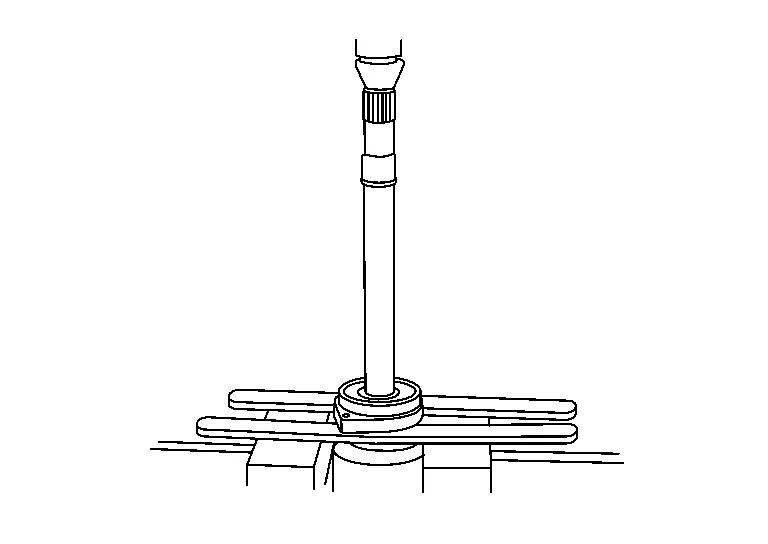
Remove dust shield.
Wheel Side
Secure front drive shaft in a vise.
Remove boot bands and slide boot back.
Screw a suitable tool (A) 30 mm (1.18 in) or more into threaded part of joint sub-assembly. Pull joint sub-assembly out of shaft.
Remove circular clip from shaft.
Remove boot from shaft.
While rotating ball cage, clean old grease off joint sub-assembly.
INSPECTION AFTER DISASSEMBLY
Shaft
Check shaft for runout, cracks, or other damage. Replace entire drive shaft if necessary.
Joint Sub-assembly
Make sure there is no rough rotation or unusual axial looseness.
Make sure there is no foreign material inside joint sub-assembly.
Check joint sub-assembly for compression scars, cracks or fractures.
Housing and Spider Assembly
Check surfaces for scratches or wear; replace entire drive shaft if necessary.
Support Bearing
Make sure support bearing rolls freely and is free from noise, cracks, pitting or wear.
ASSEMBLY
Transaxle Side
Install new boot and new small boot band on shaft.
Remove protective tape wound around serrated part of shaft.
Align matching mark (A) on spider assembly (1) with matching mark on shaft (2). Install spider assembly to shaft with chamfer (B) facing shaft.
Secure spider assembly onto shaft with snap ring (1) using a suitable tool.
Assemble housing onto spider assembly making sure to align matching marks made during disassembly, and fill with specified amount of Genuine NISSAN Grease.
| Grease quantity | : Refer to Drive Shaft. |
Install new stopper ring to housing.
After installation, pull shaft to check engagement between housing and stopper ring.
Install boot securely into grooves (indicated by "*" marks) as shown.
Make sure boot installation length (L) is length indicated below. Insert a suitable tool into large end of boot. Bleed air from boot to prevent boot deformation.
| Boot installation length (L) | : Refer to Drive Shaft. |
Install new large and small boot bands securely using Tool.
| Tool number | : KV40107300 (J-51751) |
| Dimension (M) | : Refer to Boot Bands. |
Install new dust shield to housing.
Install new circular clip to housing.
After installing housing and shaft, rotate boot to check whether or not actual position is correct. If boot position is not correct, remove old boot bands then reposition boot and secure with new boot bands.
Support Bearing
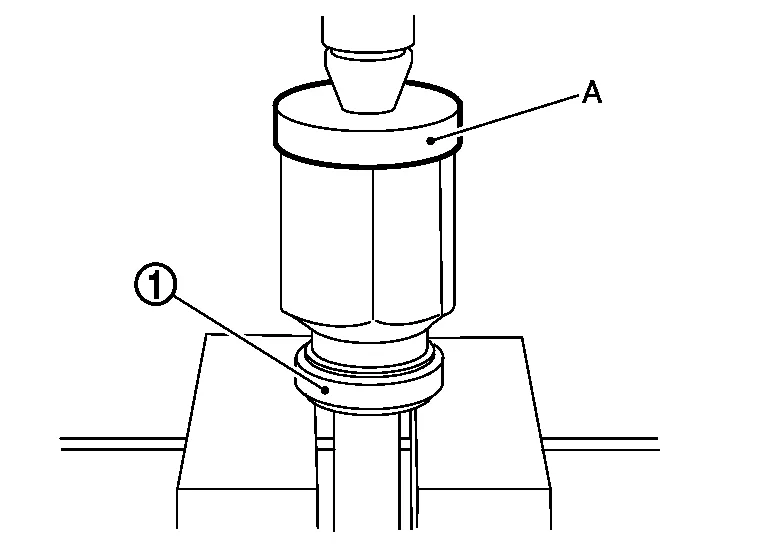
Install dust shield on housing.
Press support bearing (1) onto housing using a suitable tool (A).
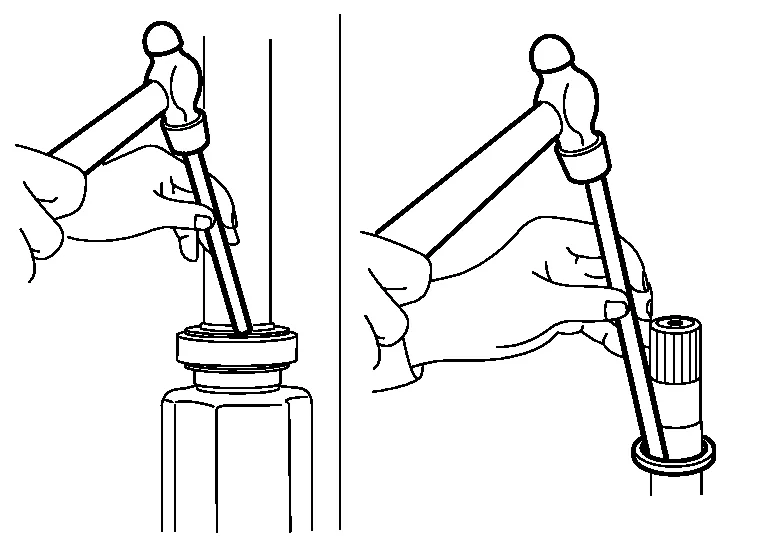
Install snap ring (1) using a suitable tool.
Install dust shields.
Wheel Side
Insert Genuine NISSAN Grease into joint sub-assembly serration hole until grease begins to ooze from ball groove and serration hole.
Install new boot and new small boot band on shaft.
Remove protective tape wound around serrated part of shaft.
Attach new circular clip to shaft. Circular clip must fit securely into shaft groove. Attach nut to joint sub-assembly. Use a suitable tool to press-fit.
Pull the joint sub-assembly in the axial direction away from transaxle assembly. Confirm that the joint sub assembly cannot be pulled out.
Insert specified amount of new Genuine NISSAN Grease listed below into housing from large end of boot.
| Grease quantity | : Refer to Drive Shaft. |
Install boot securely into grooves (indicated by "*" marks) as shown.
Make sure boot installation length (L) is specified length. Insert a suitable tool into large end of boot. Bleed air from boot to prevent boot deformation.
| Boot installation length (L) | : Refer to Drive Shaft. |
Install new large and small boot bands securely using Tool.
| Tool number | : KV40107300 (J-51751) |
| Dimension (M) | : Refer to Boot Bands. |
Attempt to rotate boot to check whether or not boot bands are securing boot. If boot is not secure, remove boot bands, reposition boot, and install new boot bands.