Mood Lamp
FRONT CONSOLE
Removal
Remove center console upper side finisher. Refer to Exploded View.
Remove mood lamp (front console) (1) screw (B).

Release harness connector (A) clip using a suitable tool and disconnect the harness connector from the mood lamp (front console).
 : Clip
Release pawls using a suitable tool and remove mood lamp assembly (front console).
 : Pawl
Release pawl and remove mood lamp (front console) from mood lamp lens (front console).
Installation
Installation is in the reverse order of removal.
REAR CONSOLE
Removal
Remove screw and release clips, then disconnect the harness connectors from the mood lamp [rear console (RH/LH) and remove center console tray. Refer to Exploded View.
Remove screws (A) and release pawls and clips, then remove mood lamps [rear console RH/LH (1, 2)] and mood lamp lens [rear console(3)] as an assembly.
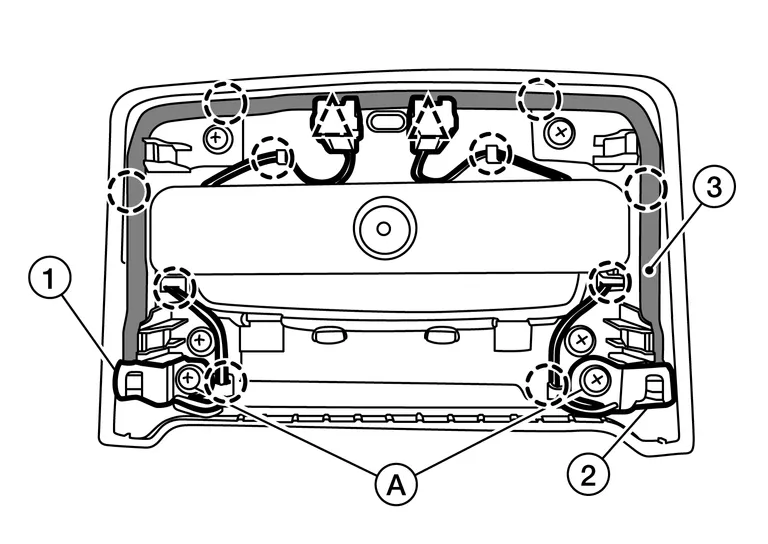
: Pawl
: Clip
Release pawls and separate the mood lamps [rear console (RH/LH)] from the mood lamp lens (rear console).
FRONT DOOR ARMREST
The mood lamp (front door armrest) is serviced as part of the front door finisher. Refer to Removal and Installation.
The mood lamp bulbs are LED and not serviced separately. Refer to Removal and Installation.