Moonroof Unit Assembly
WIND DEFLECTOR
Open glass lid fully.
Visually check for proper installation, damaged/deteriorated components, or foreign objects within mechanism. Correct as required for smooth operation.
Check for grease at the wind deflector arm (1) and pivot areas. If necessary, apply a sufficient amount of grease for non-binding operation.
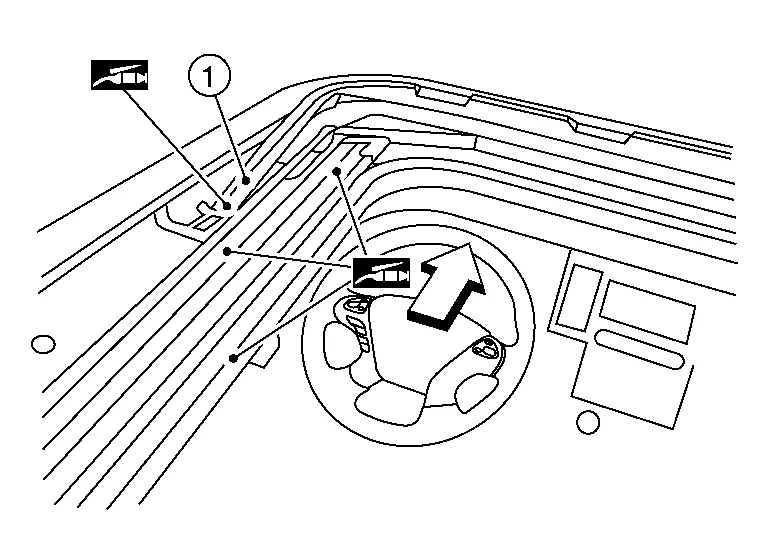
 : Front
Check that the wind deflector (1) moves freely within the moonroof unit assembly while manually pressing down and releasing. If a malfunction is detected, remove the moonroof unit assembly and visually inspect. If damage is found, replace either wind deflector (1) or moonroof unit assembly as required. Refer to Removal and Installation (WIND DEFLECTOR) or Removal and Installation (MOONROOF UNIT ASSEMBLY).
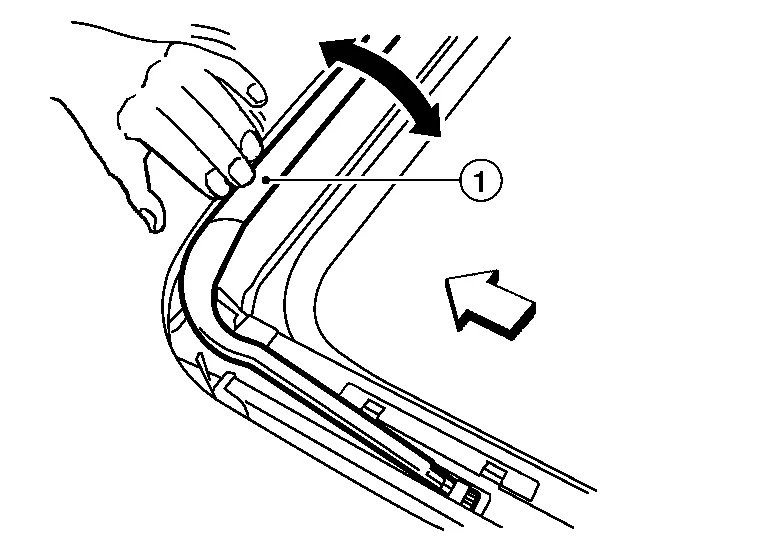
: Front
LINK AND WIRE ASSEMBLY
Check link to determine if coating film has peeled off excessively enough that substrate is visible. Check also to determine if link is the source of noise. Replace as necessary.
Visually check to determine if a sufficient amount of grease has been applied to wire or rail groove. If not, add grease as required.
Check wire for any damage or deterioration. If any damage is found, replace moonroof unit assembly. Refer to Removal and Installation.
WEATHERSTRIP
Visually check weatherstrip for damage, deterioration, or deformation.
Open glass lid partially to inspect front edge of weatherstrip.
Tilt up glass lid fully to inspect sides and rear edge of weatherstrip.
If any area of the weatherstrip is found to be damaged, replace the glass lid. Refer to Removal and Installation.
Check for leaks around glass lid.
Close glass lid.
Pour water around surface to determine area of concern.
For gaps or misalignment, adjust glass lid to specifications. Refer to ADJUSTMENT in this section.
For damaged sealing surfaces, either replace glass lid, refer to Removal and Installation or repair the panel.
DRAIN HOSES
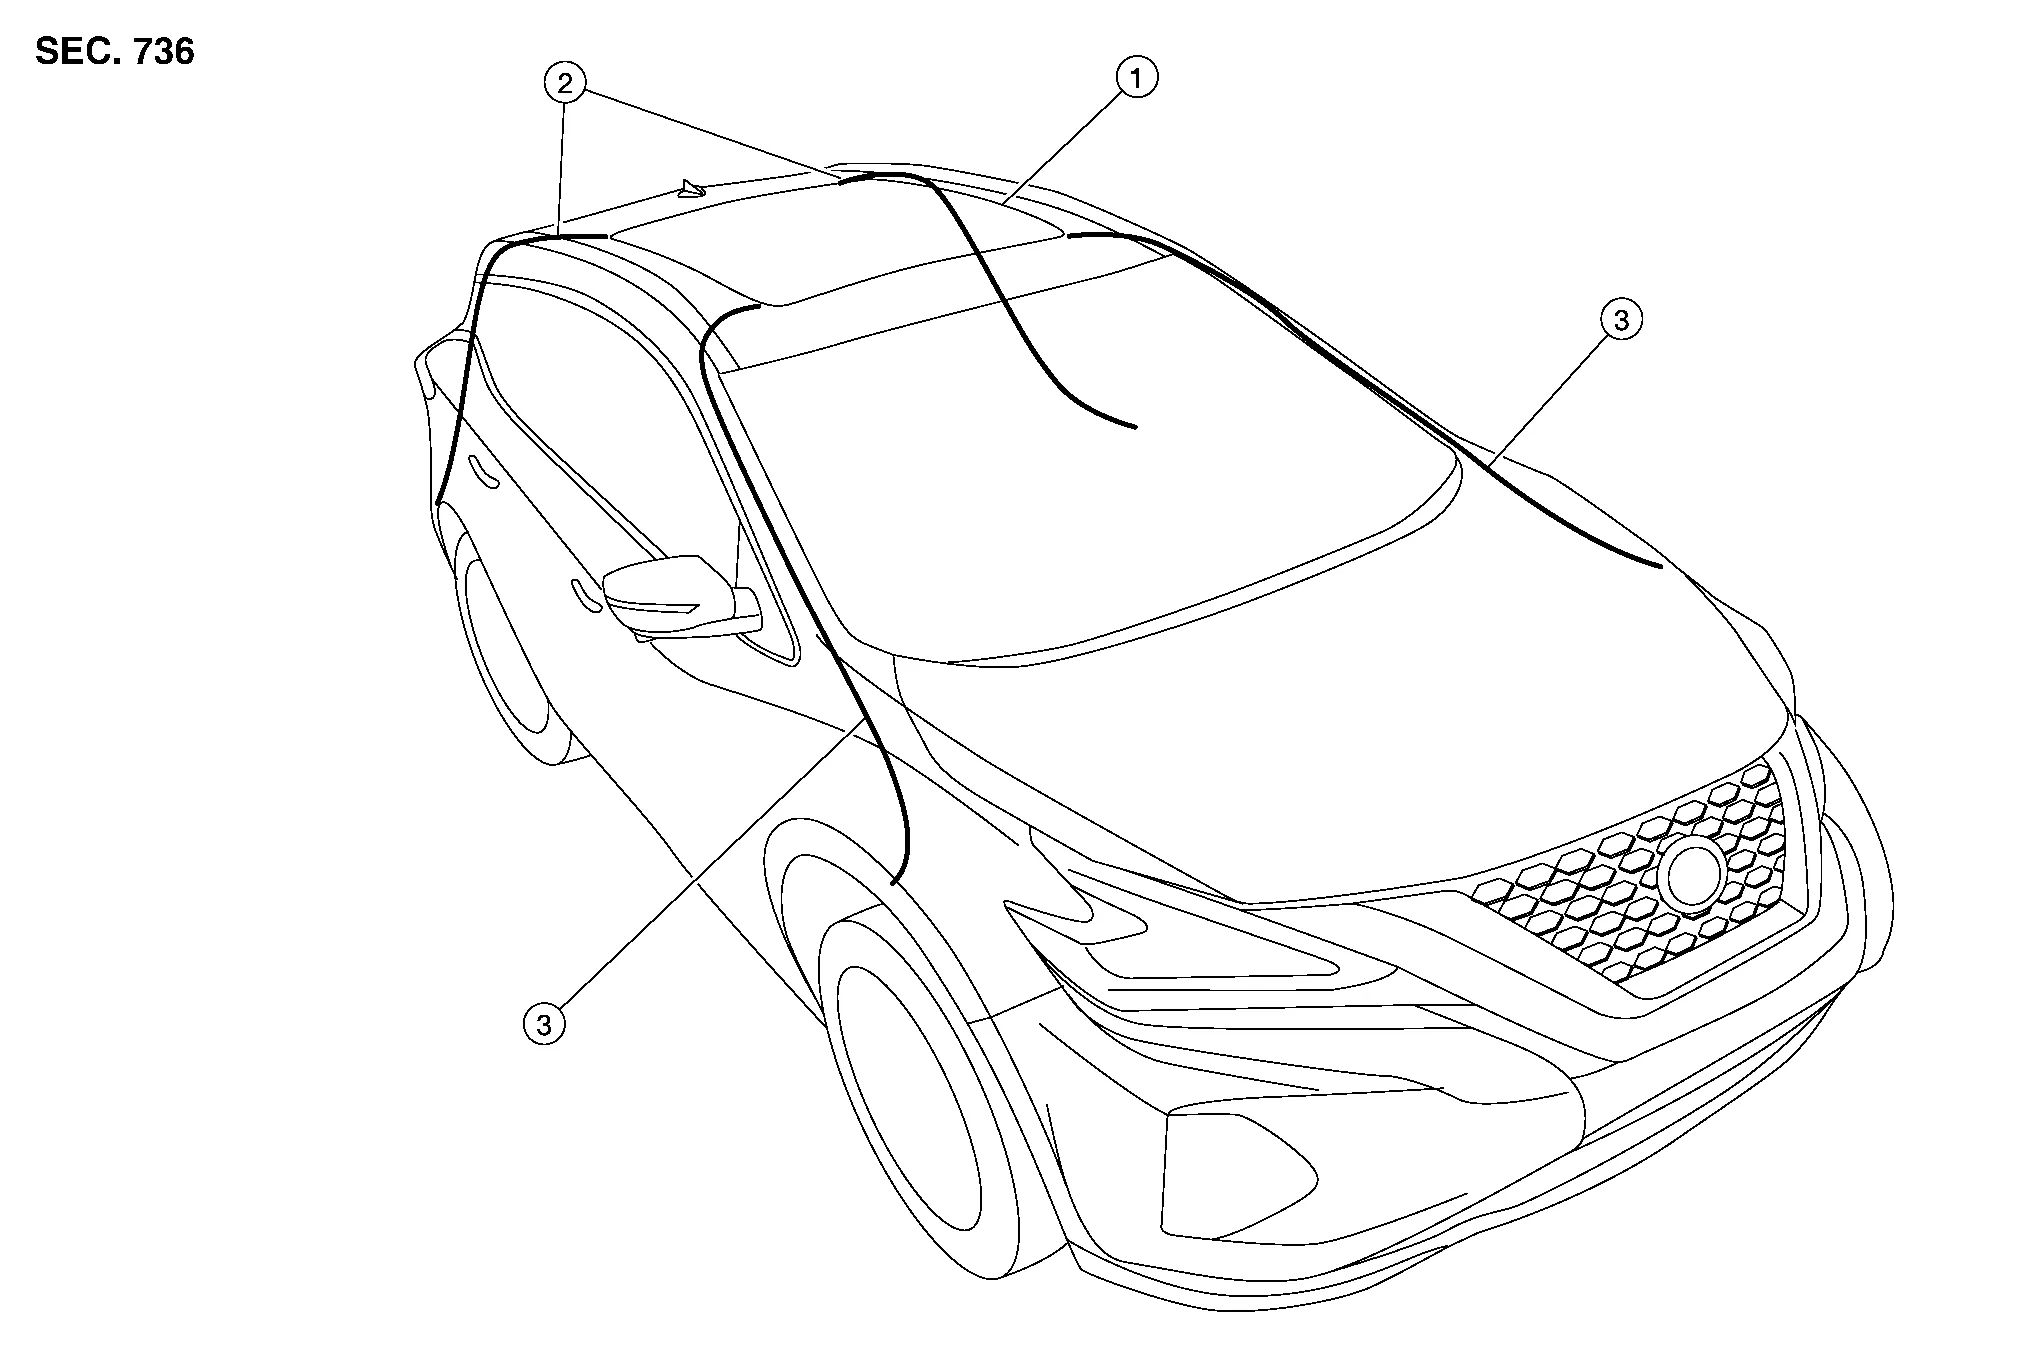
| 1. | Moonroof unit assembly | 2. | Rear drain hoses (LH/RH) | 3. | Front drain hoses (LH/RH) |
Remove the headlining. Refer to Removal and Installation.
From the inside front pillar (3) visually check drain hoses (1) for:
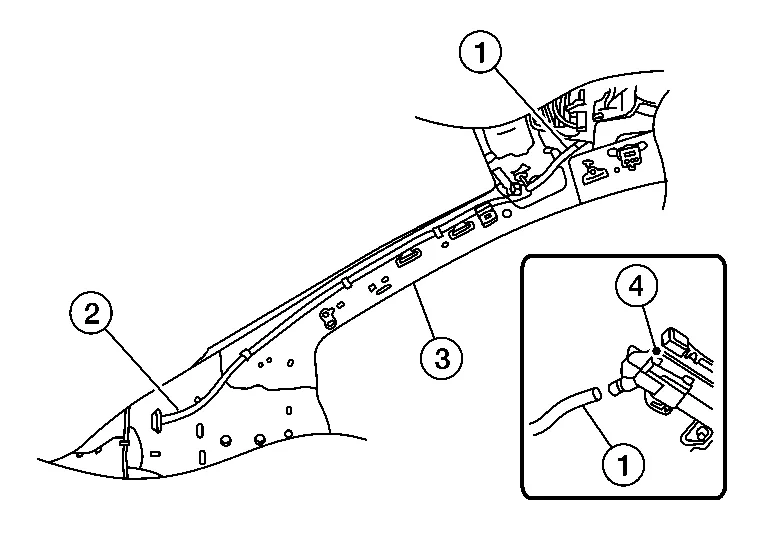
Proper connection at moonroof unit assembly (4) and drain hose connection at the exit base (2).
Damage, pinch, cracks, deterioration.
: Front
Pour water through drain hoses to determine watertight performance.
If damaged or leaking portions in any drain hose is found, replace entire drain hose as necessary.
From the inside of the rear panel (1) visually check drain hoses (2) for damage, pinching, cracks, or deterioration.
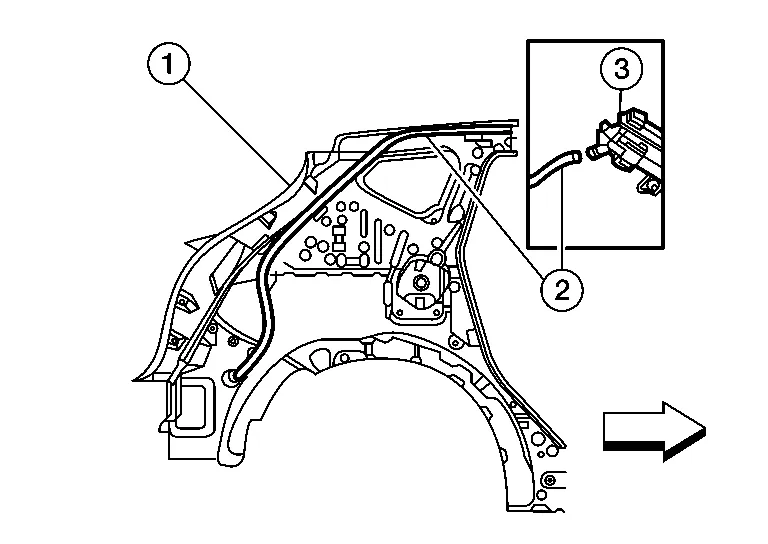
Check for proper connection at moonroof unit assembly (3) and drain hose (2) and for proper routing along the rear panel (1).
: Front
ADJUSTMENT
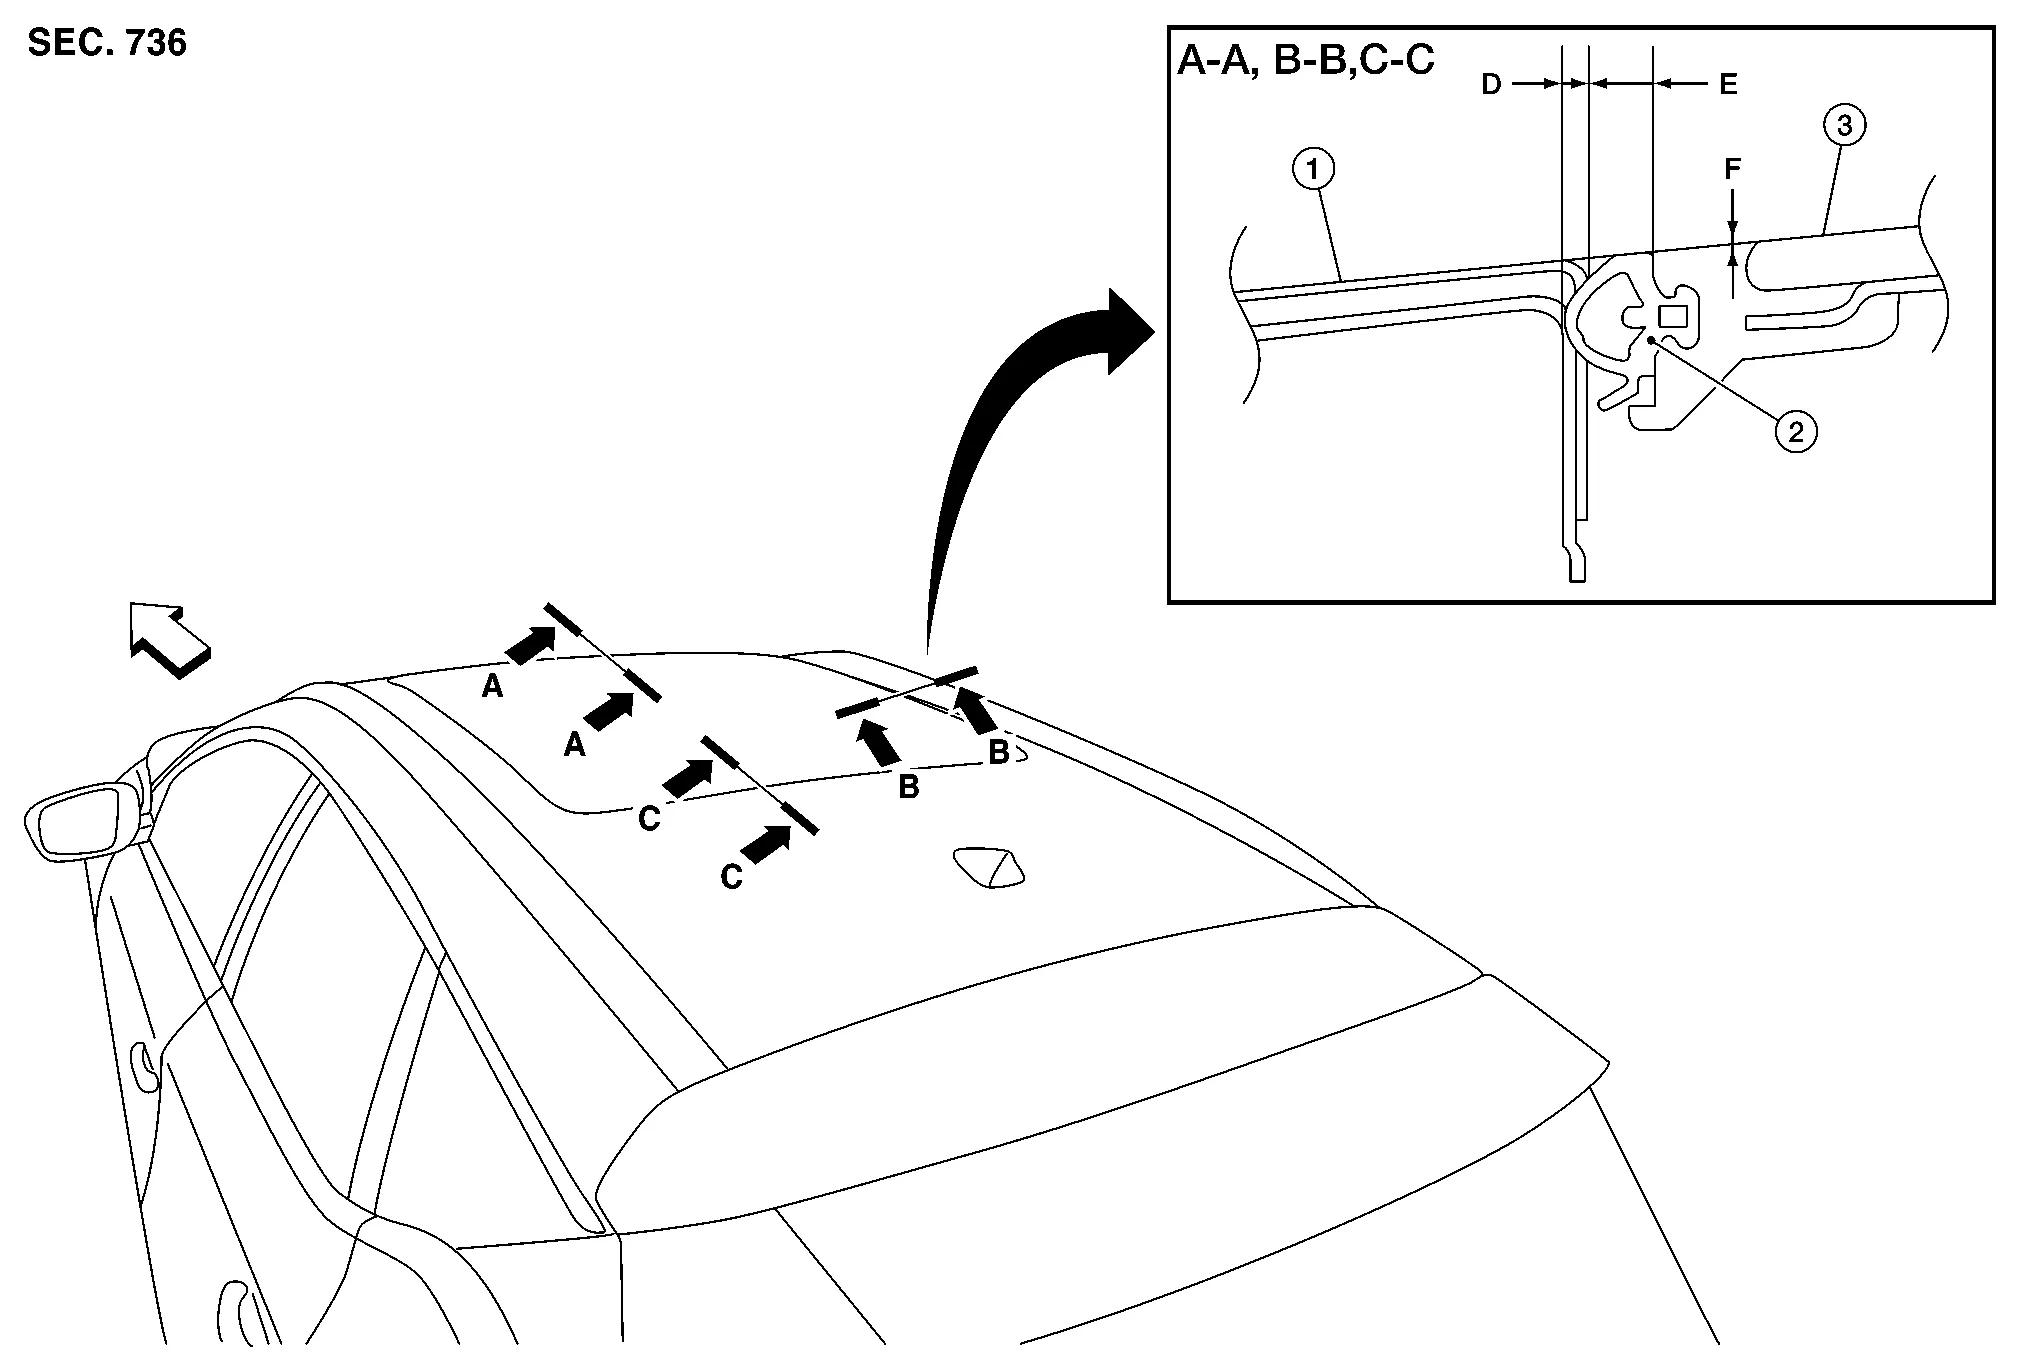
| 1. | Roof panel | 2. | Weatherstrip | 3. | Glass lid/panoramic roof glass |
|
Front |
Unit: mm (in)
| Portion | Gap | Surface height difference | |
|---|---|---|---|
| D | E | F | |
| A-A | 1.2 ± 1.0 (0.06 ± 0.03) | 3.0 | –0.7 ± 1.5 (0.03 ± 0.06) |
| B-B | 1.2 ± 1.0 (0.06 ± 0.03) | 3.0 | –0.7 ± 1.5 (0.03 ± 0.06) |
| C-C | 1.2 ± 1.0 (0.06 ± 0.03) | 3.0 | –0.7 ± 1.5 (0.03 ± 0.06) |
Gap adjustment (Front and Rear)
Open sunshade (1).
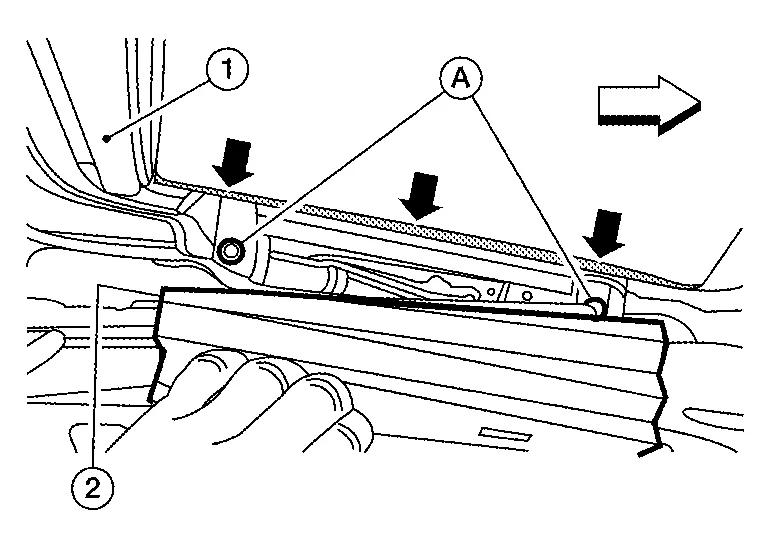
: Front
Tilt glass lid up, then release side trim cover (2) on each side and set aside.
Loosen glass lid bolts (A) (two each on LH and RH side), then tilt glass lid down.
Manually adjust glass lid from outside of Nissan Murano vehicle until gaps A-A and C-C are within specification.
Tilt glass lid up and down several times using moonroof switch to check that it operates smoothly.
Tilt glass lid up and tighten bolts.
Attach side trim covers (LH/RH), then tilt glass lid down.
Gap Adjustment (Sides)
The moonroof unit assembly is mounted on locator pins and adjustment from side to side cannot be performed.
Surface Height Adjustment
Tilt glass lid up and down several times using moonroof switch to check that it operates smoothly.
Check height difference between roof surface and glass lid surface, then compare to specifications.
If necessary, adjust height difference by using the following procedure.
Loosen glass lid bolts.
Manually raise/lower glass lid until height difference is within specification.
Temporarily loosely tighten moonroof unit assembly bolts to prevent movement between each adjustment.
Tilt glass lid up and down several times using moonroof switch to check that it operates smoothly.
Tighten glass lid and moonroof side bracket bolts.
After any adjustment, check moonroof operation and glass lid alignment.

| 1. | Panoramic roof glass | 2. | Moonroof drain | 3. | Wind deflector |
| 4. | Glass lid | 5. | Side trim covers (LH/RH) | 6. | Front drain hose (LH/RH) |
| 7. | Moonroof motor assembly | 8. | Sunshade motor assembly | 9. | Moonroof front bracket (LH/RH) |
| 10. | Moonroof rear bracket (LH/RH) | 11. | Rear drain hose (LH/RH) | 12. | Moonroof unit assembly |
| 13. | Rear trim covers (LH/RH) | 14. | Sunshade | |
Front |
 |
Pawl |  |
Clip |
REMOVAL
If replacing moonroof unit assembly, remove wind deflector. Refer to Removal and Installation.
Remove headlining. Refer to Removal and Installation.
Disconnect drain hoses (front/rear) from moonroof unit assembly. Refer to Inspection.
Disconnect harness connectors from moonroof motor assembly and sunshade motor assembly.
Using a helper, carefully lift each side, then remove nuts and then remove moonroof unit assembly out back of Nissan Murano vehicle.
INSTALLATION
Installation is in the reverse order of removal.