Interpreting states and parameters
DIAG 1
Sheet no. 27
BATTERY VOLTAGE
XR25 help: Battery voltage with ignition on, Min < # 04 < Max Battery voltage at idle, Min < # 04 < Max
INSTRUCTIONS No fault warning light should be on.
With no electrical loads
Ignition on
| If # 04 < Min, the battery is discharged: Check the charging circuit to find the cause of this problem. |
| If # 04 > Max, the battery may be overcharged: Check that the charging voltage is correct with and without electrical loads. |
At idle
| If # 04 < Min, the charging voltage is too low: Check the charging circuit to find the cause of this fault. |
| If # 04 > Maxi, charging voltage is too high: The alternator regulator is faulty. Repair this fault and check the battery electrolyte level. |
NOTE:
The battery and charging circuit can be checked with the OPTIMA 5800 Station (a measurement that does not require disconnecting the battery, so the ECU memories are retained).
AFTER REPAIR Restart the status and parameter check from the beginning.
DIAG 2
THROTTLE POTENTIOMETER Sheet no. 27
XR25 help: # 17 out of tolerance # 17 does not vary when the throttle is operated BG status 2G or 2D lit (faulty ignition)
INSTRUCTIONS No fault warning light should be on.
With ignition on or engine running.
BG state 2D poor ignition
INSTRUCTIONS Nothing to report.
| Check the resistance of the throttle potentiometer. Replace the throttle potentiometer if necessary. |
Check the insulation and continuity of the line: Repair if necessary. |
# 17 is fixed
NOTES Nothing to report
| Check the throttle position sensor resistance while operating the throttle. |
| If the resistance varies, check the sensor electrical circuits. |
| If the resistance does not vary, check that the sensor is mechanically linked to the throttle. If necessary, replace the sensor. |
# 17 is out of tolerance
INSTRUCTIONS Nothing to report.
Check the upper and lower throttle stops.Check the accelerator control (binding points and friction).
Repair.
AFTER REPAIR Restart the status and parameter check from the beginning.
DIAG 3
Sheet no. 27
COOLANT TEMPERATURE
XR25 help: # 02 = Engine temperature ± 5 °C
NOTE No fault bar graph must be illuminated.
| If the reading is inconsistent, check that the sensor follows the reference table "resistance versus temperature" correctly. Replace the sensor if it drifts (NOTE: A sensor that drifts is often the result of an electrical shock). |
Check the insulation, continuity and absence of parasitic resistance of the electrical line: Repair. |
AFTER REPAIR Restart the status and parameter check from the beginning.
DIAG 4
Sheet no. 27
AIR TEMPERATURE
XR25 help: # 03 = Under-bonnet temperature ± 5 °C
NOTE No fault bar graph must be illuminated.
| If the reading is inconsistent, check that the sensor follows the reference table "resistance versus temperature" correctly. Replace the sensor if it drifts (NOTE: A sensor that drifts is often the result of an electrical shock). |
Check the insulation, continuity and absence of parasitic resistance of the electrical line: Repair. |
AFTER REPAIR Restart the status and parameter check from the beginning.
DIAG 5
Sheet no. 27
TDC DETECTION
XR25 help: BG status 3G lit (faulty ignition)
INSTRUCTIONS No fault warning light should be on.
With starter motor operating
| Check the resistance of the TDC sensor. Replace the sensor if necessary. |
| Check that the sensor is correctly secured. Repair if necessary. |
| Check the condition of the trigger wheel (if it has been removed). Repair if necessary. |
Check the insulation, continuity and absence of parasitic resistance of the electrical line: Repair. |
AFTER REPAIR Restart the status and parameter check from the beginning.
DIAG 6
Sheet no. 27
FUEL PUMP
XR25 help: Command mode must run the fuel pump
NOTE No fault bar graph must be illuminated.
| Check the 25 A fuel pump fuse. Check the insulation and continuity of the wiring:  Repair if necessary. |
Check the insulation and continuity of the wiring: Repair if necessary. |
| Check the condition and presence of the earth on fuel pump circuit C2. |
| If +12 V does not reach the fuel pump, replace the fuel pump relay. If +12 V reaches the fuel pump, replace the fuel pump. |
AFTER REPAIR Restart the status and parameter check from the beginning.
DIAG 7
IDLE SPEED CONTROL Sheet no. 27
XR25 help: Engine speed, Min < # 06 < Max
NOTE No fault bar graph must be illuminated.
| Check the resistance of the idle speed control stepper motor. Replace the idle speed control valve if necessary. |
Check the insulation and continuity of the line: Repair as necessary and continue diagnosis according to the value of #06. |
# 06 < Min
NOTE Idle speed is too low
Idle control is not sufficient to maintain idle speed.
Clean the air intake circuit (throttle body, idle control valve) as it is probably dirty.
Check the engine oil level (too high ---> oil churning).
Check and ensure correct fuel pressure.
Using the OPTIMA 5800 Station, check engine compressions.
Check valve clearances and valve timing.
If all these points are correct, replace the idle speed control motor.
# 06 > Max
NOTE Idle speed is too high
An air leak can disrupt the idle control strategy.
Check the connections on the manifold.
Check the cleanliness of the hoses connected to the manifold.
Check the pneumatic control solenoid valves.
Check the manifold gaskets.
Check the throttle body gaskets.
Check the master vacuum servo for leaks.
Check that the restrictors are present in the oil vapour recirculation circuit.
Check the fuel pressure.
If all these points are correct, replace the idle speed control motor.
AFTER REPAIR Restart the status and parameter checks from the beginning.
DIAG 8
Sheet no. 27
KNOCK CONTROL CIRCUIT
XR25 help: # 13 not zero and variable at high engine speed or under load
NOTE No fault bar graph must be illuminated.
The knock sensor must output a variable, non-zero signal, proving that it detects the engine's mechanical vibrations.If the signal is zero:
- Check that the sensor is correctly screwed in.
- Check the insulation and continuity of the wiring:

If necessary, replace the sensor.
AFTER REPAIR Restart the status and parameter check from the beginning.
DIAG 9
Sheet no. 27
PRESSURE CIRCUIT
XR25 help: With ignition on # 01 inconsistent At idle # 01 < Min or # 01 > Max # 16 inconsistent
NOTE No fault bar graph must be illuminated.
| # 01 inconsistent with ignition on # 01 < Min at idle # 16 inconsistent |
Check the insulation, continuity and absence of parasitic resistance of the line: Repair if necessary. |
| If all these points are correct, replace the sensor. You may use a vacuum pump fitted with a gauge to check consistency with # 01 and confirm sensor failure. |
|
| # 01 > Max at idle | Manifold pressure is often a sign of an engine malfunction. Check:
|
| If all these points are correct, replace the sensor. You may use a vacuum pump fitted with a gauge to check consistency with # 01 and confirm sensor failure. |
AFTER REPAIR Restart the status and parameter check from the beginning.
DIAG 10
Sheet no. 27
MIXTURE CONTROL
XR25 Help: Mixture control faulty
INSTRUCTIONS No fault warning light should be on.
Correct ignition (check possible with the OPTIMA 5800 Station).
No other faulty status.
Check the canister purge for leaks (a leak significantly disturbs the mixture).Check the exhaust line for leaks upstream of the oxygen sensor.
Check the intake manifold for leaks.
If the vehicle is only driven in town, the sensor is probably fouled (try a drive under load).
Check the fuel pressure.
If idle is unstable, check the valve clearances.
Check the injectors (flow rate and spray pattern).
If necessary, replace the oxygen sensor.
AFTER REPAIR Restart the status and parameter check from the beginning.
DIAG 11
Sheet no. 27
INJECTOR
XR25 help: Short to earth or short to battery - ECU pin 33 for injectors 1 and 4 Short to earth or short to battery - ECU pin 32 for injectors 2 and 3
NOTE No fault bar graph must be illuminated.
| Check the resistance of the injector concerned. Replace this injector if necessary. |
| With the controller in actuator test mode, check for +12 V on pin 1 of the faulty injector. Repair as necessary |
Check the insulation and continuity of the line: Repair if necessary. |
AFTER REPAIR Restart the status and parameter checks from the beginning
DIAG 12
Sheet no. 27
ANTI-THEFT IMMOBILISER
XR25 help: BG status 3D lit (faulty ignition)
NOTE No fault bar graph must be illuminated.
| Check the insulation and continuity of the wiring to ECU pin 30. |
| If the fault is not resolved, refer to the immobilizer diagnosis. |
AFTER REPAIR Restart the status and parameter check from the beginning.
DIAG 13
Sheet no. 27
VEHICLE SPEED
XR25 help: # 18 = Speed read from the speedometer in km/h
INSTRUCTIONS No fault warning light should be on.
Check on a road test.
If the reading is inconsistent:
 Repair. |
| The fault persists! Replace the sensor. |
AFTER REPAIR Restart the status and parameter check from the beginning.
DIAG 14
Sheet no. 27, side 2/2
ADAPTIVE MIXTURE
XR25 help: Min < # 30 < Max Min < # 31 < Max
INSTRUCTIONS No fault warning light should be on.
Carry out the learning procedures.
| Ensure the EVAP canister purge line is sealed. |
| Clear the ECU memory. With the engine hot, in idle speed control, observe # 30 and # 31.
|
Ensure the cleanliness, hygiene and correct operation of the:
|
AFTER REPAIR Restart the status and parameter check from the beginning.
DIAG 15
Sheet no. 27
EMISSIONS
XR25 help: Nothing to report
NOTE No fault bar graph must be illuminated.
| 0.97 ≤ λ ≤ 1.03 at 2500 rpm. | NOTES The oxygen sensor closed-loop control is working correctly at 2500 rpm. |
| If CO > 0.3 % at 2500 rpm. | |
| The catalytic converter is faulty. NOTE: It is essential to find the cause of the catalytic converter failure to prevent the new converter from being destroyed. |
|
| If λ < 0.97 or λ > 1.03 at idle | |
| Check the ground and the heating of the sensor. Check that there is no air leak at the manifold. |
|
| 0.97 ≤ λ ≤ 1.03 at 2500 rpm. | NOTES The oxygen sensor closed-loop control is not working correctly at 2500 rpm. |
| This is an injection or sensor problem. | |
AFTER REPAIR Restart the status and parameter check from the beginning.
NOTE No fault bar graph must be illuminated.
| λ > 1.03 at 2500 rpm. | NOTES Nothing to report |
| The oxygen sensor closed-loop control is working correctly at 2500 rpm. | |
| Check that there is no exhaust leak. Check that no injector is stuck. Check that the fuel flow is not too low. |
|
| The oxygen sensor closed-loop control is not working correctly at 2500 rpm. | |
| Check that there is no injection problem. Check that there is no ignition problem. Check that there is no sensor problem. Check the fuel pressure. |
|
| λ < 0.97 at 2500 rpm. | NOTES The oxygen sensor closed-loop control is not working correctly at 2500 rpm, and CO > 0.3 % at 2500 rpm. |
| Check the pressure sensor. Check the sensor. Check that no injector is leaking. |
|
AFTER REPAIR Restart the status and parameter check from the beginning.
DIAG 16
Sheet no. 27
ANTI-PERCOLATION RELAY
XR25 help: The cooling fan unit must run under command mode G17*
NOTE No fault bar graph must be illuminated.
| The anti-percolation relay does not click under its actuator test control | Ignition on, check for 12 V on pin 1 of the fan relay. | |
| There is no 12 V on pin 1 | Check the wiring from pin 1 of the relay back to the fuse. | |
| There is 12 V on pin 1 | Connect the breakout box in place of the ECU and check the insulation and continuity of the circuit: Repair. |
|
| The problem is still not resolved, replace the relay. | ||
| The problem is still not resolved! The injection ECU must therefore be replaced. | ||
| The anti-percolation relay clicks under its actuator test control | Fan relay in place, check for 12 V on pin 5 of the fan relay during command mode. | |
| There is no 12 V on pin 5 | Check the insulation and continuity of line 3 from the relay back to the fuse. Repair if necessary. |
|
| The problem is still not resolved! Replace the cooling fan motor relay. | ||
| There is 12 V on pin 5 | Check the insulation and continuity of the line: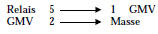 Repair as necessary |
|
| If the cooling fan unit still does not run, replace the cooling fan unit. | ||
AFTER REPAIR Restart the status and parameter check from the beginning.
DIAG 17
Sheet no. 27
POWER STEERING PRESSURE SWITCH
XR25 help: Nothing to report
NOTE No fault bar graph must be illuminated.
| Check that the power steering is working correctly (fluid level, ...). Check that the power steering pressure switch is correctly connected. Check the insulation and continuity of the power line on ECU pin 7. Repair if necessary. |
| If all these points are correct, replace the power steering pressure switch. |
AFTER REPAIR Restart the status and parameter check from the beginning.
DIAG 18
Sheet no. 27
FAULT WARNING LIGHT CIRCUIT
XR25 help: Nothing to report
NOTE No fault bar graph must be illuminated.
| Check the condition of the warning light and its power supply. Repair if necessary. |
Connect the breakout box in place of the ECU and check the insulation and continuity of the circuit: Repair. |
AFTER REPAIR Restart the status and parameter check from the beginning.
Test yourself
A quick Renault Kangoo quiz: every answer comes with an explanation and a link to the manual page.