Body Electrical System
Smart Key Unit Repair Procedures
In this manual: Body Electrical System
50steps
~300min
4/5difficulty
Done 0 of 50
Removal
Smart Key Unit- Disconnect the negative (-) battery terminal.
- Remove the glove box. (Refer to Body - Glove Box Assembly Upper Cover)
- Remove the smart key unit (B) by disconnecting the connectors (A) and loosening the bolt and nut.
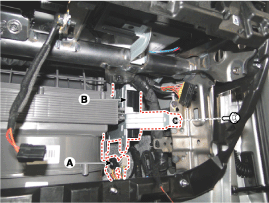
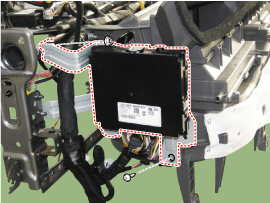
|

- Disconnect the negative (-) battery terminal.
- Remove the airbag center panel. (Heating, Ventilation and Air Conditioning - "Controller")
- Remove the interior 1 antenna (A) by loosening the mounting screws, then disconnect the connector (B).

- Disconnect the negative (-) battery terminal.
- Remove the rear console cover. (Refer to Body - "Rear Console Cover")
- Remove the interior antenna 2 (B) by first loosening the mounting screw (2EA) and disconnecting the connector (A).

- Disconnect the negative (-) battery terminal.
- Remove the rear cross trim. (Refer to Body - Luggage Compartment Trim)
- Remove the main antenna (B) after disconnecting the connector (A) and loosening the mounting nuts.

- Disconnect the negative (-) battery terminal.
- Remove the rear bumper cover. (Refer to Body - Rear Bumper Cover)
- Remove the rear bumper antenna (B) after disconnecting the connector (A) and loosening the mounting nuts.
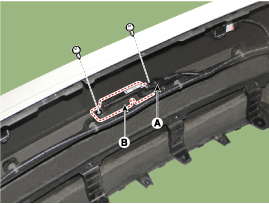
- Disconnect the negative (-) battery terminal.
- Remove the front left wheel guard.
- Disconnect the connection, then remove the buzzer (A).

- Disconnect the negative (-) battery terminal.
- Remove the front door outside handle. (Refer to Body - Front Door Outside Handle)
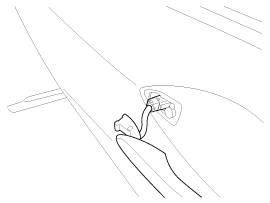
- Disconnect the negative (-) battery terminal.
- Remove the trunk lid trim. (Refer to Body - "Trunk Lid Trim")
- Disconnect the trunk opener switch connector (A).
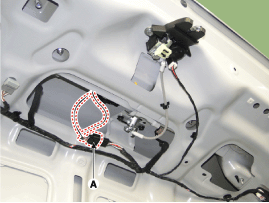
- Remove the trunk open switch by disconnecting the mounting clip.
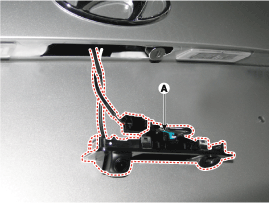
Inspection
Smart Key Unit (Refer to Smart Key System - Smart Key Diagnostics) Smart Key Switch (Refer to Smart Key System - Smart Key Diagnostics) Antenna (Refer to Smart Key System - Smart Key Diagnostics) Outside Door Handle- Disconnect the front door outside handle connector (A).

- Check the continuity of the circuit between terminals No. 3 and No. 6.

No Description 1 Door Antenna (+) 2 Pocket LED Light (+) 3 Door Lock/Unlock Button 4 Door Antenna (-) 5 Pocket LED Light (-) 6 Door Lock/Unlock Button Switch Ground

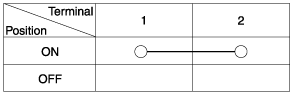
- Check the continuity of the circuit between the terminals of the luggage compartment door lock.
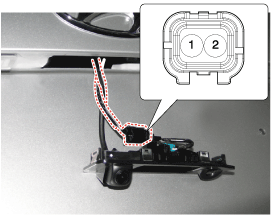
- If continuity is not as specified, inspect the switch.
Installation
Smart Key Unit- Install the smart key unit.
- Install the smart key unit mounting bolts and connect the connector.
- Install the glove box.
- Connect the negative (-) battery terminal and check the smart key system.
- Install the interior 1 antenna.
- Install the center airbag panel.
- Connect the negative (-) battery terminal and check the smart key system.
- Install the interior 2 antenna.
- Install the rear console assembly.
- Connect the negative (-) battery terminal and check the smart key system.
- Roof Rack Antenna.
- Install the rear cross trim.
- Connect the negative (-) battery terminal and check the smart key system.
- Install the rear bumper antenna.
- Install the rear bumper cover.
- Connect the negative (-) battery terminal and check the smart key system.
- Install the outside handle.
- Install the front door outside handle.
- Connect the negative (-) battery terminal and check the smart key system.
- Install the luggage compartment opener switch.
- Install the luggage compartment rear trim.
- Connect the negative (-) battery terminal and check the smart key system.
Test yourself
A quick Hyundai Sonata LF quiz: every answer comes with an explanation and a link to the manual page.
Was this page helpful?