Inspection
1. INSPECT OUTER REAR VIEW MIRROR ASSEMBLY LH (w/ Side Turn Signal Light)
(a) Apply battery voltage and check the operation of the outer mirror LH. OK:
If the result is not as specified, replace the outer rear view mirror assembly LH. |
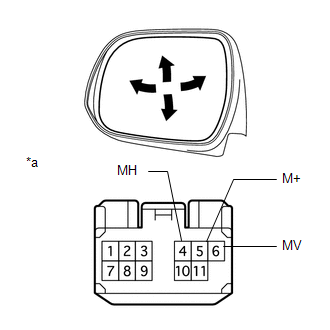 |
(b) Check the outer mirror heater LH. (1) Measure the resistance according to the value(s) in the table below. Standard Resistance:
If the result is not as specified, replace the outer rear view mirror assembly LH. (2) Apply battery voltage to check the operation of the outer mirror heater LH. OK:
HINT: It will take a short amount of time for the outer mirror LH to become warm. If the result is not as specified, replace the outer rear view mirror assembly LH. |
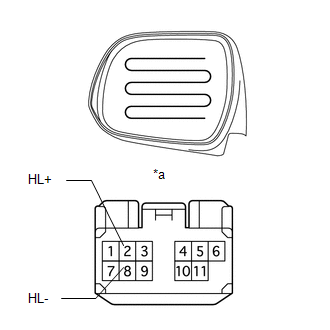 |
(c) Check the side turn signal light assembly LH.
(1) Apply battery voltage to the connector to check the illumination condition. OK:
If the result is not as specified, inspect the side turn signal light assembly LH (See page If the result is not as specified, replace the outer rear view mirror assembly LH. |
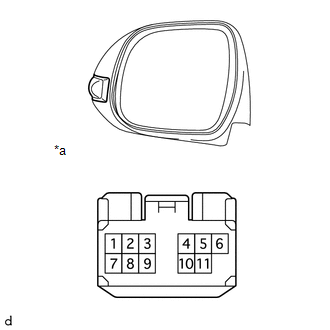 |
 ).
2. INSPECT OUTER REAR VIEW MIRROR ASSEMBLY LH (w/o Side Turn Signal Light)
(a) Apply battery voltage to check the operation of the outer mirror LH. OK:
If the result is not as specified, replace the outer rear view mirror assembly LH. |
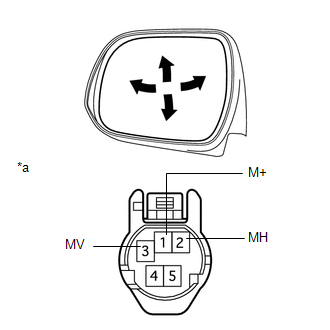 |
(b) Check the outer mirror heater LH.
(1) Measure the resistance according to the value(s) in the table below. Standard Resistance:
If the result is not as specified, replace the outer rear view mirror assembly LH. |
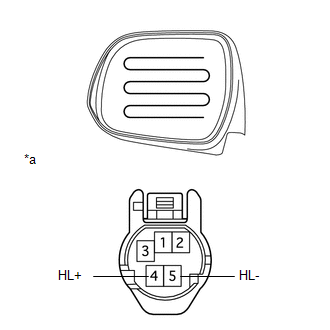 |
(2) Apply battery voltage to check the operation of the outer mirror heater LH.
OK:
Condition | Specified Condition |
|---|---|
Battery positive (+) → Terminal 4 (HL+) Battery negative (-) → Terminal 5 (HL-) |
Mirror becomes warm |
*a |
Component without harness connected (Outer Rear View Mirror Assembly LH) |
HINT:
It will take a short amount of time for the outer mirror LH to become warm.
If the result is not as specified, replace the outer rear view mirror assembly LH.
3. INSPECT OUTER REAR VIEW MIRROR ASSEMBLY RH (w/ Side Turn Signal Light)
(a) Apply battery voltage to check the operation of the outer mirror RH. OK:
If the result is not as specified, replace the outer rear view mirror assembly RH. |
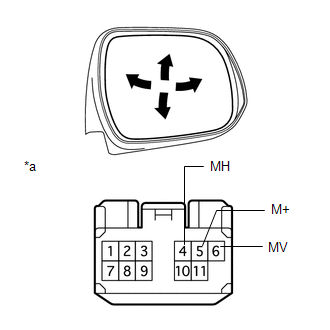 |
(b) Check the outer mirror heater RH.
(1) Measure the resistance according to the value(s) in the table below. Standard Resistance:
If the result is not as specified, replace the outer rear view mirror assembly RH. |
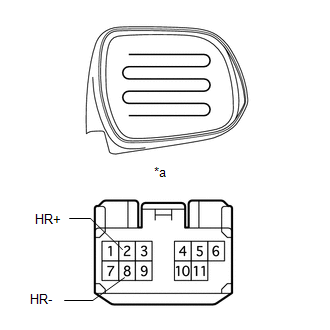 |
(2) Apply battery voltage to check the operation of the outer mirror heater RH.
OK:
Condition | Specified Condition |
|---|---|
Battery positive (+) → Terminal 2 (HR+) Battery negative (-) → Terminal 8 (HR-) |
Mirror becomes warm |
*a |
Component without harness connected (Outer Rear View Mirror Assembly RH) |
HINT:
It will take a short amount of time for the outer mirror RH to become warm.
If the result is not as specified, replace the outer rear view mirror assembly RH.
(c) Check the side turn signal light assembly RH.
(1) Apply battery voltage to the connector to check the illumination condition. OK:
If the result is not as specified, inspect the side turn signal light assembly RH (See page If the result is not as specified, replace the outer rear view mirror assembly RH. |
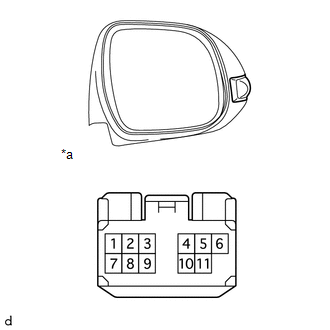 |
4. INSPECT OUTER REAR VIEW MIRROR ASSEMBLY RH (w/o Side Turn Signal Light)
(a) Apply battery voltage to check the operation of the outer mirror. OK:
If the result is not as specified, replace the outer rear view mirror assembly RH. |
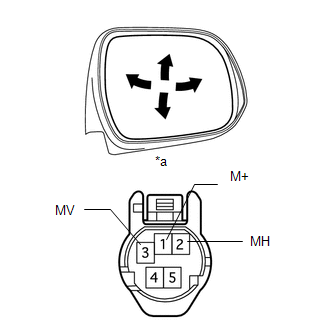 |
(b) Check the outer mirror heater RH.
(1) Measure the resistance according to the value(s) in the table below. Standard Resistance:
If the result is not as specified, replace the outer rear view mirror assembly RH. |
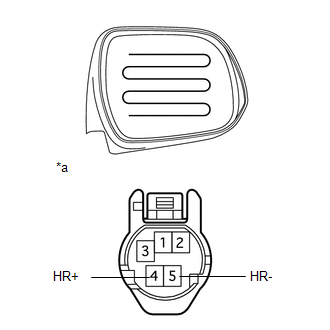 |
(2) Apply battery voltage to check the operation of the outer mirror heater RH.
OK:
Condition | Specified Condition |
|---|---|
Battery positive (+) → Terminal 4 (HR+) Battery negative (-) → Terminal 5 (HR-) |
Mirror becomes warm |
*a |
Component without harness connected (Outer Rear View Mirror Assembly RH) |
HINT:
It will take a short amount of time for the outer mirror RH to become warm.
If the result is not as specified, replace the outer rear view mirror assembly RH.
Test yourself
A quick Toyota 4Runner quiz: every answer comes with an explanation and a link to the manual page.