Installation
HINT:
- Use the same procedure for the RH and LH sides.
- The procedure listed below is for the LH side.
1. INSTALL REAR DOOR INSIDE LOCKING CABLE ASSEMBLY LH

2. INSTALL REAR DOOR LOCK REMOTE CONTROL CABLE ASSEMBLY LH
3. INSTALL REAR DOOR LOCK ASSEMBLY LH
NOTICE:
- When reusing the removed rear door lock assembly, replace the door lock wiring harness seal on the connector with a new one.
- Do not allow grease or dust to adhere to the surface of the connector which contacts the door lock wiring harness seal.
- Reusing the door lock wiring harness seal or using a damaged door lock wiring harness seal may allow water to enter into the connection. This may result in a malfunction of the rear door lock assembly.
(a) Apply MP grease to the sliding parts of the rear door lock assembly.
(b) Install a new door lock wiring harness seal to the rear door lock assembly.
(c) Insert the rear door lock assembly into the rear door outside handle release plate, and set it in place on the rear door panel. |
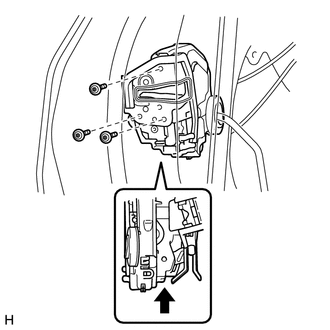 |
(d) Check that the rear door outside handle frame release plate is securely connected to the rear door lock assembly.
(e) Using a T30 "TORX" wrench, install the rear door lock assembly with the 3 screws.
Torque:
5 N·m {51 kgf·cm, 44 in·lbf}
4. INSTALL REAR DOOR GLASS SUB-ASSEMBLY LH
5. INSTALL REAR DOOR QUARTER WINDOW GLASS LH
6. INSTALL REAR DOOR REAR LOWER WINDOW FRAME SUB-ASSEMBLY LH
7. INSTALL REAR DOOR GLASS RUN LH
8. INSTALL REAR DOOR SERVICE HOLE COVER LH
9. INSTALL REAR DOOR INNER GLASS WEATHERSTRIP LH
10. INSTALL REAR DOOR TRIM BOARD SUB-ASSEMBLY LH
11. INSTALL REAR DOOR INSIDE HANDLE BEZEL LH
12. CONNECT CABLE TO NEGATIVE BATTERY TERMINAL
NOTICE:
When disconnecting the cable, some systems need to be initialized after the cable is reconnected (See page ).
Test yourself
A quick Toyota 4Runner quiz: every answer comes with an explanation and a link to the manual page.