Removal
HINT:
- Use the same procedure for the RH and LH sides.
- The procedure listed below is for the LH side.
1. DISCONNECT CABLE FROM NEGATIVE BATTERY TERMINAL
NOTICE:
When disconnecting the cable, some systems need to be initialized after the cable is reconnected (See page  ).
2. REMOVE REAR DOOR INSIDE HANDLE BEZEL LH
3. REMOVE REAR DOOR TRIM BOARD SUB-ASSEMBLY LH
4. REMOVE REAR DOOR INNER GLASS WEATHERSTRIP LH
5. REMOVE REAR DOOR SERVICE HOLE COVER LH
6. REMOVE REAR DOOR GLASS RUN LH
7. REMOVE REAR DOOR REAR LOWER WINDOW FRAME SUB-ASSEMBLY LH
8. REMOVE REAR DOOR QUARTER WINDOW GLASS LH
9. REMOVE REAR DOOR GLASS SUB-ASSEMBLY LH
10. REMOVE REAR DOOR LOCK ASSEMBLY LH
(a) Using a T30 "TORX" wrench, remove the 3 screws. |
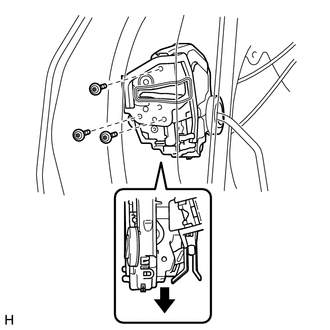 |
(b) Move the rear door lock assembly downward, pull the release plate out of the rear door outside handle frame, and remove the rear door lock assembly and cables as a unit.
(c) Remove the door lock wiring harness seal from the rear door lock assembly.
11. REMOVE REAR DOOR LOCK REMOTE CONTROL CABLE ASSEMBLY LH
12. REMOVE REAR DOOR INSIDE LOCKING CABLE ASSEMBLY LH
Test yourself
A quick Toyota 4Runner quiz: every answer comes with an explanation and a link to the manual page.