Roof Rack
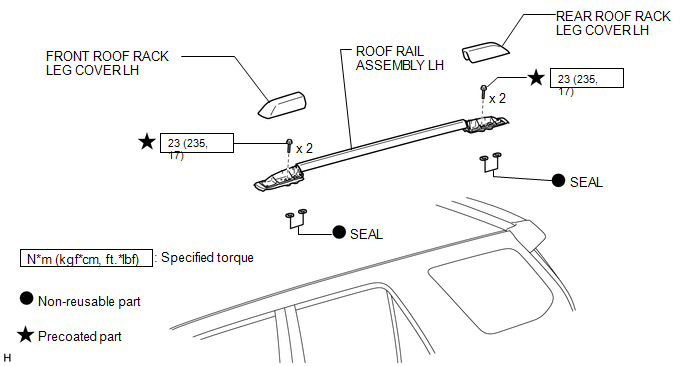
ILLUSTRATION
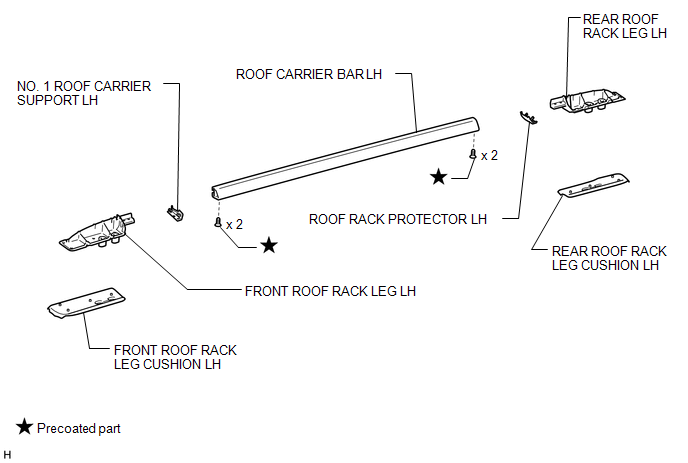
Removal REMOVAL CAUTION / NOTICE / HINT
HINT:
- Use the same procedure for the RH and LH sides.
- The procedure listed below is for the LH side.
1. REMOVE FRONT ROOF RACK LEG COVER LH
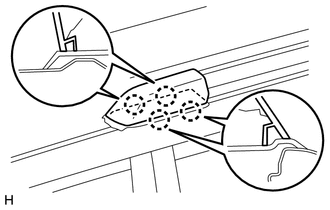
(a) Detach the 4 claws and remove the front roof rack leg cover.
2. REMOVE REAR ROOF RACK LEG COVER LH
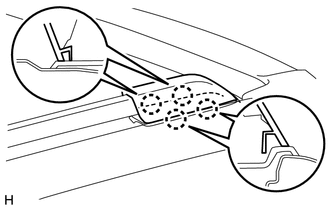
(a) Detach the 4 claws and remove the rear roof rack leg cover.
3. REMOVE ROOF RAIL ASSEMBLY LH
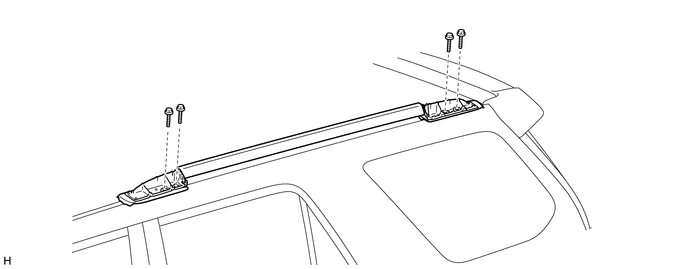
(a) Remove the 4 bolts and roof rail.
Disassembly DISASSEMBLY CAUTION / NOTICE / HINT
HINT:
- Use the same procedure for the RH and LH sides.
- The procedure listed below is for the LH side.
1. REMOVE FRONT ROOF RACK LEG CUSHION LH
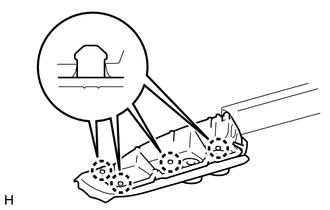
(a) Detach the 4 claws and remove the front roof rack leg cushion.
2. REMOVE REAR ROOF RACK LEG CUSHION LH
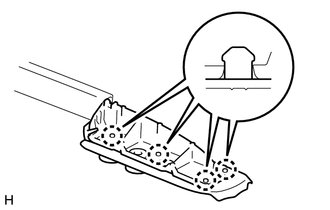
(a) Detach the 4 claws and remove the rear roof rack leg cushion.
3. REMOVE NO. 1 ROOF CARRIER SUPPORT LH
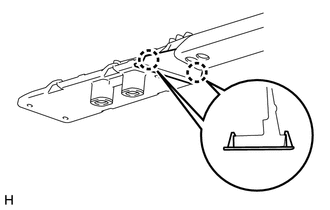
(a) Detach the 2 claws and remove the No. 1 roof carrier support.
4. REMOVE ROOF RACK PROTECTOR LH
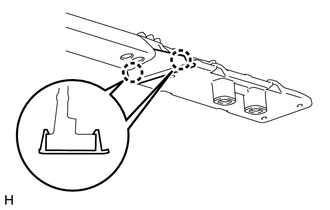
(a) Detach the 2 claws and remove the roof rack protector.
5. REMOVE FRONT ROOF RACK LEG LH
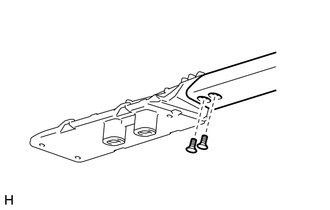
(a) Using a T30 "TORX" socket wrench, remove the 2 screws and front roof rack leg.
6. REMOVE REAR ROOF RACK LEG LH
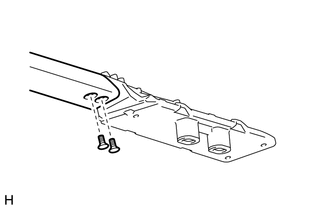
(a) Using a T30 "TORX" socket wrench, remove the 2 screws and rear roof rack leg.
Reassembly REASSEMBLY CAUTION / NOTICE / HINTHINT:
- Use the same procedure for the RH and LH sides.
- The procedure listed below is for the LH side.
1. INSTALL FRONT ROOF RACK LEG LH
(a) Clean the threads of the bolt with non-residue solvent (when reusing the bolt).
(b) Apply adhesive to the threads of the bolt (when reusing the bolt).
Adhesive:
Toyota Genuine Adhesive 1324, Three Bond 1324 or equivalent.
(c) Using a T30 "TORX" socket wrench, install the front roof rack leg with the 2 bolts.
2. INSTALL REAR ROOF RACK LEG LH
(a) Clean the threads of the bolt with non-residue solvent (when reusing the bolt).
(b) Apply adhesive to the threads of the bolt (when reusing the bolt).
Adhesive:
Toyota Genuine Adhesive 1324, Three Bond 1324 or equivalent.
(c) Using a T30 "TORX" socket wrench, install the rear roof rack leg with the 2 bolts.
3. INSTALL NO. 1 ROOF CARRIER SUPPORT LH
(a) Attach the 2 claws to install the No. 1 roof carrier support.
4. INSTALL ROOF RACK PROTECTOR LH
(a) Attach the 2 claws to install the roof rack protector.
5. INSTALL FRONT ROOF RACK LEG CUSHION LH
(a) Attach the 4 claws to install the front roof rack leg cushion.
6. INSTALL REAR ROOF RACK LEG CUSHION LH
(a) Attach the 4 claws to install the rear roof rack leg cushion.
Installation INSTALLATION CAUTION / NOTICE / HINTHINT:
- Use the same procedure for the RH and LH sides.
- The procedure listed below is for the LH side.
1. INSTALL ROOF RAIL ASSEMBLY LH
(a) Clean the threads of the bolt with non-residue solvent (when reusing the bolt).
(b) Apply adhesive to the threads of the bolt (when reusing the bolt).
Adhesive:
Toyota Genuine Adhesive 1324, Three Bond 1324 or equivalent.
(c) Install the roof rail with the 4 bolts.
Torque:
23 N·m {235 kgf·cm, 17 ft·lbf}
2. INSTALL FRONT ROOF RACK LEG COVER LH
(a) Attach the 4 claws to install the front roof rack leg cover.
3. INSTALL REAR ROOF RACK LEG COVER LH
(a) Attach the 4 claws to install the rear roof rack leg cover.
Test yourself
A quick Toyota 4Runner quiz: every answer comes with an explanation and a link to the manual page.