Removal
REMOVAL
PRECAUTION / NOTICE / HINT
The procedures necessary (adjustment, calibration, initialization or registration), which must be performed once the parts have been removed and reinstalled, or replaced during removal/installation of the integration relay, are listed below.
Procedure Required After Replacing / Removing / Installing PartsReplaced Part or Performed Procedure | Required Procedure | Effect/Inoperative Function When Required Procedure Is Not Performed | Link |
|---|---|---|---|
Disconnect the cable from the negative (-) battery terminal. |
Initialize Back Door Lock |
Door Lock Control System |
 |
Memorize Steering Angle Neutral Point |
Lane Departure Alert System (with Steering Control) |
|
|
Pre-Collision System |
PROCEDURE
1. PRECAUTIONS
NOTICE:
After turning the ignition switch OFF, a waiting time may be required before disconnecting the cable from the negative (-) battery terminal. Therefore, be sure to read the precautions for disconnecting the cable from the negative (-) battery terminal before performing the work.
Click here
2. DISCONNECT THE CABLE FROM THE NEGATIVE BATTERY TERMINAL
Click here
NOTICE:
When the cable has been disconnected, some systems must be reset after the cable is reconnected.
Click here
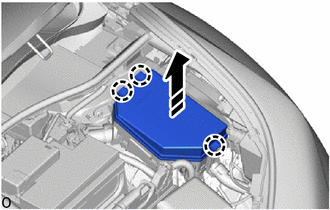
3. REMOVE NO. 1 RELAY BLOCK COVER
(a) Release the claws to remove the No. 1 relay block cover, as shown in the illustration.
 |
Remove in this direction |
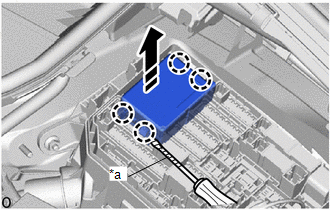
4. REMOVE NO. 1 INTEGRATION RELAY
(a) Using a screwdriver with its tip wrapped in tape, release the claws.
*a |
Protective tape |
|
Remove in this direction |
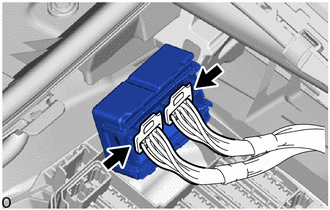
(b) Pull out the No. 1 integration relay, as shown in the illustration.
NOTICE:
Take care not to damage the No. 1 integration relay when removing it.
(c) Disconnect the 2 connectors to remove the No. 1 integration relay. NOTICE: Take care not to damage the No. 1 integration relay when removing it. |
 |