Bleeding
BLEEDING
PRECAUTION / NOTICE / HINT
NOTICE:
- Place the shift lever in P and apply the parking brake before bleeding the brakes.
- Add brake fluid to keep the level between the MIN and MAX marks on the reservoir while bleeding the brakes.
- If brake fluid leaks onto a painted surface, wipe it off immediately.
- Do not operate the brake actuator assembly while there is air in the brake system or in the brake master cylinder. Air could enter the brake actuator assembly.
- If bleeding the brake actuator assembly is difficult due to air in the actuator assembly, replace it with a new one.
- When bleeding air, select the appropriate procedure listed below.
Replaced/Installed Part
Work Procedure
Hose (Front/Rear)
Bleed Brake Line
Disc Brake Wheel Cylinder Assembly (Front)
Brake Actuator Assembly
Brake Master Cylinder Sub-assembly
Master Cylinder Reservoir Sub-assembly
Brake Booster Assembly
Disc Brake Wheel Cylinder Assembly (Rear)
Bleed Air from Rear Disc Brake Wheel Cylinder Assembly
HINT:
Before working on the brake system, or if air may be present in the brake lines, bleed air from the brake system.
PROCEDURE
1. FILL BRAKE FLUID RESERVOIR
Click here
2. BLEED BRAKE MASTER CYLINDER SUB-ASSEMBLY
NOTICE:
- To prevent brake fluid from damaging painted surfaces, cover all surrounding parts with a cloth.
- Be sure to clean your hands before bleeding the master cylinder to avoid contaminating the brake system. Contamination, for example by dirt particles or mineral oil, can cause brake malfunctions.
HINT:
When the brake master cylinder sub-assembly is installed or contains almost no brake fluid, bleed the brake master cylinder from the sub-assembly.
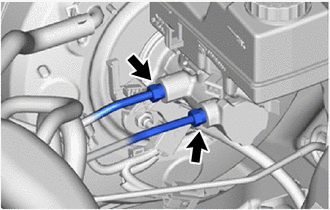
(a) Using a flare nut wrench, disconnect the 2 brake lines from the brake master cylinder sub-assembly. NOTICE:
|
 |
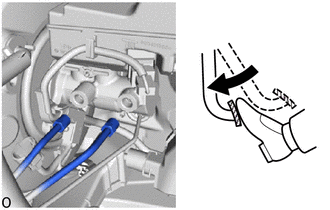
(b) Slowly depress the brake pedal and hold it in this position.*1 |
 |
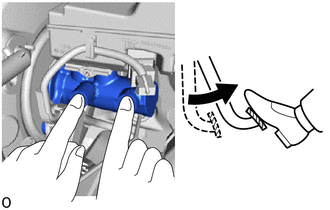
(c) Cover the 2 outlet ports with your fingers and release the brake pedal.*2 |
 |
(d) Repeat steps *1 and *2 three or four times.
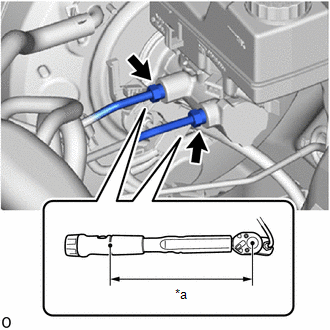
(e) Using a flare nut wrench, connect the 2 brake lines to the brake master cylinder sub-assembly. Torque: Specified torque: 19.5 N·m {199 kgf·cm, 14 ft·lbf} NOTICE:
HINT:
|
|
3. BLEED BRAKE LINE
Click here
4. BLEED AIR FROM REAR DISC BRAKE WHEEL CYLINDER ASSEMBLY
- TMC production:
Click here
- TMMT production:
Click here
5. CHECK FOR BRAKE FLUID LEAKS
6. CHECK BRAKE FLUID LEVEL IN RESERVOIR
Click here