Installation
INSTALLATION
PRECAUTION / NOTICE / HINT
HINT:
- Use the same procedure for the RH side as for the LH side.
- The procedure described below applies to the LH side.
PROCEDURE
1. INSTALL FRONT SPEAKER NO. 1 ASSEMBLY
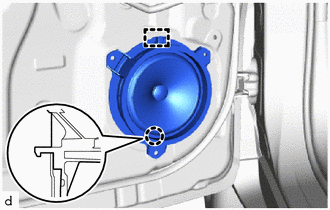
(a) Engage the claw and guide to temporarily install the front speaker No. 1 assembly. |
 |
(b) Using a pneumatic rivet gun or a hand rivet gun, install the front speaker No. 1 assembly with 3 new rivets in the order shown in the illustration.
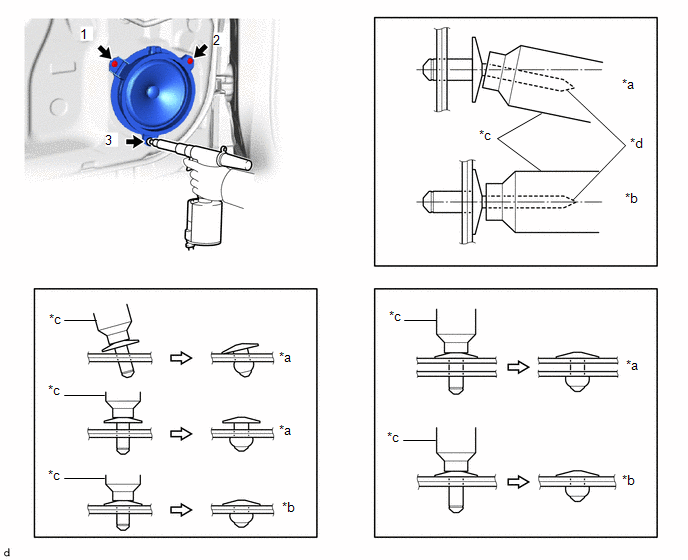
*a |
Incorrect |
*b |
Correct |
*c |
Rivet Gun |
*d |
Mandrel |
NOTICE:
- Do not touch the speaker cone.
- Do not pry on the rivets with the rivet gun, as this may damage the rivet gun and the mandrel.
- Make sure the rivets are seated firmly against the speaker.
- Do not tilt the rivet gun when installing the speaker with the rivets.
- Make sure there is no gap between the rivet heads and the speaker.
- Make sure there is no gap between the speaker and the door. Hold the speaker and the door firmly while installing the rivet.
HINT:
If the rivet mandrel does not come out on the first use of the rivet gun, slide the rivet gun forward over the mandrel, then operate it again.
(c) Connect the connector.
2. INSTALL FRONT DOOR TRIM PANEL SUB-ASSEMBLY
Click here
3. INSTALL MULTIPLEX NETWORK MAIN SWITCH ASSEMBLY WITH FRONT ARMREST BASE UPPER PANEL (for driver side)
Click here
4. INSTALL POWER WINDOW SWITCH ASSEMBLY WITH FRONT ARMREST BASE UPPER PANEL (for front passenger side)
Click here
5. INSTALL FRONT DOOR INSIDE HANDLE BEZEL CLIP
Click here