Installation
INSTALLATION
PRECAUTION / NOTICE / HINT
HINT:
- Repeat the same procedure for the right side and the left side.
- The following procedure applies to the left side.
PROCEDURE
1. TEMPORARILY INSTALL REAR SUSPENSION ARM ASSEMBLY NO. 1
(a) Temporarily install the rear suspension arm assembly no. 1 onto the rear axle carrier sub-assembly and rear suspension member sub-assembly using the 2 bolts and 2 nuts.
NOTICE:
- Do not turn the nut as it has a stopper. Tighten the bolt with the nut in place.
- Insert the bolt with the threaded end facing the rear of the vehicle.
2. TEMPORARILY INSTALL REAR SUSPENSION ARM ASSEMBLY NO. 2
(a) Temporarily install the No. 2 rear suspension arm assembly to the rear suspension member sub-assembly with the No. 2 rear camber adjusting cam, the rear toe adjusting cam sub-assembly and the nut.
NOTICE:
- Insert the rear suspension toe adjusting cam sub-assembly from the rear of the vehicle.
- When tightening the nut, prevent the rear suspension toe adjusting cam sub-assembly from turning.
3. INSTALL REAR COIL SPRING LOWER SEAT
Click here
4. INSTALL REAR COIL SPRING
Click here
5. STABILIZE SUSPENSION
Click here
6. INSTALL REAR STABILIZER BAR LINK ASSEMBLY
Click here
7. INSTALL NO. 1 REAR SUSPENSION ARM ASSEMBLY
(a) Install the No. 1 rear suspension arm assembly with the 2 bolts. Torque: 73 N·m {744 kgf·cm, 54 ft·lbf} NOTICE: Do not turn the nut as it has a stopper. Tighten the bolt with the nut in place. |
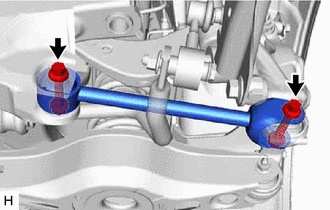 |
8. INSTALL NO. 2 REAR SUSPENSION ARM ASSEMBLY
(a) Install the No. 2 rear suspension arm assembly (rear axle carrier sub-assembly side) with the bolt. Torque: 73 N·m {744 kgf·cm, 54 ft·lbf} NOTICE: Do not turn the nut as it has a stopper. Tighten the bolt with the nut in place. |
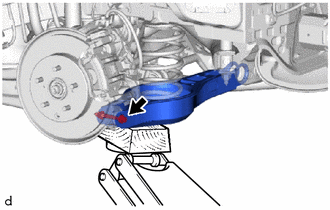 |
9. INSTALL REAR LH HEIGHT CONTROL SENSOR SUB-ASSEMBLY (with height control sensor)
Click here
10. INSTALL REAR WHEEL
Click here
11. INSTALL NO. 2 REAR SUSPENSION ARM ASSEMBLY
(a) Lower the vehicle to the ground.
(b) Bounce the vehicle at each corner to stabilize the rear suspension.
(c) Align the alignment marks on the No. 2 rear camber adjusting cam, the rear toe adjusting cam sub-assembly and the rear suspension member sub-assembly. |
|
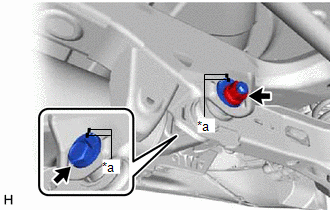
(d) Fully tighten the nut.
Torque:
100 N·m {1,020 kgf·cm, 74 ft·lbf}
NOTICE:
- Hold the rear suspension toe adjusting cam subassembly while turning the nut.
- Make sure the vehicle is unloaded before fully tightening the nut.
12. INSPECT AND ADJUST REAR WHEEL ALIGNMENT
Click here
13. PERFORM INITIALIZATION (with Height Control Sensor)
Click here