DISCONNECT FLOOR SHIFT CABLE TRANSMISSION CONTROL SELECT
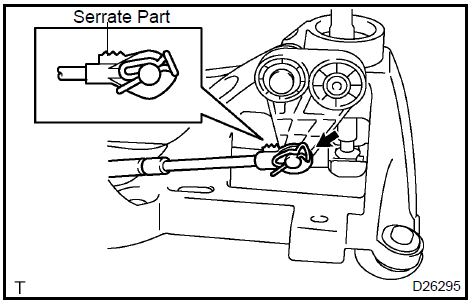
Remove the clip and separate the top of the select cable from the shift lever assy.
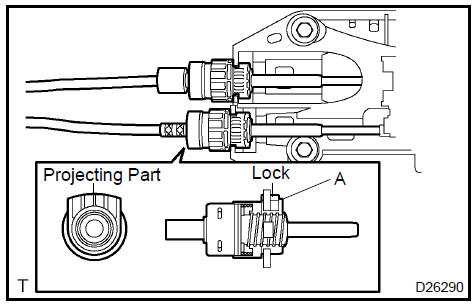
Turn the lock and separate the select cable from the shift lever retainer.
7. DISCONNECT FLOOR SHIFT CABLE TRANSMISSION CONTROL SHIFT
Separate the top of the shift cable from the shift lever assy.
Turn the lock and separate the shift cable from the shift lever retainer.
8. REMOVE FLOOR SHIFT SHIFT LEVER ASSY
a. Remove the 4 bolts and shift lever assy.
9. INSTALL FLOOR SHIFT SHIFT LEVER ASSY a. Install the shift lever assy with the 4 bolts.Torque: 12 N·m10. CONNECT FLOOR SHIFT CABLE TRANSMISSION CONTROL SHIFT
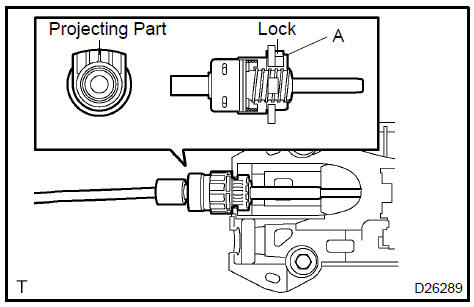
a. Connect the shift cable to the shift lever retainer.
NOTICE:
The projecting part of the cable outer should face upward when the shift cable is installed.
Make sure that after installation the cable outer lock is projecting from A shown in the illustration.
b. Install the top of the shift cable to the shift lever assy.
Connect floor shift cable transmission control shift11. CONNECT FLOOR SHIFT CABLE TRANSMISSION CONTROL SELECT
a. Connect the select cable to the shift lever retainer.
NOTICE:
The projecting part of the cable outer should face upward when the select cable is installed.
Make sure that after installation the cable outer lock is projecting from A shown in the illustration.
b. Connect the top of the select cable to the shift lever assy and install the clip.
NOTICE:
The serrate part of the select cable point should face upward when the select cable point is connected.
the clip should be inserted to the direction shown in the illustration.
INSTALL AIR DUCT REAR No.2
INSTALL AIR DUCT REAR No.1
REMOVE CONSOLE BOX FRONT
REMOVE RR CONSOLE BOX
REMOVE SHIFT LEVER KNOB SUB−ASSY
?
Test yourself
A quick Toyota Camry quiz: every answer comes with an explanation and a link to the manual page.
 Connect floor shift cable transmission control shift 11. CONNECT FLOOR SHIFT CABLE TRANSMISSION CONTROL SELECT