Disassembly
NOTICE: When using a vise, do not overtighten it.
1. SECURE PS GEAR ASSEMBLY IN VISE

Using SST, secure the gear assembly in a vise, as shown in the illustration.
SST 09630-00014 (09631-00142)
2. REMOVE 2 TURN PRESSURE TUBES
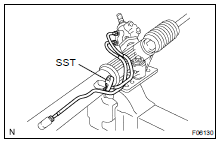
Using SST, remove the tube.
SST 09023-38200
3. REMOVE RH AND LH CLIPS, RACK BOOTS AND CLAMPS
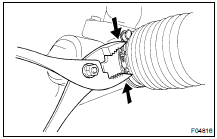
(a) Using pliers, loosen the clamp, as shown in the illustration.
NOTICE: Be careful not to damage the boot.
(b) Remove the clip, rack boot and clamp.(c) Employ the same manner described above to the other side.
HINT: Mark the RH and LH rack boots.
4. REMOVE RH AND LH RACK ENDS AND CLAW WASHERS
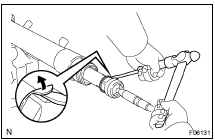
(a) Using a screwdriver and hammer, stake back the washer.
NOTICE: Avoid and impact to the steering rack.
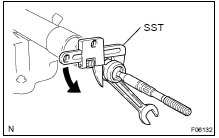
(b) Using a spanner to hold the steering rack steady, and using SST, remove the rack end.
SST 09922-10010
NOTICE: Use SST 09922-10010 in the direction shown in the illustration.
(c) Remove the claw washer.(d) Employ the same manner described above to the other side.
HINT: Mark the RH and LH rack ends.
5. REMOVE RACK GUIDE SPRING CAP LOCK NUT

Using SST, remove the nut.
SST 09922-10010
NOTICE: Use SST 09922-10010 in the direction shown in the illustration.
6. REMOVE RACK GUIDE SPRING CAP
7. REMOVE RACK GUIDE SPRING AND RACK GUIDE SUB-ASSEMBL Y
8. REMOVE DUST COVER
9. REMOVE CONTROL VALVE HOSING WITH CONTROL VALVE ASSEMBLY
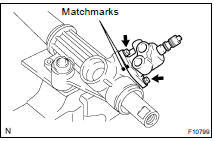
(d) Remove the O-ring from the valve housing.
10. REMOVE CONTROL VALVE ASSEMBLY
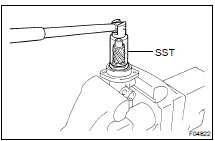
(a) Using SST, loosen the bearing guide nut.
SST 09631-20060
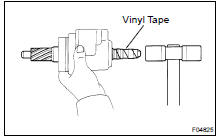
(c) Using a plastic hammer, tap out the valve assembly with the nut from the control valve housing.
NOTICE: Be careful not to damage the oil seal lip.
(d) Remove the nut from the valve assembly.
NOTICE: Be careful not the damage the oil seal lip.
(e) Remove the O-ring from the nut.
11. REMOVE CYLINDER END STOPPER AND SPACER
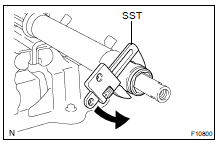
(a) Using SST, remove the stopper.
SST 09922-10010
NOTICE: Use SST 09922-10010 in the direction shown in the illustration.
(b) Remove the O-ring from the stopper.
12. REMOVE STEERING RACK AND OIL SEAL
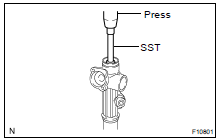
(a) Using SST, press out the rack and oil seal.
NOTICE: Take care not to drop the rack.
SST 09950-70010 (09951-07200)
(b) Remove the oil seal from the rack.
Test yourself
A quick Toyota Land Cruiser quiz: every answer comes with an explanation and a link to the manual page.