Replacement
1. REPLACE REAR BEARING
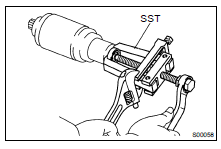
(a) Using SST, remove the bearing.
SST 09286-4601 1
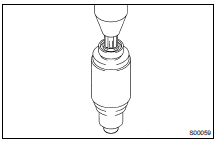
(b) Using a press, press in a new bearing.
2. REPLACE FRONT BEARING
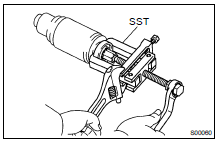
(a) Using SST, remove the bearing.
SST 09286-4601 1

(b) Using SST and a press, press in a new bearing.
NOTICE: Be careful of the bearing installation direction.
SST 09820-00031
3. REPLACE MAGNETIC SWITCH TERMINAL KIT PARTS

(a) Remove the magnetic switch end cover.
Remove the 3 bolts, the end cover, the gasket and the plunger.

(b) Inspect contact plate for wear.
Using vernier calipers, measure the contact plate for depth of wear.
Maximum wear: 0.9 mm (0.035 in.)
If the depth of wear is greater than the maximum, replace the contact plate.
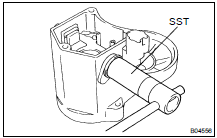
(c) Remove terminal kit parts.
- Using SST, loosen the terminal nuts.
SST 09810-38140
- Terminal C: Remove the terminal nut, wave washer, terminal insulator (outside), O- ring, terminal bolt, contact plate and terminal insulator (inside).
- Terminal 30: Remove the terminal nut, wave washer, terminal insulator (outside), O- ring, terminal bolt, contact plate, terminal insulator (inside).
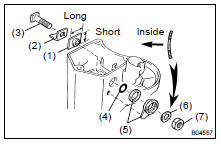
(d) Temporarily install these new terminal 30 kit parts:
- Terminal insulator (inside)
- Contact plate
- Terminal bolt
- O-ring
- Packing and terminal insulator (outside) Install the packing to the terminal insulator, and install them.
HINT: Match the protrusion of the insulator with the indentation of the housing.
- Wave washer
- Terminal nut
NOTICE: Be careful to install the terminal insulator (inside) and wave washer in the correct direction.
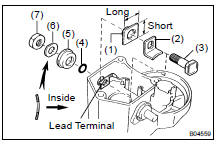
(e) Temporarily install these new terminal C kit parts:
- Terminal insulator (inside)
- Contact plate
- Terminal bolt
- O-ring
- Terminal insulator (outside)
- Wave washer
- Terminal nut
NOTICE: Be careful to install the terminal insulator (inside) and wave washer in the correct direction.
(f) Temporarily tighten the terminal nuts.

(g) Tighten terminal nuts.
- Put a wooden block on the contact plate and press it down with a hand press.
Dimensions of wooden block: 20 x 37 x 40 mm (0.79 x 1.46 x 1.57 in.) Press force: 981 N (100 kgf, 221 lbf)
NOTICE:
- Check the diameter of the hand press ram. Then calculate the gauge pressure of the press when 981 N (100 kgf, 221 lbf) of force is applied.
Gauge pressure:

- If the contact plate is not pressed down with the specified pressure, the contact plate may tilt due to coil deformation or the tightening of the nut.
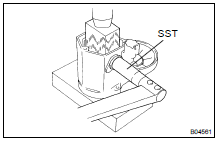
- Using SST, tighten the nuts to the specified torque.
SST 09810-38140
Torque: 17 N·m
NOTICE: If the nut is over tightened, it may cause cracks on the inside of the insulator.
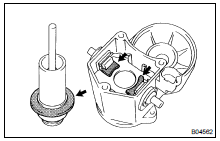
(h) Clean contact surfaces of the contact plate and the plunger.
Clean the contact surfaces of the remaining contact plate and plunger with a dry shop rag.
(i) Reinstall the magnetic switch end cover.
Install the plunger, the new gasket, the end cover and lead clamp with the 3 bolts.
Torque: 3,6 N·m
Test yourself
A quick Toyota Land Cruiser quiz: every answer comes with an explanation and a link to the manual page.