Disassembly
1. REMOVE 2 DUST PROTECTORS
2. REMOVE FIELD FRAME AND ARMATURE
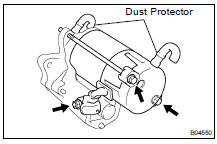
(a) Remove the nut, and disconnect the lead wire from the magnetic switch terminal.
Torque: 5,9 N·m
(b) Remove the 2 through bolts.
Torque: 9,3 N·m
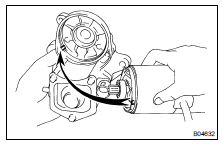
(c) Pull out the field frame together with the armature from the magnetic switch assembly.
NOTICE: At the time of notice, align the protrusion of the field frame with the groove of the magnetic switch.
(d) Remove the O-ring from the field frame.
HINT: At the time of assembly, use a new O-ring.
3. REMOVE STARTER HOUSING, CLUTCH ASSEMBLY AND GEAR
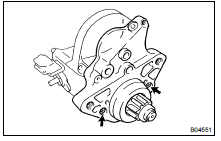
(a) Remove the 2 screws.
Torque: 9,3 N·m
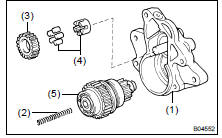
(b) Remove these parts from the magnetic switch assembly:
- Starter housing
- Return spring
- Idler gear
- Bearing
- Starter clutch assembly
HINT: At the time of assembly, apply grease to the return spring and insert the return spring into the clutch shaft hole.
4. REMOVE STEEL BALL
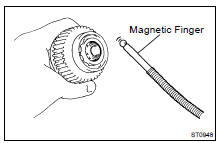
Using a magnetic finger, remove the steel ball from the clutch shaft hole.
HINT: At the time of assembly, apply grease to the steel ball and insert the steel ball into the clutch shaft hole.
5. REMOVE BRUSH HOLDER
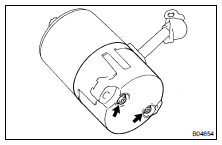
(a) Remove the 2 screws w/ O-ring and the end cover from the field frame.
Torque: 3,8 N·m
(b) Remove the O-ring from the field frame.
HINT: At the time of assembly, use a new O-ring.
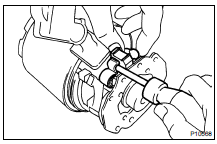
(c) Using a screwdriver, hold the spring back and disconnect the brush from the brush holder. Disconnect the 4 brushes, and remove the brush holder.
NOTICE: Check that the positive (+) lead wires are not grounded.
6. REMOVE ARMATURE FROM FIELD FRAME
Test yourself
A quick Toyota Land Cruiser quiz: every answer comes with an explanation and a link to the manual page.