Reassembly (2006/01- )
- Install front drive shaft bearing (for rh)
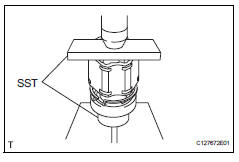
- Install the bearing bracket snap ring to the inboard shaft.
- Using sst and a press, press in the drive shaft bearing to the inboard joint rh.
The bearing should be installed completely.
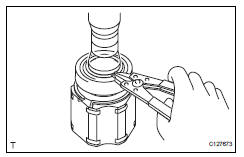
- Using a snap ring expander, install a new drive shaft hole snap ring.
- Remove front drive shaft dust cover rh
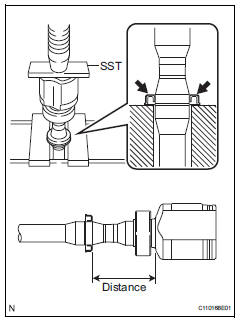
- Using sst and a press, press in a new drive shaft dust cover until the distance from the tip of the center drive shaft to the drive shaft dust cover reaches the specification, as shown in the illustration.
Be careful not to damage the dust cover.
- Install front drive shaft dust cover lh

- Using sst and a press, press in a new drive shaft dust cover.
- The dust cover should be installed so that the drive shaft contacts the dust cover at the location indicated by the arrows in the illustration.
- Be careful not to damage the dust cover.
- Install front drive shaft hole snap ring lh
- Install a new hole snap ring.
- Inspect front drive shaft
- Install front axle outboard joint boot
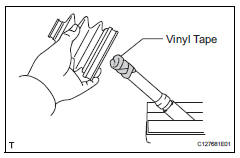
Hint:
Before installing the boots, wrap the spline of the drive shaft with vinyl tape to prevent the boots from being damaged.
- Install new parts to the outboard joint shaft in the following order.
- Outboard joint boot no. 2 Clamp
- Outboard joint boot
- Outboard joint boot clamp
- Pack the outboard joint shaft and boot with grease from the boot kit.

- Install front axle outboard joint boot no. 2 Clamp
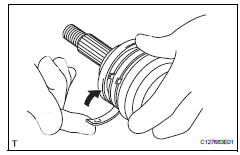
Caution: Wear protective gloves while performing the operation and be careful to avoid cutting your hands or other body parts.
- Install a new boot clamp to the outboard joint boot and temporarily bend the lever.
- When temporarily bending the lever, make sure not to deform the band and lever.
- Set the clamp correctly in the guide groove and align it with the interior of the vehicle as much as possible.

- With the joint on the working surface, use your body weight to press down on the joint with one hand.
- Do not damage the deflector.
- Make sure the joint is in full contact with the joint surface at all times.
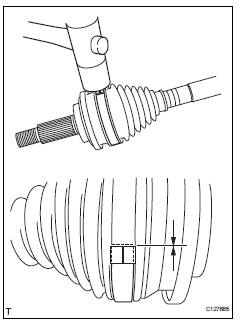
- Using a plastic-faced hammer, fix the buckle into place by tapping it. At the same time, use the plastic-faced hammer to adjust the lift of the lever so that the gaps between the buckle flange and lever end flange become even.
- Install front axle outboard joint boot clamp
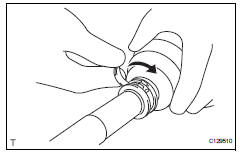
Caution: Wear protective gloves while performing the operation and be careful to avoid cutting your hands or other body parts.
- Install a new boot clamp to the outboard joint boot and temporarily bend the lever.
When temporarily bending the lever, make sure not to deform the band and lever.

- Using water pump pliers, temporarily lock the boot clamp by clamping it down until a "click" sound is heard.
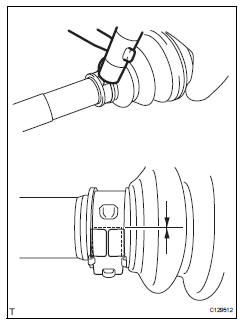
- Using a plastic-faced hammer, fix the buckle into place by tapping it. At the same time, use the plastic-faced hammer to adjust the lift of the lever so that the gaps between the buckle flange and lever end flange become even.
Do not strike the drive shaft forcefully with the plastic-faced hammer.
- Install front drive shaft damper lh

- Install a new drive shaft damper clamp and the drive shaft damper to the drive shaft.
Install the damper clamp to the outboard joint side.
- Set the distance, as described below.
- Install front drive shaft damper clamp lh
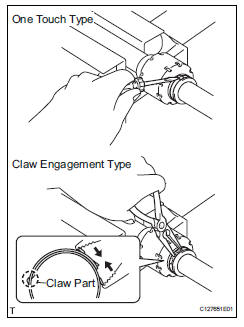
- Hold the front drive shaft lightly in a soft vise.
- Install the drive shaft damper clamp to the damper.
Be sure to install the clamp in the correct position.
- One touch type: using a screwdriver, install the drive shaft damper clamp, as shown in the illustration.
- Claw engagement type: using needle-nose pliers, install the drive shaft damper clamp, as shown in the illustration.
- Install front drive shaft damper rh
Use the same procedures described for the lh side.
- Install front drive shaft damper clamp rh
Use the same procedures described for the lh side.
- Install front drive inboard joint assembly lh
- Wrap the spline of the outboard joint shaft with vinyl tape to prevent the boots from being damaged.
- Install new parts to the outboard joint shaft in the following order.
- Inboard joint boot clamp
- Inboard joint boot no. 2 Clamp
- Inboard joint boot
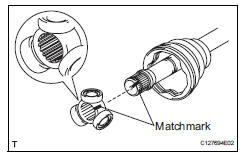
- Place the beveled side of the tripod axial spline toward the outboard joint.
- Align the matchmarks placed before removal.
- Using a brass bar and hammer, tap the tripod joint onto the drive shaft.
- Do not tap the rollers.
- Be sure to install the tripod joint in the correct direction.
- Pack the inboard joint shaft and boot with grease from the boot kit.
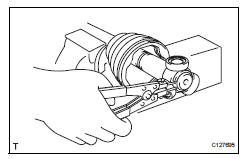
- Using a snap ring expander, install a new shaft snap ring.
- Align the matchmarks, and install the inboard joint to the outboard joint shaft.
- Install front drive inboard joint assembly rh
Use the same procedures described for the lh side.
- Install front axle inboard joint boot
- Install the inboard joint boot to the inboard joint.
- Install front axle inboard joint boot clamp
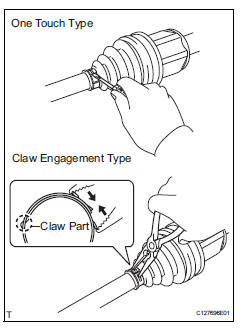
- One touch type: using a screwdriver, install the inboard joint boot clamp, as shown in the illustration.
Be careful not to damage the boot.
- Claw engagement type: using needle-nose pliers, install the inboard joint boot clamp, as shown in the illustration.
Be careful not to damage the boot.
- Install front axle inboard joint boot no. 2 Clamp
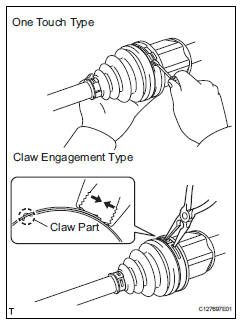
- One touch type: using a screwdriver, install the no. 2 Inboard joint boot clamp, as shown in the illustration.
Be careful not to damage the boot.
- Claw engagement type: using needle-nose pliers, install the no. 2 Inboard joint boot clamp, as shown in the illustration.
Be careful not to damage the boot.
- Inspect front drive shaft

- Check that there is no severe play in the radial direction of the outboard joint.
- Check that the inboard joint slides smoothly in the thrust direction.
- Check that there is no severe play in the radial direction of the inboard joint.
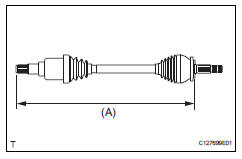
- Check the boots for damage.
Keep the drive shaft assembly level during inspection.
Hint:For dimension (a), refer to the following values.
Standard reference value
Test yourself
A quick Toyota RAV4 quiz: every answer comes with an explanation and a link to the manual page.