Installation
1. Install air fuel ratio sensor (for bank 2 sensor 1)
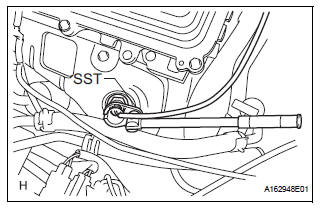
(a) Using SST, install the sensor to the exhaust manifold LH.
SST 09224-00010
Torque: 40 N*m (408 kgf*cm, 30 ft.*lbf) for use with SST 44 N*m (449 kgf*cm, 32 ft.*lbf) for use without SST
HINT:
- Use a torque wrench with a fulcrum length of 30 cm (11.81 in.).
- Make sure that SST and a wrench are connected in a straight line.
(b) Connect the sensor connector
2. INSTALL AIR FUEL RATIO SENSOR (for Bank 1 Sensor 1)
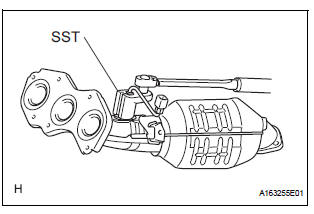
(a) Using SST, install the sensor to the exhaust manifold RH.
SST 09224-00010
Torque: 40 N*m (408 kgf*cm, 30 ft.*lbf) for use with SST
44 N*m (449 kgf*cm, 32 ft.*lbf) for use without SST
HINT:
- Use a torque wrench with a fulcrum length of 30 cm (11.81 in.).
- Make sure that SST and wrench are connected in a straight line.
3. INSTALL EXHAUST MANIFOLD RH

(a) Install the exhaust manifold RH with a new gasket and 6 nuts.
Torque: 21 N*m (214 kgf*cm, 15 ft.*lbf)

(b) Install the exhaust manifold stay with the nut and bolt.
Torque: 35 N*m (357 kgf*cm, 26 ft.*lbf) (c) Connect the air fuel ratio sensor (for Bank 1 Sensor 2) connector.
4. INSTALL FRONT EXHAUST PIPE ASSEMBLY
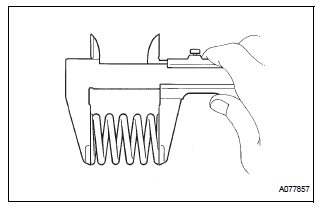
(a) Check compression springs.
(1) Check the compression springs using vernier calipers.
Specified length: 38.86 mm (1.5299 in.)
HINT:
If the result is not as specified, replace the compression spring.
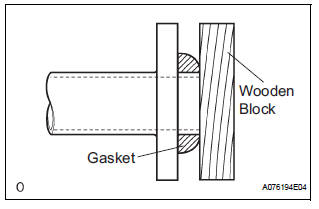
(b) Install the gasket.
(1) Install a new gasket by hand onto the front exhaust pipe assembly.
(2) Using a plastic hammer and wooden block, tap in the new gasket until its surface is flush with the front exhaust pipe.
NOTICE:- Be careful with the installation direction of the gasket.
- Do not damage the gasket.
- Do not reuse the gasket.
- To ensure a proper seal, do not use the exhaust pipe to force the gasket on to the front exhaust pipe.
(c) Install 2 new gaskets to the front exhaust pipe assembly.
(d) Install the front exhaust pipe assembly with the 4 nuts.
Torque: 62 N*m (632 kgf*cm, 46 ft.*lbf)
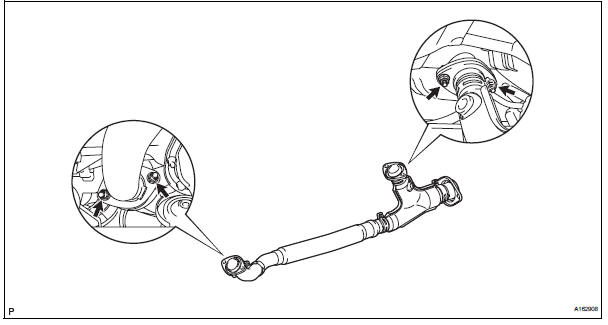

(e) Install the center exhaust pipe assembly with the 2 compression springs and 2 bolts.
Torque: 43 N*m (438 kgf*cm, 32 ft.*lbf) (f) Install the No. 1 exhaust pipe support bracket with the 2 new nuts.
Torque: 21 N*m (214 kgf*cm, 15 ft.*lbf)
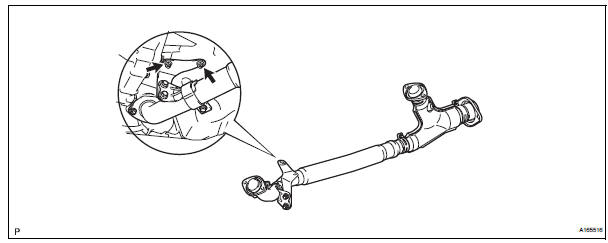
(g) Connect the heated oxygen sensor (for Bank 1 sensor 2) connector
5. CONNECT CABLE TO NEGATIVE BATTERY TERMINAL
6. INSPECT FOR EXHAUST GAS LEAK
Test yourself
A quick Toyota Sienna quiz: every answer comes with an explanation and a link to the manual page.