Audio / Video
Microphone Amplifier
In this manual: Audio / Video
~1min read
Components COMPONENTS ILLUSTRATION 
Removal REMOVAL PROCEDURE
*A |
w/o Sliding Roof |
*B |
w/ Sliding Roof |
*1 |
TELEPHONE MICROPHONE ASSEMBLY |
- |
- |
1. REMOVE ROOF HEADLINING ASSEMBLY (for Double Cab)
Click here 
2. REMOVE ROOF HEADLINING ASSEMBLY (for Access Cab)
Click here
3. REMOVE TELEPHONE MICROPHONE ASSEMBLY
(a) Disconnect the connector. |
|
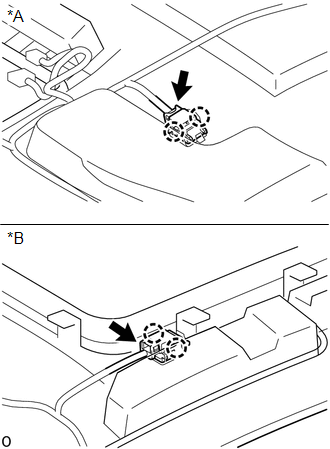
(b) Disengage the 2 claws to remove the telephone microphone assembly.
Installation INSTALLATION PROCEDURE1. INSTALL TELEPHONE MICROPHONE ASSEMBLY
(a) Engage the 2 claws to install the telephone microphone assembly.
(b) Connect the connector.
2. INSTALL ROOF HEADLINING ASSEMBLY (for Double Cab)
Click here 
3. INSTALL ROOF HEADLINING ASSEMBLY (for Access Cab)
Click here
Test yourself
A quick Toyota Tacoma quiz: every answer comes with an explanation and a link to the manual page.
Was this page helpful?