Back Door Lock

Removal REMOVAL PROCEDURE
1. REMOVE BACK DOOR PANEL TRIM ASSEMBLY

2. REMOVE BACK DOOR LOCK ASSEMBLY
(a) Disconnect the connector. |
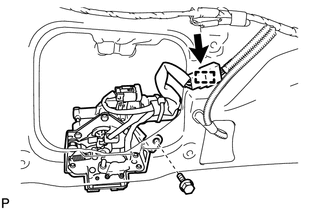 |
(b) Disengage the clamp.
(c) Remove the bolt.
(d) Remove the 3 bolts and back door lock assembly. |
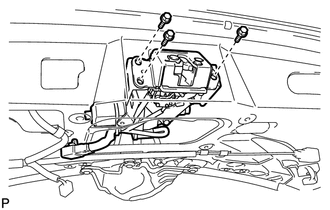 |
1. INSPECT BACK DOOR LOCK ASSEMBLY
(a) Check the operation of the door lock motor.
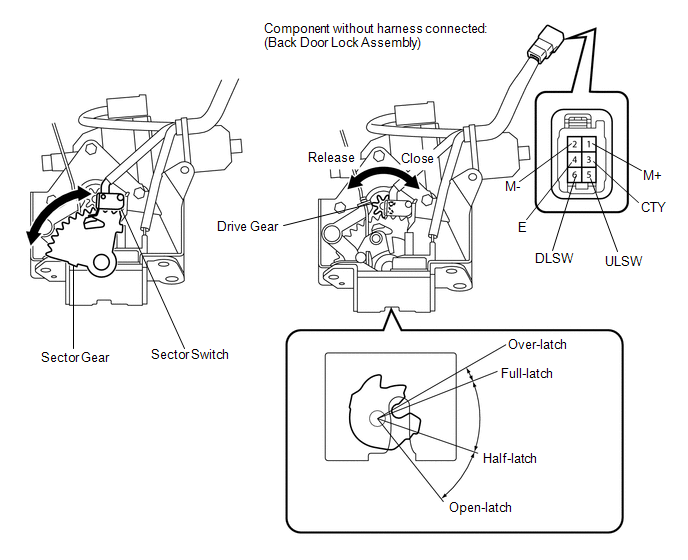
(1) Apply the battery voltage to the door lock motor and check the operation of the door lock motor.
OK:
Measurement Condition | Specified Condition |
|---|---|
Battery positive (+) → Terminal 1 (M+) Battery negative (-) → Terminal 2 (M-) |
Latch turns to full-latch position |
Battery positive (+) → Terminal 2 (M-) Battery negative (-) → Terminal 1 (M+) |
Latch turns to open-latch position |
If the result is not specified, replace the back door lock.
(b) Check the operation of the switch.
(1) Measure the resistance according to the value(s) in the table below.
Standard Resistance:
Latch Switch
Tester Connection | Door Lock Latch Position | Specified Condition |
|---|---|---|
5 (ULSW) - 4 (E) |
Open-latch |
Below 1 Ω |
5 (ULSW) - 4 (E) |
Half-latch |
10 kΩ or higher |
5 (ULSW) - 4 (E) |
Full-latch |
10 kΩ or higher |
5 (ULSW) - 4 (E) |
Over-latch |
Below 1 Ω |
Sector Switch
Tester Connection | Condition | Specified Condition |
|---|---|---|
6 (DLSW) - 4 (E) |
Sector gear in neutral position (Sector switch on) |
Below 1 Ω |
6 (DLSW) - 4 (E) |
Sector gear not in neutral position (Sector switch off) |
10 kΩ or higher |
Back Door Courtesy Light Switch
Tester Connection | Door Lock Latch Position | Specified Condition |
|---|---|---|
3 (CTY) - 4 (E) |
Open-latch |
Below 1 Ω |
3 (CTY) - 4 (E) |
Half-latch |
Below 1 Ω |
3 (CTY) - 4 (E) |
Full-latch |
10 kΩ or higher |
3 (CTY) - 4 (E) |
Over-latch |
10 kΩ or higher |
If the result is not specified, replace the back door lock assembly.
Installation INSTALLATION PROCEDURE1. INSTALL BACK DOOR LOCK ASSEMBLY
(a) Apply MP grease to the sliding parts of the back door lock assembly.
(b) Apply adhesive to the threads of the bolt.
Adhesive:
Toyota Genuine Adhesive 1324, Three Bond 1324 or equivalent
(c) Install the back door lock assembly with the 3 bolts. Torque: 8 N·m {82 kgf·cm, 71 in·lbf} |
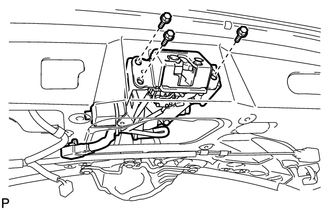 |
(d) Install the bolt. Torque: 8 N·m {82 kgf·cm, 71 in·lbf} |
 |
(e) Engage the clamp.
(f) Connect the connector.
2. INSTALL BACK DOOR PANEL TRIM ASSEMBLY

Test yourself
A quick Toyota Venza quiz: every answer comes with an explanation and a link to the manual page.