Installation
1. INSTALL ENGINE SWITCH
(a) Attach the 2 claws to install the engine switch. |
 |
2. INSTALL LOWER INSTRUMENT PANEL FINISH PANEL ASSEMBLY
(a) Connect the connector. |
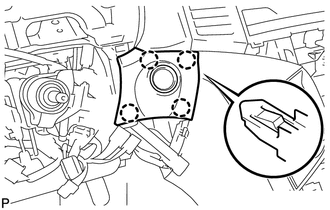 |
(b) Engage the 4 claws to install the lower instrument panel finish panel assembly.
3. INSTALL INSTRUMENT CLUSTER FINISH PANEL

4. INSTALL UPPER STEERING COLUMN COVER
5. INSTALL LOWER STEERING COLUMN COVER
6. INSTALL CONSOLE BOX SUB-ASSEMBLY
7. INSTALL SHIFT LEVER KNOB SUB-ASSEMBLY
8. INSTALL LOWER INSTRUMENT PANEL SUB-ASSEMBLY
9. INSTALL NO. 2 INSTRUMENT PANEL UNDER COVER SUB-ASSEMBLY
10. INSTALL COWL SIDE TRIM SUB-ASSEMBLY RH
11. INSTALL FRONT DOOR SCUFF PLATE RH
12. INSTALL LOWER NO. 1 INSTRUMENT PANEL FINISH PANEL
13. INSTALL COWL SIDE TRIM SUB-ASSEMBLY LH
14. INSTALL FRONT DOOR SCUFF PLATE LH
15. INSTALL AIR CONDITIONING CONTROL ASSEMBLY
16. INSTALL CONSOLE BOX ASSEMBLY
17. INSTALL NO. 2 CONSOLE BOX CARPET
18. INSTALL UPPER CONSOLE PANEL SUB-ASSEMBLY (w/ Seat Heater System)
19. INSTALL UPPER CONSOLE PANEL SUB-ASSEMBLY (w/o Seat Heater System)
20. CONNECT CABLE TO NEGATIVE BATTERY TERMINAL
NOTICE:
When disconnecting the cable, some systems need to be initialized after the cable is reconnected (See page ).
Test yourself
A quick Toyota Venza quiz: every answer comes with an explanation and a link to the manual page.