Installation
HINT:
- Use the same procedure for the RH side and LH side.
- The procedure listed below is for the LH side.
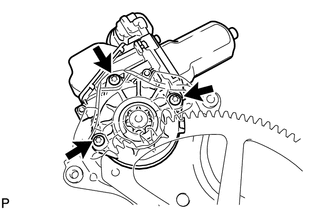
1. INSTALL REAR POWER WINDOW REGULATOR MOTOR ASSEMBLY
NOTICE:
The regulator arm must be below the intermediate position when installing the rear power window regulator motor assembly.
(a) Using a T25 "TORX" driver, install the rear power window regulator motor assembly with the 3 screws. Torque: 5,4 N·m {55 kgf·cm, 48 in·lbf} HINT: A new rear window regulator uses self-tapping screws to thread new installation holes when the self-tapping screws are inserted. |
 |
2. INSTALL REAR DOOR WINDOW REGULATOR ASSEMBLY

3. INSTALL REAR DOOR GLASS SUB-ASSEMBLY
4. INSTALL REAR DOOR WINDOW DIVISION BAR SUB-ASSEMBLY
5. INSTALL REAR DOOR GLASS RUN
6. INSTALL REAR DOOR SERVICE HOLE COVER
7. INSTALL REAR DOOR INSIDE HANDLE SUB-ASSEMBLY
8. INSTALL REAR DOOR TRIM BOARD SUB-ASSEMBLY
9. INSTALL REAR POWER WINDOW REGULATOR SWITCH ASSEMBLY WITH REAR DOOR ARMREST BASE PANEL
10. INSTALL REAR DOOR INSIDE HANDLE BEZEL PLUG
11. CONNECT CABLE TO NEGATIVE BATTERY TERMINAL
NOTICE:
When disconnecting the cable, some systems need to be initialized after the cable is reconnected (See page ).
12. INITIALIZE POWER WINDOW CONTROL SYSTEM
(See page )
Test yourself
A quick Toyota Venza quiz: every answer comes with an explanation and a link to the manual page.