Installation
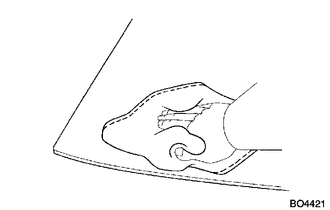
1. CLEAN QUARTER WINDOW ASSEMBLY
(a) Clean the outer edges of the quarter window assembly with a non-residue solvent. NOTICE:
|
 |
2. INSTALL QUARTER WINDOW ASSEMBLY
(a) Using a brush or a sponge, apply Primer M to the exposed part of the vehicle body.
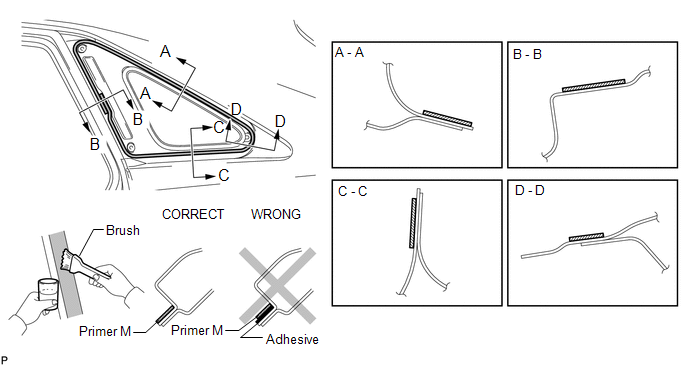
NOTICE:
- Do not coat the adhesive with Primer M.
- Do not apply too much primer.
- Allow the primer to dry for 3 minutes or more.
- Throw away any leftover primer.
(b) Using a brush or a sponge, apply Primer G to the contact surface of the quarter window glass.
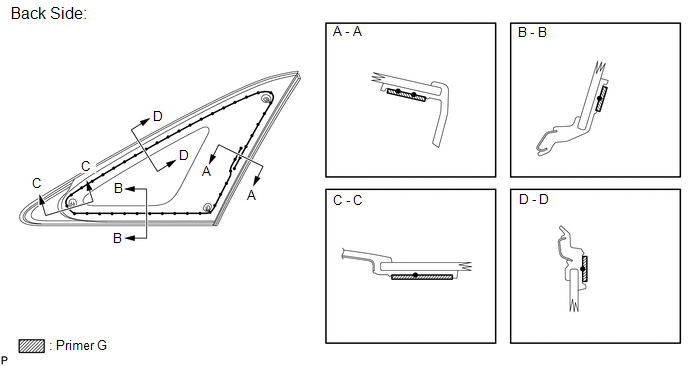
HINT:
If an area other than that specified is coated by accident, wipe off the primer with a non-residue solvent before it dries.
NOTICE:
- To prevent the glass from breaking at low temperatures, ensure that no primer adheres to the contact surface between the moulding and glass during application.
- Allow the primer to dry for 3 minutes or more.
- Throw away any leftover primer.
- Do not apply too much primer.
(c) Apply adhesive to the quarter window assembly.
Adhesive:
Toyota Genuine Windshield Glass Adhesive or equivalent
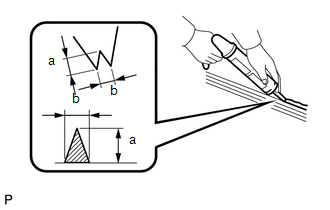
(1) Cut off the tip of the cartridge nozzle as shown in the illustration. Standard Dimension:
|
 |
(2) Load the sealer gun with cartridge.
(3) Apply adhesive to the quarter window glass as shown in the illustration.
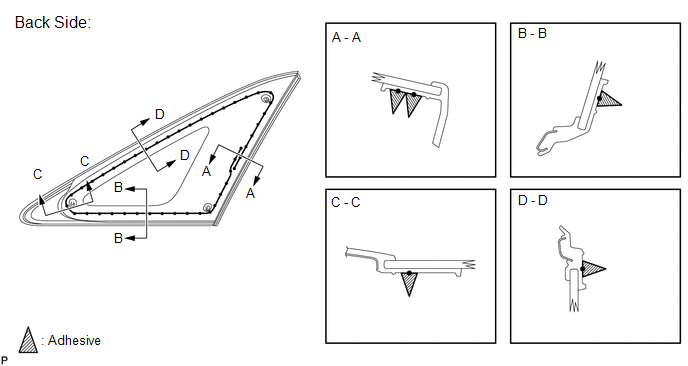
(d) Install the quarter window glass to the vehicle body.
(1) Position the quarter window glass so that the matchmarks are aligned, and press it in gently along the rim (when a window with missing clips is used). Text in Illustration
|
 |
(2) Lightly press the front surface of the windshield glass to ensure that the windshield glass is securely fit to the vehicle body (when a window with missing clips is used).
HINT:
Press the glass with a force of 98 N (10 kgf, 22 lbf) or more.
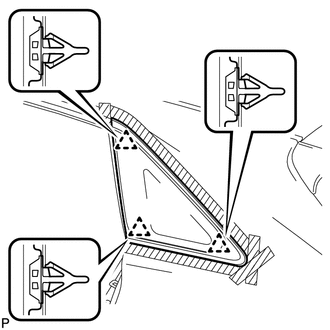
(3) Engage the 3 clips to install the quarter window glass (when a window without missing clips is used used). |
 |
(4) Hold the quarter window assembly in place securely with protective tape or equivalent until the adhesive hardens.
NOTICE:
- Allow the primer to dry for 3 minutes or more.
- Check that the clips are attached to the body correctly.
- Check the clearance between the body and glass.
(5) Lightly press the outer surface of the glass to ensure that the glass is securely fit to the vehicle body.
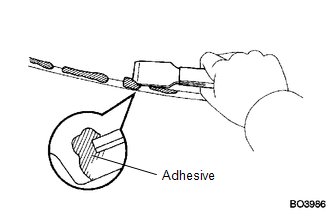
(6) Using a scraper, remove any excess or protruding adhesive. HINT: Apply adhesive onto the glass rim. NOTICE: Do not drive the vehicle within the time described in the table below. Minimum Time:
|
 |
3. INSPECT FOR LEAK AND REPAIR
(a) After the adhesive has hardened, apply water from the outside of the vehicle. Check that no water leaks into the cabin.
(b) If water leaks into the cabin, allow the water to dry and add adhesive.
(c) Remove the protective tape.
4. INSTALL ROOF SIDE INNER GARNISH ASSEMBLY

5. INSTALL DECK TRIM SIDE PANEL ASSEMBLY LH (for LH Side)
6. INSTALL DECK TRIM SIDE PANEL ASSEMBLY RH (for RH Side)
7. CONNECT REAR SEAT OUTER BELT ASSEMBLY
8. INSTALL LUGGAGE HOLD BELT STRIKER ASSEMBLY
9. INSTALL RECLINING REMOTE CONTROL BEZEL
10. INSTALL REAR SEAT ASSEMBLY LH (for LH Side)
11. INSTALL REAR SEAT NO. 2 RECLINING CONTROL CABLE SUB-ASSEMBLY (for LH Side)
12. INSTALL REAR SEAT OUTER TRACK BRACKET COVER (for LH Side)
13. INSTALL REAR SEAT INNER TRACK BRACKET COVER (for LH Side)
14. INSTALL REAR SEAT HEADREST ASSEMBLY (for LH Side)
15. INSTALL REAR SEAT ASSEMBLY RH (for RH Side)
16. INSTALL REAR SEAT RECLINING CONTROL CABLE SUB-ASSEMBLY (for RH Side)
17. INSTALL REAR SEAT OUTER TRACK BRACKET COVER (for RH Side)
18. INSTALL REAR SEAT INNER TRACK BRACKET COVER (for RH Side)
19. INSTALL REAR SEAT CENTER HEADREST ASSEMBLY (for RH Side)
20. INSTALL REAR SEAT HEADREST ASSEMBLY (for RH Side)
21. INSTALL REAR FLOOR FINISH PLATE
22. INSTALL REAR SEAT SUB FLOOR PANEL ASSEMBLY
23. INSTALL NO. 1 DECK BOARD
24. INSTALL DECK SIDE TRIM BOX RH
25. INSTALL NO. 2 DECK BOARD SUB-ASSEMBLY
26. INSTALL DECK SIDE TRIM BOX LH
27. INSTALL NO. 3 DECK BOARD SUB-ASSEMBLY
28. INSTALL DECK BOARD ASSEMBLY
29. INSTALL TONNEAU COVER ASSEMBLY (w/ Tonneau Cover)
30. INSTALL REAR DOOR OPENING TRIM WEATHERSTRIP
31. INSTALL REAR DOOR SCUFF PLATE
Test yourself
A quick Toyota Venza quiz: every answer comes with an explanation and a link to the manual page.