Installation
1. INSTALL NO. 3 ANTENNA CORD SUB-ASSEMBLY
(a) Pass the washer hose through the No. 3 antenna cord sub-assembly.
(b) Pass the No. 3 antenna cord sub-assembly with washer hose through the vehicle body as shown in the illustration. |
 |
(c) Engage the 2 claws.
(d) Connect the grommet to the back door.
(e) Engage the 4 clamps.
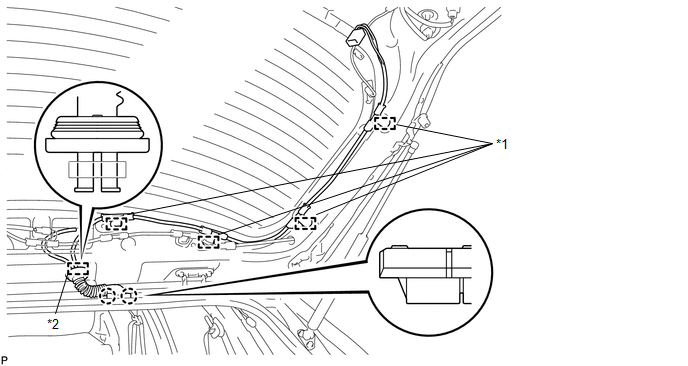 Text in Illustration
*1 |
Clamp |
*2 |
Grommet |
(f) Connect the connector and engage the clamp.
(g) w/o Satellite Radio:
(1) Engage the 7 clamps.
(2) Engage the 4 hooks to connect the washer hose.
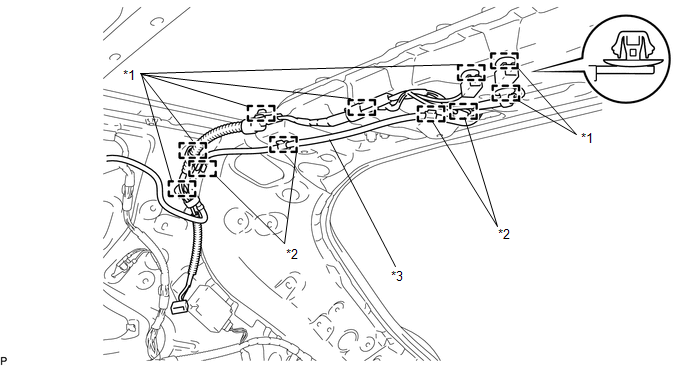 Text in Illustration
*1 |
Clamp |
*2 |
Hook |
*3 |
Washer Hose |
- |
- |
(3) Connect the 2 connectors. |
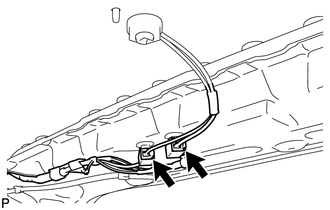 |
(h) w/ Satellite Radio:
(1) Engage the 5 clamps.
(2) Engage the 4 hooks to connect the washer hose.
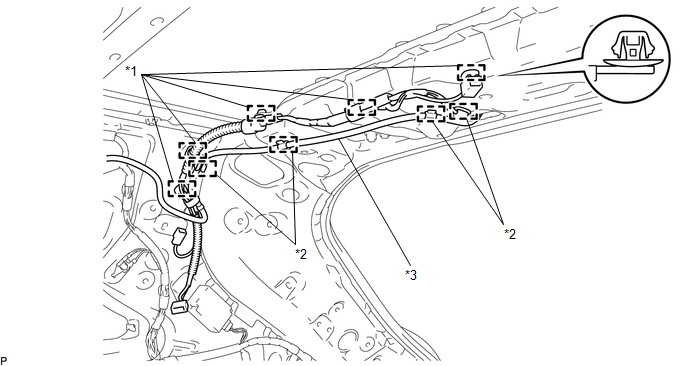 Text in Illustration
*1 |
Clamp |
*2 |
Hook |
*3 |
Washer Hose |
- |
- |
(3) Connect the connector.
(i) Set the position of the grommet as shown in the illustration. Text in Illustration
HINT: Flat area to be oriented outside the vehicle. |
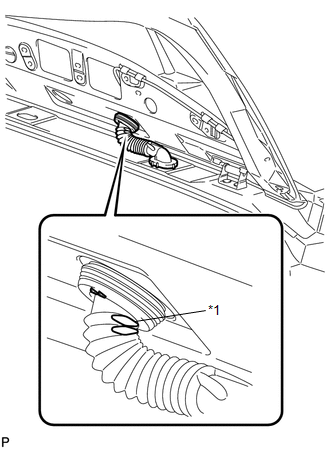 |
2. INSTALL BACK DOOR TRIM COVER RH

3. INSTALL BACK DOOR TRIM COVER LH (w/o Power Back Door)
4. INSTALL BACK DOOR TRIM COVER LH (w/ Power Back Door)
5. INSTALL BACK DOOR PANEL TRIM ASSEMBLY
6. INSTALL UPPER BACK WINDOW PANEL TRIM
7. INSTALL NO. 2 ANTENNA CORD SUB-ASSEMBLY (w/o Sliding Roof)
(a) Aligning the No. 2 antenna cord sub-assembly and washer hose with the markings on the roof headlining assembly, temporarily install the cord and washer hose.
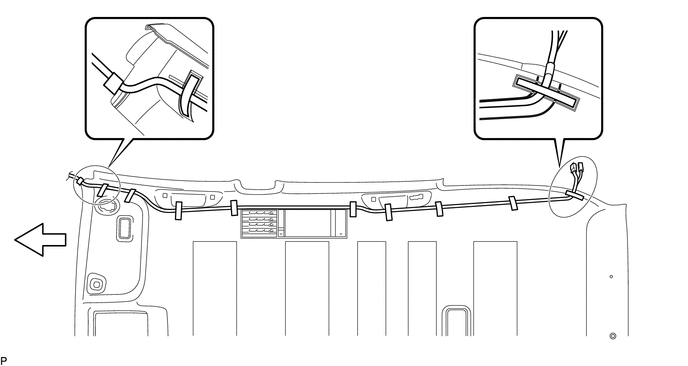 Text in Illustration
 | Tape |
- |
- |
 | Front |
- |
- |
(b) Put the strips of the tape back to the positions shown in the illustration in order to secure the antenna cord and washer hose to the roof headlining assembly.
HINT:
- If the tape has lost adhesion, use other tape, such as packing tape, with enough adhesion to secure the antenna cord and washer hose to the roof headlining assembly.
- Secure the antenna cord and washer hose to the roof headlining assembly with tape as shown in the illustration.
8. INSTALL NO. 2 ANTENNA CORD SUB-ASSEMBLY (w/ Sliding Roof)
(a) Aligning the No. 2 antenna cord sub-assembly and washer hose with the markings on the roof headlining assembly, temporarily install the cord and washer hose.
 Text in Illustration
| Tape |
- |
- |
| Front |
- |
- |
(b) Put the strips of the tape back to the positions shown in the illustration in order to secure the antenna cord and washer hose to the roof headlining assembly.
HINT:
- If the tape has lost adhesion, use other tape, such as packing tape, with enough adhesion to secure the antenna cord and washer hose to the roof headlining assembly.
- Secure the antenna cord and washer hose to the roof headlining assembly with tape as shown in the illustration.
9. INSTALL ROOF HEADLINING ASSEMBLY
(See page )
10. INSTALL NO. 1 ANTENNA CORD SUB-ASSEMBLY
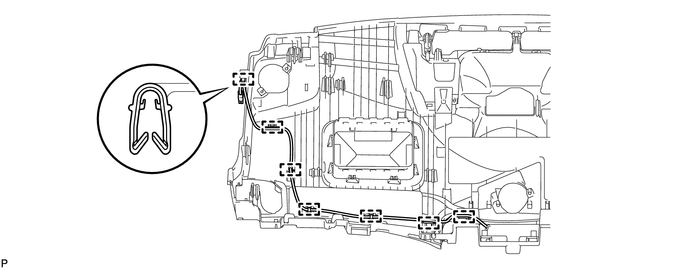
(a) Engage the 7 clamps to install the No. 1 antenna cord sub-assembly.
11. INSTALL INSTRUMENT PANEL SAFETY PAD ASSEMBLY
(See page )
Test yourself
A quick Toyota Venza quiz: every answer comes with an explanation and a link to the manual page.