Rear Shock Absorber
PROCEDURE
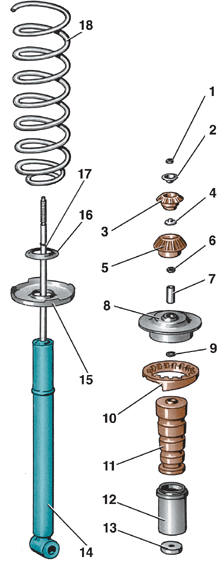
Rear Shock Absorber 1 – nut; 2 – upper mount retainer; 3 – upper mount; 4 – lower mount retainer; 5 – lower mount; 6 – nut; 7 – bushing; 8 – upper spring seat; 9 – washer; 10 – spring retainer; 11 – compression bumper; 12 – protective sleeve; 13 – protective washer; 14 – shock absorber; 15 – lower spring seat; 16 – washer; 17 – ring; 18 – spring
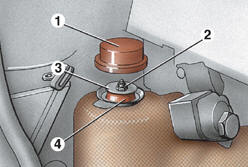
Upper Shock Absorber Mount (view from inside the vehicle) 1 – protective cap; 2 – nut; 3 – upper mount retainer; 4 – upper mount
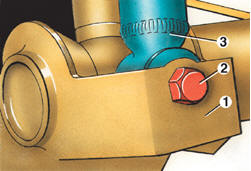
Lower Shock Absorber Mount 1 – bracket; 2 – bolt; 3 – shock absorber
Removal PROCEDURE 1. Remove the trim in the luggage compartment covering access to the upper shock absorber mounting. 2. Remove protective cap 1 (see figure Upper Shock Absorber Mounting) from the upper shock absorber mounting from the luggage compartment. 3. Unscrew nut 1 (see figure Rear Shock Absorber) while holding the shock absorber rod. 4. Remove upper bushing retainer 2. 5. Remove upper mounting insulator 3. 6. Remove lower bushing retainer 4. 7. Place wheel chocks under the front wheels. 8. Loosen the wheel mounting bolts. 9. Raise and support the rear of the vehicle on stands. 10. Lift the trailing arm slightly in the area of the wheel mounting, making sure the vehicle does not slip off the stands. 11. Unscrew bolt 2 (see figure Lower Shock Absorber Mounting), holding its nut with a wrench. 12. Lower the trailing arm as far as possible and remove the shock absorber. Disassembly PROCEDURE 1. Remove lower insulator 5 (see figure Rear Shock Absorber) of the shock absorber mounting. 2. Compress spring 18 with a special tool. 3. Unscrew nut 6 (see figure Rear Shock Absorber). 4. Remove bushing 7, upper spring seat 8, spring retainer 10 and washer 9. 5. Remove compression bumper 11. 6. Remove spring 18. 7. Remove protective bushing 12, protective washer 13, retaining ring 17, washer 16 and lower spring seat 15. Shock Absorber Inspection PROCEDURE 1. Install the shock absorber vertically. 2. Extend the shock absorber and compress it again. The piston must move through its entire stroke with uniform resistance and without binding. 3. A faulty shock absorber can be detected by knocking noise when driving over uneven road. 4. Replace a faulty shock absorber. If significant leakage of shock absorber fluid is noted, the shock absorber must also be replaced. Assembly PROCEDURE 1. Assemble the rear suspension shock absorber in the reverse order of disassembly. 2. Make sure the ends of spring 18 (see figure Rear Shock Absorber) are correctly seated in their seats. 3. Tighten nut 6 to a torque of 15 N·m. Installation PROCEDURE 1. Install the rear suspension shock absorber in the reverse order of removal. 2. Install bolt 2 (see figure Lower Shock Absorber Mounting), slightly raising the trailing arm with a jack. 3. Tighten bolt 2 to a torque of 15 N·m only after lowering the vehicle wheels to the ground. 4. Tighten nut 1 (see figure Rear Shock Absorber) to a torque of 15 N·m.
Test yourself
A quick Volkswagen Golf quiz: every answer comes with an explanation and a link to the manual page.