Rear Suspension Beam
PROCEDURE

Rear Suspension Beam 1 – hub; 2 – bracket; 3 – trailing arm; 4 – parking brake cable; 5 – bracket; 6 – bushing; 7 – nut; 8 – washer; 9 – bracket; 10 – bolt; 11 – beam
Removal PROCEDURE 1. Remove the rear brake with hub. 2. Place the trailing arms on stands. 3. Raise and support the rear of the vehicle on stands. 4. Lift the trailing arm slightly in the area of the wheel mounting, making sure the vehicle does not slip off the stands. 5. Unscrew bolt 2 (see figure Lower Shock Absorber Mounting), holding its nut with a wrench. 6. Lower the trailing arm as far as possible and remove the shock absorber. 7. Remove the pressure regulator (see subsection 10.6), if fitted. 8. Disconnect the parking brake cables (see subsection 10.12). 9. Install supports under beam 11 (see figure Rear Suspension Beam). 10. Unscrew bolts 10. 11. Remove the rear suspension beam. 12. Press bushings 6 out of the beam bracket.
Warning If it becomes necessary to remove bracket 9 from the body, first trace its outline on the body for accurate reinstallation of the bracket. Installation PROCEDURE 1. Install the rear suspension beam in the reverse order of removal. 2. Brackets 9 must be installed at an angle of approximately 12° to the rear suspension beam. 3. Install the right bracket 9 centered on the longitudinal holes.
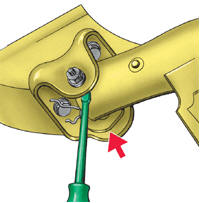
4. Install the left bracket 9 so that there is minimum clearance at the point shown by the arrow in the figure.

5. Press bushing 1 in at the position shown in the figure. 6. The cylindrical end of bushing 6 (see figure Rear Suspension Beam) must protrude from the bracket by 8 mm. 7. The heads of bolts 10 must face the center of the vehicle.
Test yourself
A quick Volkswagen Golf quiz: every answer comes with an explanation and a link to the manual page.