General body repairs, interior
Assembly overview - dash panel
In this manual: General body repairs, interior
~1min read
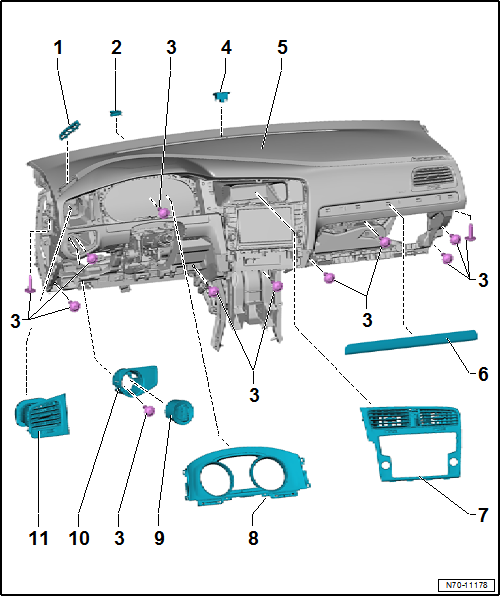
| 1 - | Side defroster vent |
- Left and right
- Removing and installing → Chapter
| 2 - | Rubber buffer |
- Qty. 2
- Slide onto dash panel mountings on lower windscreen frame
| 3 - | Bolt |
- 1,5 N·m
| 4 - | Sunlight penetration photosensor -G107- |
- Removing and installing → Heating, air conditioning; Rep. gr.87
| 5 - | Dash panel |
- Removing and installing → Chapter
| 6 - | Trim panel for dash panel |
- Allocation → Electronic Parts Catalogue
- Removing and installing → Chapter
| 7 - | Centre vent with trim for display unit for front information display and operating unit control unit -J685- |
 Note Always remove trim for display unit for front information display and operating unit control unit -J685- and centre vent together as one unit.
- Removing and installing → Chapter
| 8 - | Dash panel insert trim |
- Removing and installing → Chapter
| 9 - | Rotary light switch -EX1- |
- Removing and installing → Electrical system; Rep. gr.96
| 10 - | Light switch trim |
- Removing and installing → Chapter
| 11 - | Side vent |
- Left and right
- Removing and installing → Chapter
Test yourself
A quick Volkswagen Golf quiz: every answer comes with an explanation and a link to the manual page.
Was this page helpful?