Electrical system

Removing and installing washer fluid reservoir

~1min read

Special tools and workshop equipment required

Drip tray

Note Removal and installation of washer fluid reservoirs with headlight washer system are described. Removal and installation of washer fluid reservoirs without headlight washer system are carried out in the same way.

Removing

  • Remove front bumper cover → General body repairs, exterior; Rep. gr.63.
  • Remove left headlight → Chapter.
  • If necessary, remove headlight washer system pump -V11- → Chapter.
  • Place drip tray under washer fluid reservoir.
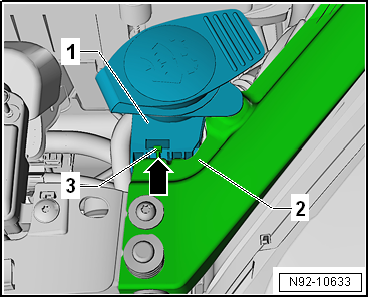
  • Release locking lug -3-.
Caution

Risk of leakage.

The washer fluid reservoir is constructed in a one-piece design. The washer fluid reservoir, the filler pipe and the filler neck are not intended to be separated from each other. If they are nevertheless detached from each other, the connection could then leak.
  • Pull filler neck -1- upwards out of bracket on lock carrier -2-.
Removing and installing washer fluid reservoir
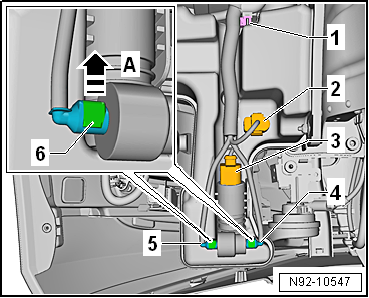
  • Disconnect electrical connectors -2- and -3-.
  • Release securing clips -6- in direction of arrow -A-.
  • Pull water lines -4- and -5- off windscreen washer pump.
  • Detach wiring harness from washer fluid reservoir -1-.
Removing and installing washer fluid reservoir
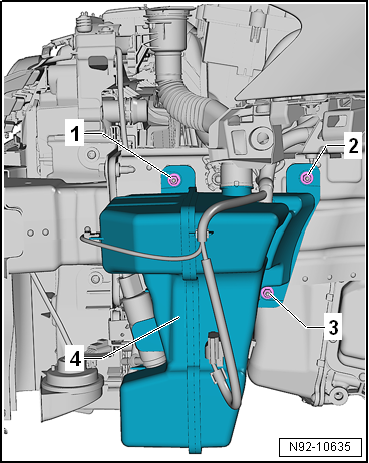
  • Unscrew nuts -1, 2 and 3-.
  • Pull washer fluid reservoir -4- off threaded pins.

Installing

Install in the reverse order of removal, observing the following:

Note The connections at the pump and hoses are colour-marked to prevent incorrect connection of the washer fluid lines to the windscreen and rear window washer pump -V59-. The hose fittings must be connected to the correct colour-coded pump connections during installation.

Specified torques

→ Chapter „Assembly overview - windscreen washer system“

Removing and installing washer fluid reservoir

Test yourself

A quick Volkswagen Golf quiz: every answer comes with an explanation and a link to the manual page.