Access/Start Authorization, KESSY
General Information
Caution
To disconnect and connect the battery, always follow the procedure as described in the repair manual.
Note
Additional information:
- Refer to the Owner's Manual.
- Refer to → Wiring diagrams, Troubleshooting & Component locations
Malfunction Recognition and Malfunction Indicator:
Access/start authorization is equipped with On Board Diagnostic (OBD) which assists troubleshooting.
General Description:
The "Keyless Access" system regulates keyless opening, locking and starting of the vehicle.
Opening:
The ID sensor in ignition key must be located within reception range of lock location (approximately 1.5 meters). The proximity sensor located on the inside of the door handle is activated whenever the door handle is touched. This then speaks to the ID sensor inside the key and the door unlocks immediately if the identification is valid. Pulling the door handle opens the vehicle.
Starting:
The ID sensor in ignition key must be located in the vehicle interior. The clutch pedal must be pressed on manual transmission vehicles. If this is a DSG transmission vehicle, then the selector must be in the P position and the brake pedal must pushed down. Briefly push the ignition starter button. This speaks to the ID sensor in the key and if the identification is valid, the steering wheel unlocks and the vehicle can be started.
It is only possible to start the engine with the start button if a valid ignition key is inside the vehicle.
Locking:
The ID sensor in ignition key must be located within reception range of lock location (approximately 1.5 meters). Touching the locking sensor on the outside of the door handle activates the sensor. This then speaks to the ID sensor inside the key and the vehicle unlocks if the identification is valid.
The Access/Start Authorization Control Module -J518- controls all access/start authorization functions.
Overview - Access/Start Authorization

- Antenna Contact Point Coverage Area
- Front Passenger Side Exterior Door Handle
The following components are integrated in the front passenger side exterior door handle:
- Front Passenger Exterior Door Handle Touch Sensor -G416-
- Front Passenger Access/Start System Antenna -R135-
Front passenger side exterior door handle, removing and installing.
- Front Passenger Access/Start System Antenna -R135-, Checking.
- Front Passenger Exterior Door Handle Touch Sensor -G416-, checking.
- Access/Start System Antenna in Rear Bumper -R136-
- Component location: behind the bumper cover inside the rear lid
- Removing and installing.
- Access/Start System Antenna in Rear Bumper -R136-, checking.
- Access/Start System Antenna in Luggage Compartment -R137-
- Component location: inside the center of the luggage compartment, in front of spare wheel well
- Removing and installing.
- Access/Start System Antenna in Luggage Compartment -R137-, checking.
- Driver Side Exterior Door Handle
The following components are integrated in the driver side exterior door handle:
- Driver Exterior Door Handle Touch Sensor -G415-
- Driver Access/Start System Antenna -R134-
- Driver side exterior door handle, removing and installing.
- Driver Exterior Door Handle Touch Sensor -G415-, checking.
- Driver Access/Start System Antenna -R134-, Checking.
- Access/Start System Antenna 1 in Vehicle Interior -R138-
- Component location: under the center console in front of the selector lever.
- Removing and installing.
- Access/Start System Antenna 1 in Vehicle Interior -R138-, Checking.
- Start System Button -E378-
- Installed location: in the center console in front of the gearshift lever.
- Removing and installing.
- Access/Start Authorization Control Module -J518-
- Component location: inside the footwell on the driver side and above the brake pedal
- Removing and installing.
- Access/Start Authorization Control Module -J518-, coding.
Access/Start Authorization Control Module -J518-
General Information
The Access/Start Authorization Control Module -J518- controls all access/start authorization functions.The Access/Start Authorization Control Module -J518- is located in the footwell on the driver side above the brake pedal.
The "access/start authorization" system must be coded after the Access/Start Authorization Control Module -J518- has been replaced.Access/Start Authorization Control Module -J518-, Removing and Installing
The "access/start authorization" system must be coded after the Access/Start Authorization Control Module -J518- has been replaced.
Removing
- Remove the trim in the driver footwell.
- Remove the footwell vent on the driver side.
Note
To remove the Access/Start Authorization Control Module -J518- and its bracket from the pedal bracket, the steering column must be lowered.
Caution
Follow the instructions for working with and transporting the steering column.
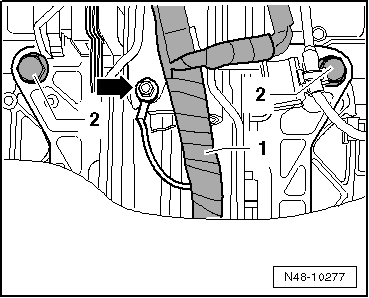
- Unscrew the two mounting bolts -2-.
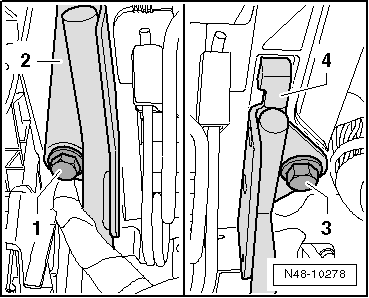
- Remove the bolt -1- and the clutch pedal crash bolster -2-.
- Remove the bolts -3- and the brake pedal crash bolster -4-.
- Lower the steering column just enough so the Access/Start Authorization Control Module -J518- can be removed from the pedal bracket.
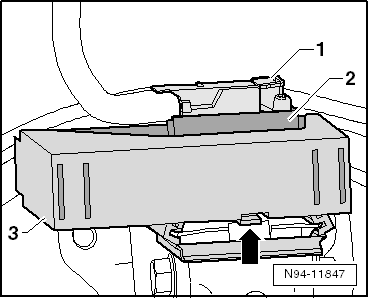
- Disconnect the connector -1-.
- Open the retainer -arrow- and remove the Access/Start Authorization Control Module -J518--2- and bracket -3- from the brake pedal block.
- Open the side retainers and remove the Access/Start Authorization Control Module -J518--2- from the bracket -3-.
Installing
Install in reverse order of removal. Note the following:
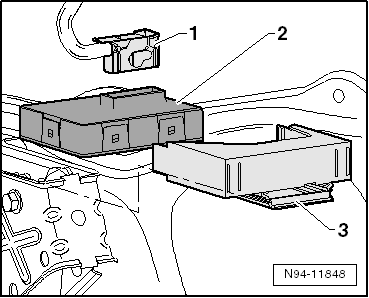
- Install the Access/Start Authorization Control Module -J518--2- in its bracket -3- so that it clicks into place.
- Slide the bracket and control module onto the guides on the brake pedal bracket until it locks in place.
- Connect the connector -1-.
The "access/start authorization" system must be coded after the Access/Start Authorization Control Module -J518- has been replaced.
Access/Start Authorization Control Module -J518-, Coding
The "access/start authorization" system must be coded after the Access/Start Authorization Control Module -J518- has been replaced.
- Code the Access/Start Authorization Control Module -J518- using the Vehicle Diagnostic Tester.
Access/Start Authorization Antennas and Sensors
Front Passenger Exterior Door Handle, Removing and Installing
The following components are integrated in the front passenger side exterior door handle:
- Front Passenger Exterior Door Handle Touch Sensor -G416-
- Front Passenger Access/Start System Antenna -R135-
Note
- The entire exterior door handle must always be replaced if malfunctioning.
- No coding, basic setting or adaptation is necessary when the exterior door handle is replaced. Erase the entry in the DTC memory using "Guided Fault Finding" with the Vehicle Diagnostic Tester.
Removing
- Turn off the ignition and all electrical equipment.
- Remove the right front exterior door handle.
Installing
Install in reverse order of removal.
Driver Side Exterior Door Handle, Removing and Installing
The following components are integrated in the driver side exterior door handle:
- Driver Exterior Door Handle Touch Sensor -G415-
- Driver Access/Start System Antenna -R134-
Note
- The entire exterior door handle must always be replaced if malfunctioning.
- No coding, basic setting or adaptation is necessary when the exterior door handle is replaced. Erase the entry in the DTC memory using "Guided Fault Finding" with the Vehicle Diagnostic Tester.
Removing
- Turn off the ignition and all electrical equipment.
- Remove the left front exterior door handle.
Installing
Install in reverse order of removal.
Access/Start System Antenna in Rear Bumper -R136-, Removing and Installing
The Access/Start System Antenna in Rear Bumper -R136- is located in the rear bumper cover on the right back-up lamp.
Note
No coding, basic setting or adaptation is necessary if the Access/Start System Antenna in Rear Bumper -R136- is replaced. Erase the entry in the DTC memory using "Guided Fault Finding" with the Vehicle Diagnostic Tester.
Removing
- Turn off the ignition and all electrical equipment.
- Remove the rear bumper cover.
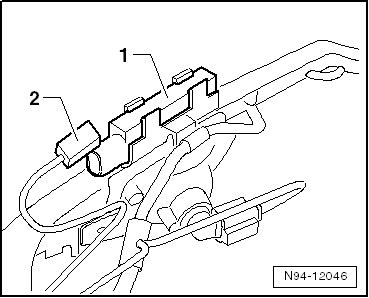
- Remove the Access/Start System Antenna in Rear Bumper -R136--1- from the bumper lower section. Pay attention to the wires still connected.
- Disconnect the connector -2- and remove the Access/Start System Antenna in Rear Bumper -R136--1-.
Installing
Install in reverse order of removal.
Access/Start System Antenna in Luggage Compartment -R137-, Removing and Installing
The Access/Start System Antenna in Luggage Compartment -R137- is located in the luggage compartment and is clipped into the floor panel at the center in front of the spare wheel well.
Note
No coding, basic setting or adaptation is necessary if the Access/Start System Antenna in Luggage Compartment -R137- is replaced. Erase the entry in the DTC memory using "Guided Fault Finding" with the Vehicle Diagnostic Tester.
Removing
- Turn off the ignition and all electrical equipment.
- Move the rear seats all the way forward and fold up carpet in the luggage compartment.
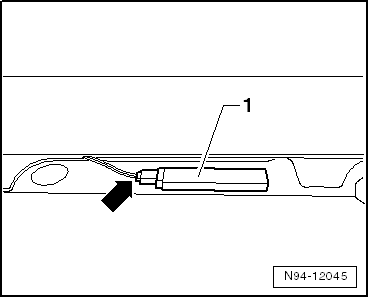
- Remove the Access/Start System Antenna in Luggage Compartment -R137--1- upward vertically from its retainer. Pay attention to the wires still connected.
- Disconnect the connector -arrow- and remove the Access/Start System Antenna in Luggage Compartment -R137--1- from the vehicle.
Installing
Install in reverse order of removal.
Access/Start System Antenna 1 in Vehicle Interior -R138-, Removing and Installing
The component location of the Access/Start System Antenna 1 in Vehicle Interior -R138- is under the front center console, in front of the selector lever.
Note
No coding, basic setting or adaptation is necessary if the Access/Start System Antenna 1 in Vehicle Interior -R138- is replaced. Erase the entry in the DTC memory using "Guided Fault Finding" with the Vehicle Diagnostic Tester.
Removing
- Turn off the ignition and all electrical equipment.
- Remove the cover from the center console.
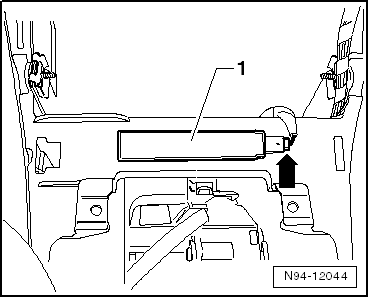
- Remove the Access/Start System Antenna 1 in Vehicle Interior -R138--1- upward vertically from its retainer. Pay attention to the wires still connected.
- Disconnect the connector -arrow- and remove the Access/Start System Antenna 1 in Vehicle Interior -R138--1- from the vehicle.
Installing
Install in reverse order of removal.
Access/Start Authorization Antennas and Sensors, Checking
General Information
The following access/start authorization antennas and sensors can be checked with the Vehicle Diagnostic Tester.
- Driver Access/Start System Antenna -R134-.
- Front Passenger Access/Start System Antenna -R135-.
- Access/Start System Antenna in Rear Bumper -R136-.
- Access/Start System Antenna in Luggage Compartment -R137-.
- Access/Start System Antenna 1 in Vehicle Interior -R138-.
- Driver Exterior Door Handle Touch Sensor -G415-.
- Front Passenger Exterior Door Handle Touch Sensor -G416-.
Driver Access/Start System Antenna -R134-, Checking
- Connect the Vehicle Diagnostic Tester.
- Check the Driver Access/Start System Antenna -R134- using the Vehicle Diagnostic Tester.
Front Passenger Access/Start System Antenna -R135-, Checking
- Connect the Vehicle Diagnostic Tester.
- Check the Front Passenger Access/Start System Antenna -R135- using the Vehicle Diagnostic Tester.
Access/Start System Antenna in Rear Bumper -R136-, Checking
- Connect the Vehicle Diagnostic Tester.
- Check the Access/Start System Antenna in Rear Bumper -R136- using the Vehicle Diagnostic Tester.
Access/Start System Antenna in Luggage Compartment -R137-, Checking
- Connect the Vehicle Diagnostic Tester.
- Check the Access/Start System Antenna in Luggage Compartment -R137- using the Vehicle Diagnostic Tester.
Access/Start System Antenna 1 in Vehicle Interior -R138-, Checking
- Connect the Vehicle Diagnostic Tester.
- Check the Access/Start System Antenna 1 in Vehicle Interior -R138- using the Vehicle Diagnostic Tester.
Driver Exterior Door Handle Touch Sensor -G415-, Checking
- Connect the Vehicle Diagnostic Tester.
- Check the Driver Exterior Door Handle Touch Sensor -G415- using the Vehicle Diagnostic Tester.
Front Passenger Exterior Door Handle Touch Sensor -G416-, Checking
- Connect the Vehicle Diagnostic Tester.
- Check the Front Passenger Exterior Door Handle Touch Sensor -G416-Vehicle Diagnostic Tester.
Start System Button -E378-
Start System Button -E378-, Removing and Installing
Special tools and workshop equipment required
- Trim Removal Wedge -3409-
Vehicles with "Keyless" have a Start System Button -E378- rather than an ignition/starter switch. The button performs the functions of an ignition lock but without a key. The Start System Button -E378- is installed in the center console in front of the selector lever.
Note
When removing and installing components in visible area (switches, covers, trim, etc.), cover by taping the areas at which a prying tool (Trim Removal Wedge -3409-, screwdriver) will be positioned using commercially available adhesive tape.
Removing
- Turn off the ignition and all electrical equipment.
- Remove the upper section of the center console.
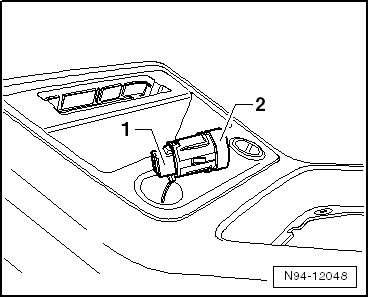
- Release both tabs -arrows- and push the Start System Button -E378--1- toward the outside through the cover.
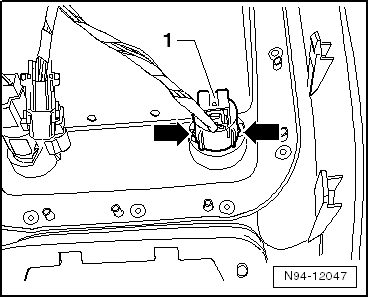
- Disconnect the connector -1- and remove the Start System Button -E378--2-.
Installing
Install in reverse order of removal. Note the following:
Note
Make sure the Start System Button -E378- fits securely inside the center console when installing it.
Test yourself
A quick Volkswagen Tiguan quiz: every answer comes with an explanation and a link to the manual page.