Tail Lamps
Side Panel Tail Lamps
General Information
Note
Additional information:
- Refer to Self Study Program; No 404; The Tiguan.
- Refer to → Wiring diagrams, Troubleshooting & Component locations
Malfunction Recognition and Malfunction Indicator:
Vehicle electrical system control is equipped with OBD which assists in Fault Finding.
Use the Vehicle Diagnostic Tester in "Guided Fault Finding".
Note
- The following illustrations show the taillights in the left side panel. Working on the taillights in the right side panel is identical.
- The side panel tail lamps include, in addition to the turn signal bulb, and additional one-filament bulb, which functions as a brake lamp and tail lamp.
Overview - Side Panel Tail Lamps

- Side Locking Mechanism
- Bulb Holder
- Screws: 1,5 N·m
- Removing and Installing
- Left Brake/Tail Lamp Bulb -M21- or Right Brake/Tail Lamp Bulb -M22-
- 12V, P21W
- Replacing.
- Left Rear Turn Signal Bulb -M6- or Right Rear Turn Signal Bulb -M8-
- 12V, 21W
- Replacing.
- Trim
- Screws
- 3 N·m
- Side Panel Tail Lamp Housing
- Removing and Installing.
Side Panel Tail Lamps, Removing and Installing
Special tools and workshop equipment required
- Torque Wrench 1783 - 2-10Nm -VAG1783-
Note
The following illustrations show the procedure for removing and installing of the tail lamps in the side panel on the left side. Removing and installing the tail lamps in the side panel on the right side is identical.
Removing
- Switch off the ignition and all electrical consumers and remove the ignition key.
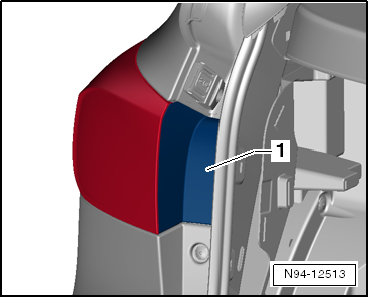
- Remove the trim -1-.
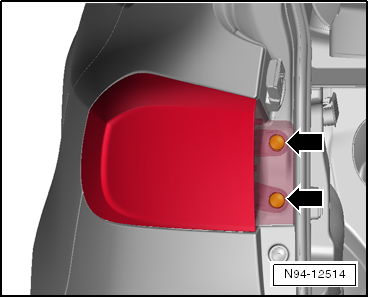
- Remove both screws -arrows-.
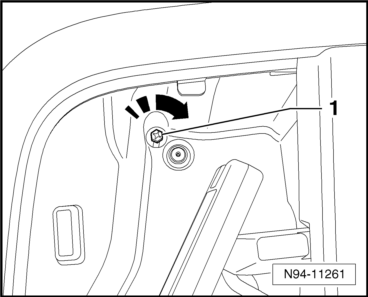
- Open the flap -1- in the luggage compartment side panel.

- Turn the screw -1- all the way approximately 90º in the direction of -arrow-.

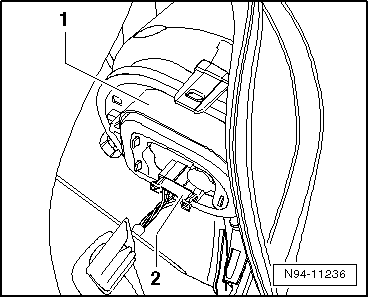
- Remove the tail lamps -1- downward from the retainer -2- in the direction of -arrow-. Pay attention to the wires still connected.

- Disconnect the connector -2- and remove the tail lamps -1-.
Installing
Install in reverse order of removal. Note the following:
- Turn the locking screw -1- all the way approximately 90º in the direction of -arrow- and lock the flap in the side panel.
- Connect the connector -2- so that it clicks.

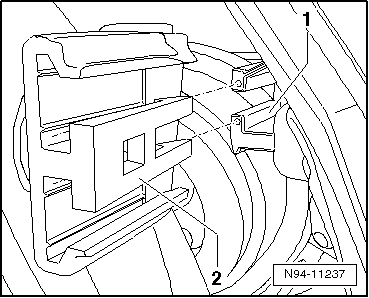
- Slide the mount -1- into the side retainer -2- and lock it secure.
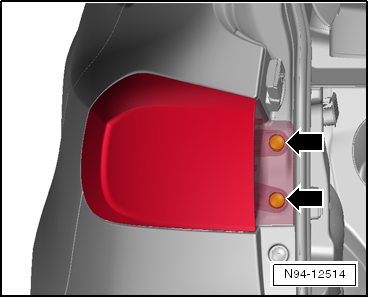
- Tighten both screws in the tail lamp housing -arrows- to the tightening specification given in the assembly overview.
- Install the trim.
- Check the functionality and the gap dimensions of the tail lamp to the body after installing it.
Side Panel Tail Lamp Bulb, Replacing
Note
- The following illustrations show the procedure for replacing the Left Tail Lamp Bulb -M4- in the side panel tail lamp on the left side. Replacing the Right Tail Lamp Bulb -M2- in the side panel tail lamp on the right side is identical.
- The tail lamps works as a brake and tail lamp, depending on how it is activated.
Removing
- Switch off the ignition and all electrical consumers and remove the ignition key.
- Remove the side panel tail lamps.
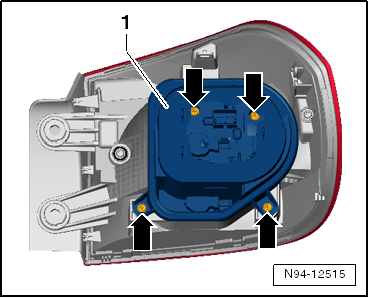
- Remove the four screws -arrows- and then remove the bulb holder -1- from the tail lamp.
- Push the tail lamps -1- into the bulb socket, turn it in the direction of -arrow- and remove it from the bulb holder.

Tail lamps: 12V, 21W
Installing
Install in reverse order of removal. Note the following:
- Tighten the screws to the tightening specification given in the overview.
Side Panel Turn Signal Bulbs, Replacing
Note
The following illustrations show the procedure for replacing the Left Rear Turn Signal Bulb -M6- in the side panel tail lamp on the left side. Replacing the Right Rear Turn Signal Bulb -M8- in the side panel tail lamp on the right side is identical.
Removing
- Switch off the ignition and all electrical consumers and remove the ignition key.
- Remove the side panel tail lamps.
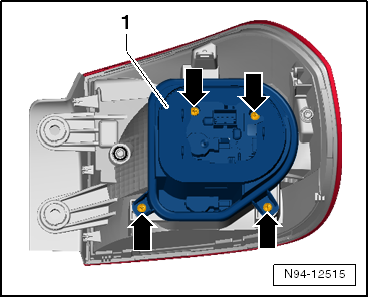
- Remove the four screws -arrows- and then remove the bulb holder -1- from the tail lamp.
- Push the turn signal bulb -2- into the bulb socket, turn it in the direction of -arrow- and remove it from the bulb holder.

Turn signal bulb: 12V 21W
Installing
Install in reverse order of removal. Note the following:
- Tighten the screws to the tightening specification given in the overview.
Rear Lid Tail Lamps
General Information
Note
Additional information:
- Refer to Self Study Program; No 404; The Tiguan.
- Refer to → Wiring diagrams, Troubleshooting & Component locations
Malfunction Recognition and Malfunction Indicator:
Vehicle electrical system control is equipped with OBD which assists in Fault Finding.
Use the Vehicle Diagnostic Tester in "Guided Fault Finding".
Note
- The following illustrations show the work procedures on the rear lid tail lamp on the left side of a RHD vehicle. Working on the right rear lid tail lamp is identical.
- USA and Canada vehicles do not have a rear fog lamp.
Overview - Rear Lid Tail Lamp
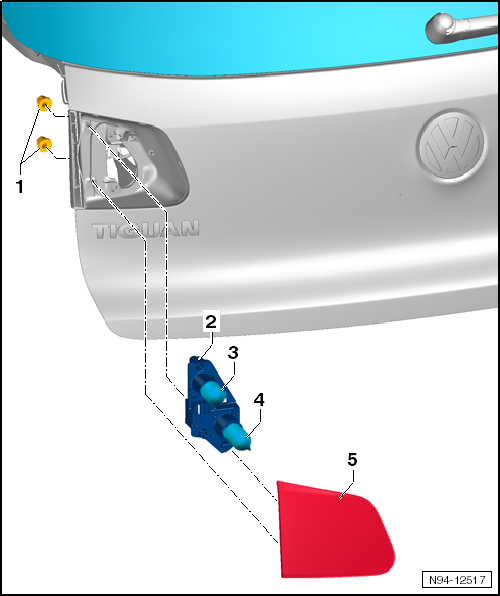
- Nuts
- 3 N·m
- Follow the tightening sequence.
- Bulb Holder
- Removing and installing.
- Right Tail Lamp Bulb -M2- or Left Tail Lamp Bulb -M4-
- Replacing.
- Left Rear Fog Lamp Bulb -L46- or Right Rear Fog Lamp Bulb -L47-
- Not available for North America
- Tail Lamp Housing in Rear Lid
- Removing and installing.
Rear Lid Tail Lamp, Removing and Installing
Special tools and workshop equipment required
- Torque Wrench 1783 - 2-10Nm -VAG1783-
Note
The following illustrations show the procedure for removing and installing the rear lid tail lamp on the left side. Removing and installing the rear lid tail lamp on the right side is identical.
Removing
- Switch off the ignition and all electrical consumers and remove the ignition key.
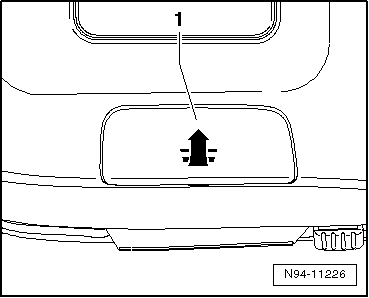
- Unclip the service cover -1- and remove it from the trim panel in the direction of -arrow-.
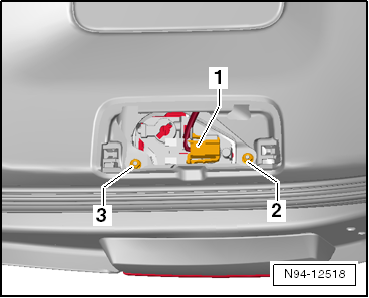
- Disconnect the connector -1-.
- Remove the nuts -2- and -3- and remove the tail lamp from the rear lid.
Installing
Install in reverse order of removal. Note the following:
Note
When mounting the tail lamp connector into the rear lid, it must "audibly" latch.
- Install the tail lamp into the opening in the body and lift it upward in the center.
- Tighten the upper nut -2- first and then the lower nut -3- to the to the tightening specification.
- Check the functionality and the gap dimensions of the tail lamp to the body after installing it.

Rear Lid Tail Lamp Bulb, Replacing
Note
The following illustrations show the procedure for replacing the Left Tail Lamp Bulb -M4- on a RHD vehicle. Replacing the Right Tail Lamp Bulb -M2- is identical.
Removing
- Switch off the ignition and all electrical consumers and remove the ignition key.
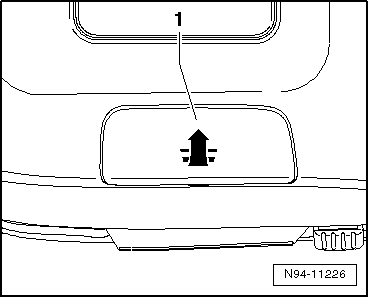
- Unclip the service cover -1- and remove it from the trim panel in the direction of -arrow-.
- Disconnect the connector -1-.

- Push the retainer -1- in the direction of -arrow- and remove the bulb holder -2-.

- Pull the tail lamp bulb -1- in the direction of -arrow- straight out of the bulb socket in the bulb holder -3-.

Tail lamp bulb: 12V, 16W
Installing
Install in reverse order of removal. Note the following:
- After installation, check the tail lamp functions.
Test yourself
A quick Volkswagen Tiguan quiz: every answer comes with an explanation and a link to the manual page.