Covers and Padding, Front Seats
Assembly Overview - Cover and Padding, Seat Pan

Note
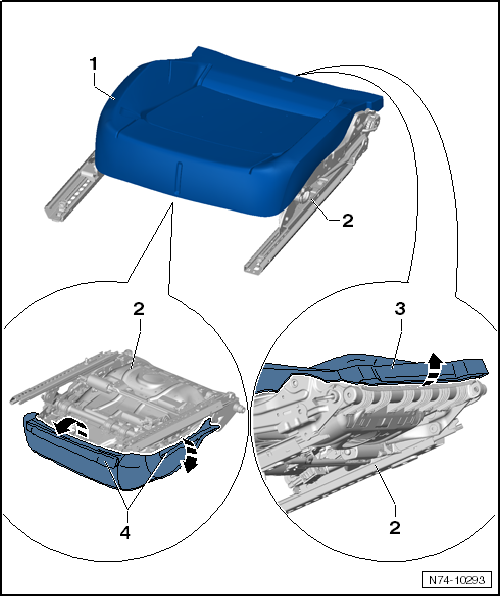
The illustration shows the cover and padding of the seat pan, driver side. The cover and padding of the seat pan, passenger side, is mirror image accordingly.
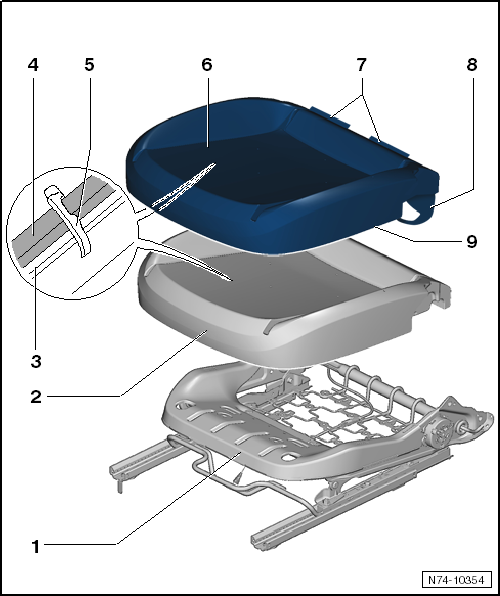
- Seat pan
- Pad
- Assignment → Electronic Parts Catalog
- Remove and install
- Wire
- for fastening cover of seat pan to padding of seat pan
- Contour strip
- sewn to cover of seat pan
- for fastening cover of seat pan to padding of seat pan
- Padding clip
- for fastening cover of seat pan to padding of seat pan
- replace after every removal
- Cover
- Assignment → Electronic Parts Catalog
- after installation, check seat for wrinkle-free fit
- Remove and install
- Profile
- sewn to cover of seat pan
- for hooking cover of seat pan onto upper frame of seat pan
- Retaining strap
- for securing cover of seat pan to padding of seat pan
- Profile
- sewn to cover of seat pan
- for hooking cover of seat pan onto wire frame of seat pan
Assembly Overview - Cover and Padding, Backrest

Note
The illustration shows the cover and padding of the front backrest, driver side. The cover and padding of the front backrest, passenger side, is mirror image accordingly.
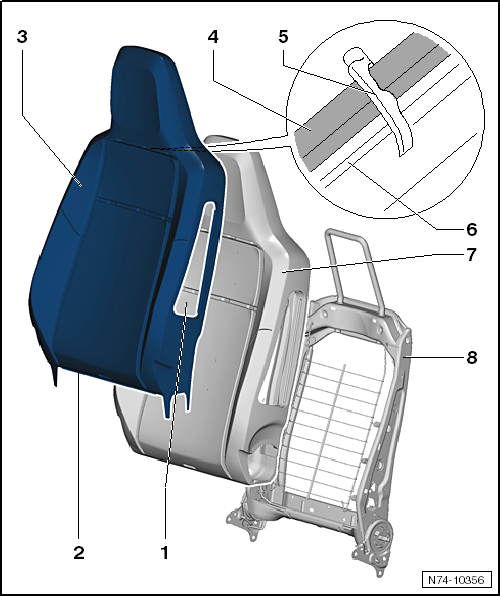
- Airbag cutout
- for side airbag
- Zipper
- sewn to cover of backrest
- Zipper closer for zipper -1S0.881.451-
- Cover
- Assignment → Electronic Parts Catalog
- after installation, check seat for wrinkle-free fit
- Remove and install
- Contour strip
- sewn to cover of backrest
- for fastening cover of backrest to padding of backrest
- Padding clip
- for fastening cover of backrest to padding of backrest
- replace after every removal
- Wire
- for fastening cover of backrest to padding of backrest
- Pad
- Assignment → Electronic Parts Catalog
- Remove and install
- Backrest frame
Assembly Overview - Seat Heating Element

Note
The illustration shows the cover and padding of the front backrest, driver side. The cover and padding of the front backrest, passenger side, is mirror image accordingly.
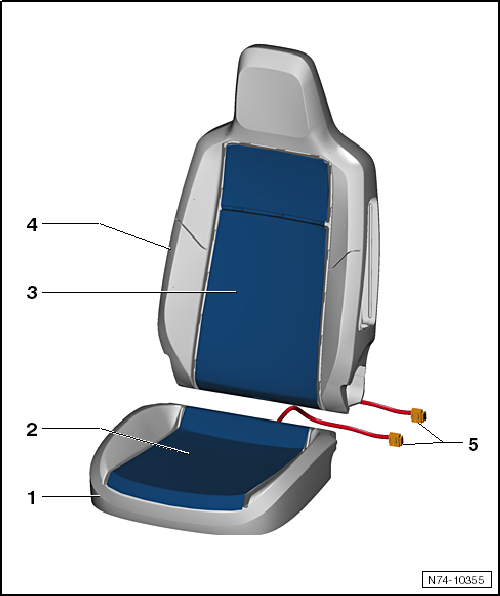
- Pad
- Assignment → Electronic Parts Catalog
- Remove and install
- Heating element, heated driver seat -Z6-
- Passenger side: heated passenger seat -Z8-
- Assignment → Electronic Parts Catalog
- Remove and install
- Heating element, heated driver seat backrest -Z7-
- Passenger side: heated passenger seat backrest -Z9-
- Assignment → Electronic Parts Catalog
- Remove and install
- Pad
- Assignment → Electronic Parts Catalog
- Remove and install
- Electrical lead
Removing and installing cover and padding on seat pan
Required Special Tools, Test and Measuring Equipment and Auxiliary Items
- Padding clip pliers -V.A.G 1634-

Note
Removal and installation of the respective front passenger seat is performed in mirror image accordingly.

WARNING!
- If the padding, front seat cushion on the passenger side is replaced, the passenger seat occupancy sensor -G128- must always be replaced as well.
- Replace passenger seat occupancy sensor -G128-.
Removing
- Remove front seat.
- Remove front seat belt buckle.
- Remove trim on front seat.
- Remove the front backrest.

- Unhook profile -3- from the holders.
- Unhook profiles -4- from the holders on the sides of seat pan -2-.
- Remove cover and padding -1-.
- Depending on vehicle equipment, disconnect any existing electrical connectors.
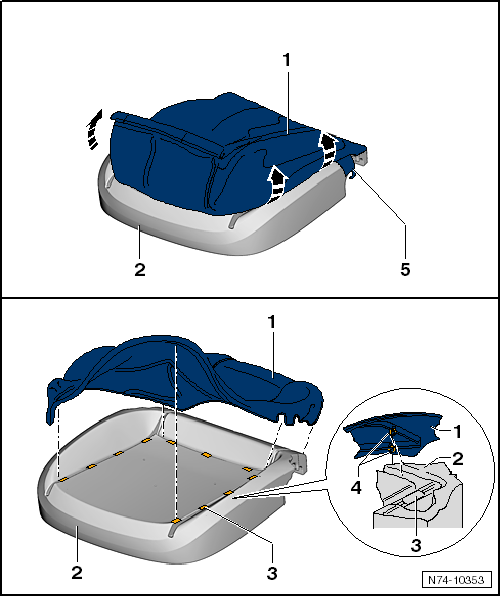
- Fold the outer edges of cover -1- upward all around in -arrow direction- away from padding -2-.
- Fold retaining strap -5- over the padding.
- Remove padding clips -4- of cover -1- from padding holders -3-.
- Remove cover -1-.
Installing

Note
Before installation, check all fasteners for damage and replace them if necessary.
Installation is carried out in the reverse order of removal, observing the following:
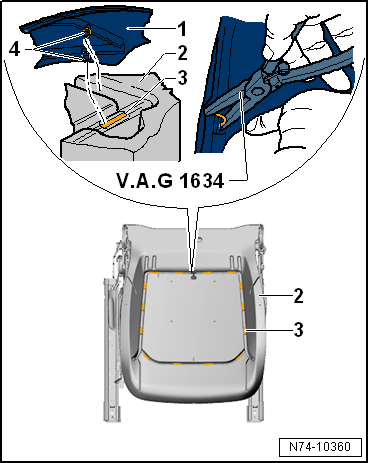
- Fasten cover -1- to padding -2- all around at the specified points -3- with new padding clips -4- using padding clip pliers -V.A.G 1634-.
Removing and installing cover and padding on backrest
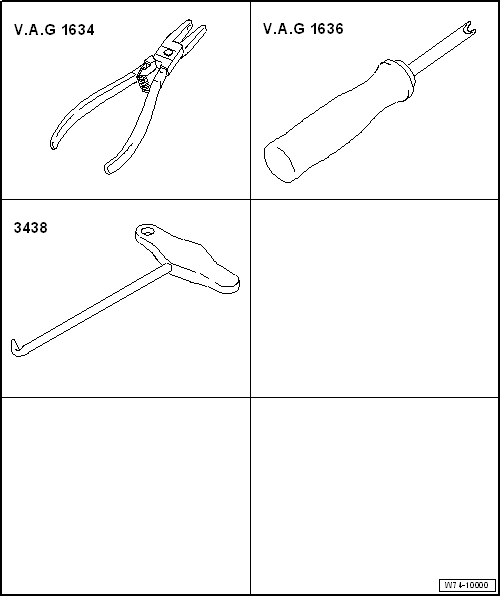
Required Special Tools, Test and Measuring Equipment and Auxiliary Items
- Padding clip pliers -V.A.G 1634-
- Awl -V.A.G 1636-
- Hook -3438-
Zipper closer for zipper -1S0.881.451-
Assignment → Electronic Parts Catalog

Note
Removal and installation of the respective front passenger seat is performed in mirror image accordingly.
Removing
- Remove front seat.
- Remove front seat belt buckle.
- Remove trim on front seat.
- Remove the front backrest.
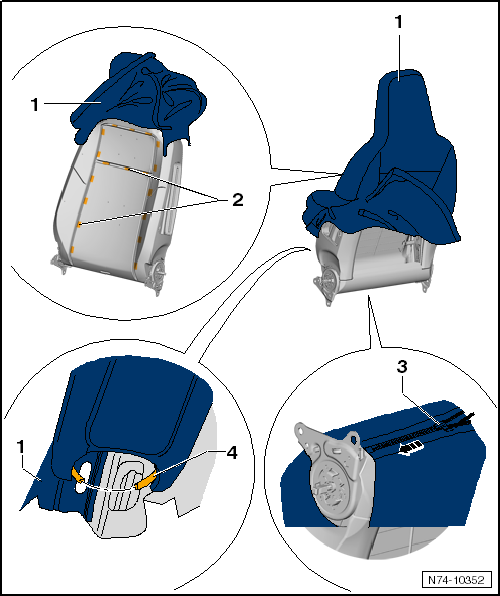
- Open zipper -3- in -arrow direction-.
- Fold cover -1- up slightly.
- Remove padding clips -4- of cover -1- from padding holders -2-, starting from the bottom.
- Fold the backrest cover -1- further upward until all padding clips -4- can be removed.
- Slide cover -1- over the head restraint and remove it from the padding.
- Depending on vehicle equipment, disconnect any existing electrical connectors.
Cover with knee recess
- Unhook retaining wire -2- on right and left from wire frame -4- using awl -V.A.G 1636--1- and hook -3438--3-.
Continuation for all

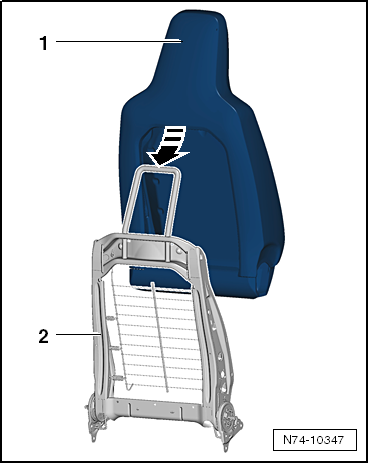
- Press padding -1- outward on the right and left sides -arrows-.
- Press padding -1- at the bottom over the backrest frame -arrows-.

- Remove padding -1- from backrest frame -2-.
Installing

Note
Before installation, check all fasteners for damage and replace them if necessary.

Note
The zipper of the backrest cover must be closed using zipper closer -1S0.881.451-.
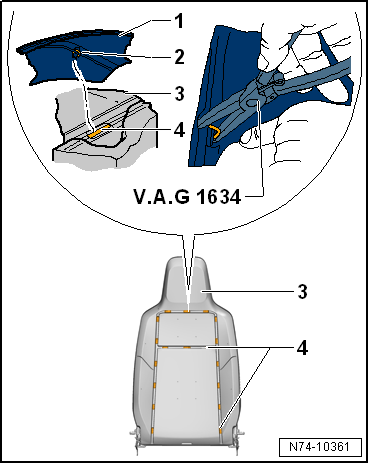
Installation is carried out in the reverse order of removal, observing the following:

Note
The sequence -1- to -14- of the padding clips to be fastened must be followed.

- Start sliding cover -1- on at the head restraint.
- Fasten cover -1- to padding -3- at the specified points -4- with new padding clips -2- using padding clip pliers -V.A.G 1634-.
Removing and installing seat heating element

Note
Removal and installation are described for the left seat. Removal and installation of the right seat is performed accordingly.
Removing
- Remove cover and padding from seat pan.

Note
The padding and the seat heating element are glued together.
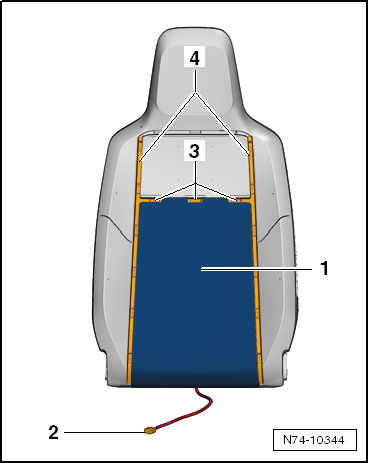
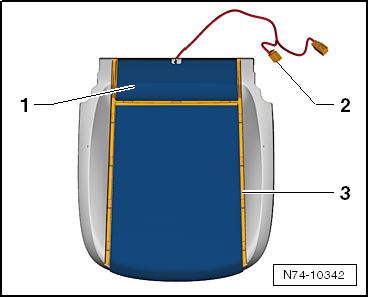
- Pull seat heating element -1- off padding -2-.
- Route electrical lead through the opening in the padding.
Installing

Note
- Make sure the seat heating element is glued without wrinkles.
- The adhesive strip can only be used once.
Installation is carried out in the reverse order of removal, observing the following:
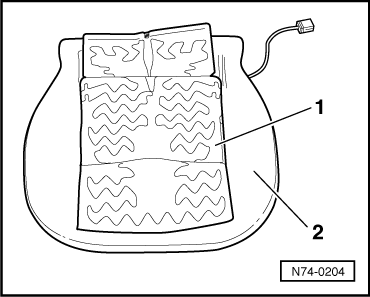
- Route electrical lead -2- through the opening in the padding.
- Align seat heating element -1- with the seam channels -3-.
- Peel off protective film and glue the seat heating element in place, starting at the rear.
Removing and installing backrest heating element

Note
Removal and installation are described for the left seat. Removal and installation of the right seat is performed accordingly.
Removing
- Remove cover and padding from backrest.

Note
The padding and the backrest heating element are glued together.
- Peel backrest heating element -2- off padding -1-.
- Guide electrical wire -3- through the opening in the padding.
Installing

Note
- Make sure the backrest heating element is glued on without wrinkles.
- The adhesive strip can only be used once.
Installation is carried out in the reverse order of removal, observing the following:
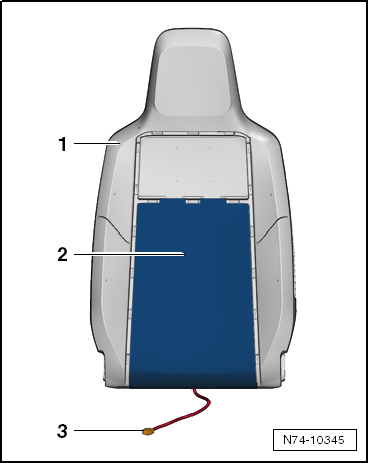
- Route electrical lead -2- through the opening in the padding.
- Align backrest heating element -1- with seam channels -3- and -4-.
- Peel off the protective film and glue the backrest heating element in place, starting at the top.