Technical Data
Safety Information
Safety precautions when working on pyrotechnic components

Note
Pyrotechnic components are:
- Airbag units
- Belt tensioners
- Belt force limiters (equipment dependent)
- Battery disconnect elements (equipment dependent)
General
- Only trained personnel may carry out testing, installation and repair work.
- There are no replacement intervals for airbag units.
- Never test with a test lamp, voltmeter or ohmmeter.
- Pyrotechnic components may only be tested while installed and with diagnostic, measurement and information systems approved by the manufacturer.
- When working on pyrotechnic components and on the airbag control unit -J234-, the battery ground strap must be disconnected with the IGNITION ON. Then cover the negative terminal.
- After disconnecting the battery, a waiting time of 10 seconds is required.
- The battery must be connected with the IGNITION ON. No person may be in the vehicle interior during this. Exception: vehicles with battery in the vehicle interior. Do not stay within the active range of the airbags and seat belts during this.
- Measures after connecting the battery → Electrical System; observe.
- Before handling pyrotechnic restraint system components, for example disconnecting the electrical connector, the technician must discharge static electricity. Electrostatic discharge is achieved by touching grounded metal parts, for example by briefly touching the door striker.
- After touching deployed pyrotechnic restraint components, wash hands.
- Pyrotechnic components must neither be opened nor repaired; only use new parts (risk of injury).
- Pyrotechnic components that have fallen onto a hard surface or show damage must no longer be installed.
- Pyrotechnic components must be installed immediately after removal from the transport container.
- If work is interrupted, return the pyrotechnic component to the transport container.
- Leaving the pyrotechnic component unattended is not permitted.
- When connecting pyrotechnic restraint system components, only the person performing the work may be in the vehicle interior.
- Pyrotechnic components must not be treated with grease, cleaning agents or similar.
- If any contaminants such as oil, grease, paint, lacquer or solvents have penetrated the fabric, the airbag unit must be replaced.
- Pyrotechnic components must not be exposed to temperatures above 100 °C, even briefly.
Storage, transport and disposal of airbag, belt tensioner and battery disconnect units (pyrotechnic components)
- Storage is subject to the respective national legislation.
- Transport is subject to national and international regulations, which specify packaging, marking, labeling and accompanying documents in detail.
- Non-deployed pyrotechnic components must, in accordance with national legislation, be disposed of properly in their original packaging! For questions, please contact your importer.
- Only fully deployed pyrotechnic components may be disposed of with commercial waste.
Airbag safety regulations
- Driver and passenger airbag units, when removed, must be stored with the padded side facing up.
When replacing airbag units, the following sequence must be strictly observed:
- Remove the old airbag unit and place it padded side up.
- Remove the new airbag unit from the transport container and place it padded side up.
- Immediately place the old airbag unit into the transport container.
- Install the new airbag unit in the vehicle.
Additional safety regulations for side airbag
- Under no circumstances may seat covers or protective covers be fitted that are not specifically approved for use on Volkswagen seats with side airbags.
- The backrest padding must not be cut out in the area of the side airbag.
- During installation, the seam in the area of the side airbag must run straight.
- All upholstery clips must be replaced (metal and plastic clips).
- During installation, all upholstery clips must be placed in the same positions as during removal.
- If the cover (cracks, burn holes, etc.) is damaged in the area of the side airbag, the cover must always be replaced for safety reasons, otherwise the side airbag will not deploy correctly.
- Repairs to the seat backrest cover in the area of the side airbag must not be carried out (due to special thread and precisely defined seam).
- After side airbags have deployed, the seat backrest padding must be replaced.
- After an accident, all damaged components must be replaced. If no damage to the airbag unit can be detected, the airbag unit may be reused.
- If side airbag units are replaced, remove the airbag number sticker from the new side airbag unit and stick it over the old sticker on the seat pan.
- Do not pierce the cover with upholstery needles or similar sharp objects in the area of the airbag, front passenger seat occupancy sensor -G128- and the seat occupancy detection mat.
Seat belts
- Belt tensioner units must be handled with the utmost care during removal and installation. Improper handling of belt tensioner units poses a high risk of danger and injury.
- Belt tensioner units that are mechanically damaged (dents, cracks) must be replaced.
- The open end of a belt tensioner must never be pointed at people.
- When connecting the belt tensioner unit, all mechanical parts, including those of the three-point safety belt, must be correctly secured. If connecting the belt tensioner unit is not possible due to lack of space, the belt webbing must be fully rolled up before connecting. In this case there is no increased safety risk if the further safety instructions are observed and followed. These mainly include disconnecting the battery and electrostatically discharging the fitter before connecting the belt tensioner unit.
- Depending on the crash, the belt tensioner may have been triggered while the belt force limiter has NOT been triggered. These components must be handled like untriggered components!
Safety regulations for front side airbag crash sensors (pressure sensors)
The side airbag crash sensors respond to pressure changes and must therefore be handled with particular care. Observe the following points:
- Always observe the correct installation position: install only at the intended mounting location in the door.
- Protect the crash sensor from impacts and knocks: do not reuse crash sensors that have fallen to the floor. For bodywork work on the door, remove the crash sensor.
- The crash sensor is calibrated to the air volume inside the door: deformation of the door that reduces the air space in the door impairs the function of the crash sensor.
- Avoid heavy contamination of the crash sensor: do not use compressed air in the vicinity of the crash sensor. Protect the crash sensor from filings and drill shavings (for example when retrofitting door speakers). Do not use cavity sealant or spray oil in the area of the crash sensor.
- Protection from heat/cold: avoid exposure to heat, for example during painting or other bodywork. The crash sensors must not be exposed to temperatures below -40 ºC (for example in non-climate-controlled aircraft cargo holds).
- Protect the crash sensor from moisture during storage and installation work.
For trouble-free function of the crash sensor, it must be ensured that the door is watertight after reassembly. Observe the following points:
- All components (for example cover, speaker, door trim) must be correctly installed.
- The door trim retaining clips seal the system. Replace retaining clips if necessary.
Replacement of pyrotechnic, electrical and mechanical restraint system components after an accident
Required Special Tools, Test and Measuring Equipment and Auxiliary Items
- Vehicle diagnostic tester

Note
- The airbag control unit can be used with airbag generation 8.* "not 8.R" for up to 2 side and/or belt tensioner activations.
- The airbag control unit can be used with airbag generations 9.*, 10.* and 8.R for up to 2 side, driver and front passenger airbag and/or belt tensioner activations.
- After the third activation, the fault message "Control unit faulty" is displayed.
The airbag control unit must be replaced:
- after a driver or front passenger airbag activation "but not for airbag generations 9.*, 10.* and 8.R"
- after 3 side, driver or front passenger airbag or belt tensioner activations
- if the housing is damaged
- if there is deformation of the tunnel within 200 mm around the control unit
In principle, the following must be replaced:
- all triggered airbag units
- the igniter for battery disconnection -N253-
Additionally after front passenger airbag activation:
- Dash panel
- deformed supports for the front passenger airbag unit (must not be straightened back)
- all front airbag sensors on the front end
- remaining lateral acceleration sensors if the mounting points in the area of the sensors are deformed
Additionally after driver airbag activation:
- reset ring with slip ring
- all front airbag sensors on the front end
- remaining lateral acceleration sensors if the mounting points in the area of the sensors are deformed
Additionally after side airbag activation:
- pressure sensors on the triggered side
- lateral acceleration sensors on the triggered side
- Cover
- Pad
- with fold-down rear seat backrest: side pad (if fitted)
- remaining lateral acceleration sensors if the mounting points in the area of the sensors are deformed
Additionally:
- all retractors with triggered belt tensioners
- all retractors with triggered belt force limiters (equipment dependent)
- seat belt buckles for all retractors with triggered belt tensioners
- belt height adjusters (mechanical and electrical) for all retractors with triggered belt tensioners
- If belt tensioner and/or belt force limiter activation is suspected, connect a vehicle diagnostic tester.
- In "Guided Fault Finding" under "15 - AIRBAG", check whether a crash entry is stored in the airbag control unit.
- Check whether the fault "Resistance too high" is stored for the belt tensioner and/or belt force limiter at the same time. Triggered belt tensioners and/or belt force limiters must meet both conditions. "Prerequisite: the airbag control unit has not yet been replaced".

Note
- The fault "Resistance too high" can also be stored due to an open circuit. In that case there is normally no crash entry.
- Depending on the crash, the belt tensioner may have been triggered while the belt force limiter has "NOT" been triggered. In that case, observe the disposal instructions for pyrotechnic components.
- In addition, observe the point "Checking seat belts".
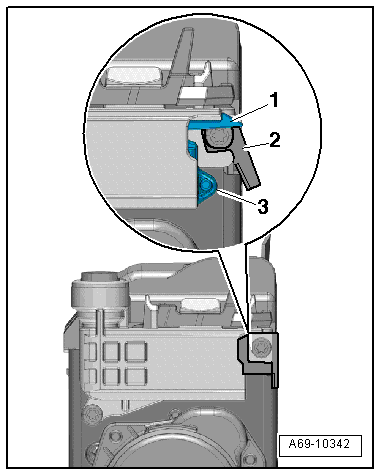
- Triggered belt force limiters can be recognised by the following features:
- The pin -1- and the lug -3- have come out of the housing of the belt force limiter on the retractor.
- The tab -2- no longer stands vertically but points diagonally outwards.
- If parts of the belt system are removed following an accident, the belt system bolts must be replaced.
- If required (visual inspection), the following must also be replaced: all damaged components.
Checking airbag mounting parts after an accident
All damaged mounting parts must always be replaced; straightening back or "making fit" the components is not permitted
The following components must be inspected after the respective airbag deployment.
After a front passenger airbag deployment:
- Center tube for dashboard; the supports for the front passenger airbag and the front passenger airbag unit must be installed without tension. Otherwise, the center tube must also be replaced.
- Check the glove box for damage. If the glove box is damaged, replace it.
After a driver airbag deployment:
- Steering wheel: Remove the steering wheel and place it with the steering wheel rim on a flat surface. The steering wheel rim must rest over its entire surface. Otherwise, replace the steering wheel.
- Check the steering wheel for soot/residue marks. If soot/residue marks are present, replace the steering wheel.
Accident without airbag deployment
- If the airbag warning lamp -K75- does not indicate a fault, replacement of pyrotechnic components is not required. Seat belts must be checked separately.
Checking Seat Belts

WARNING!
After every accident, the seat belt system must be systematically inspected! If damage is found at the test points, advise the customer that the belt must be replaced.
Test points
- Check the webbing.
- Check the retractor (locking function).
- Buckle visual inspection.
- Buckle function test.
- Check the guide fittings and the latch plate.
- Check the fastening parts and fastening points.

Caution!
If the customer declines replacement of a damaged seat belt, make an appropriate note in the service plan.
Checking the webbing
Work sequence
- Pull the webbing completely out of the retractor or the lap belt adjuster tongue.
- Check the webbing for dirt; if necessary, wash with mild soap solution → Owner's Manual.
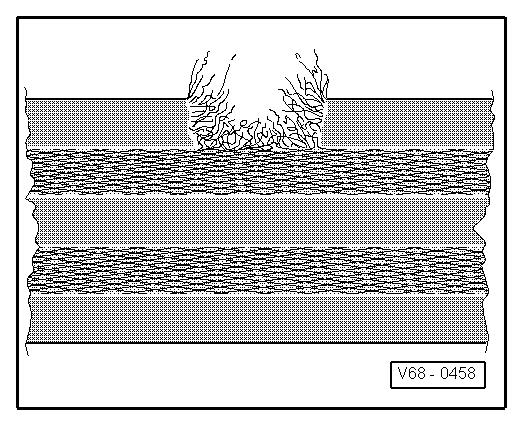
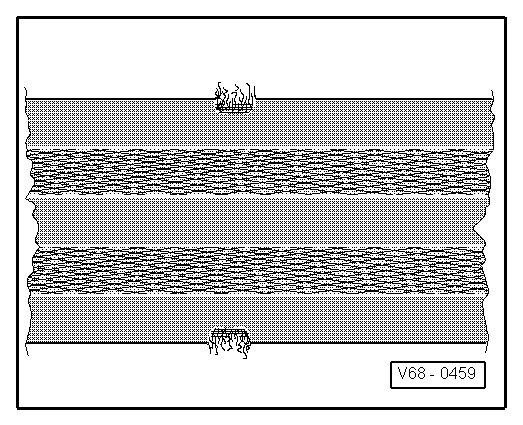
- If one of the damages shown below (1 and 2) is found on an accident vehicle, replace the complete seat belt with buckle.
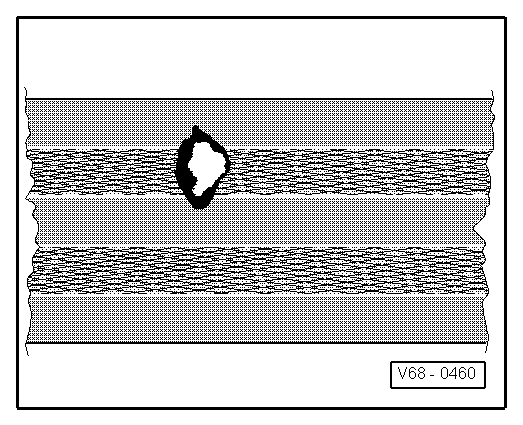
- If damage as described under points 1, 2, 3 is found on a vehicle that was not in an accident, it is sufficient to replace only the damaged seat belt.
- 1 - Webbing cut, torn or abraded.
- 2 - Fabric loops on the webbing edge torn through.
- 3 - Burn marks from cigarettes or similar.
Checking the retractor (locking function)
The retractor has 2 locking functions.
- The first locking function is triggered by quickly pulling the belt out of the retractor (webbing extraction acceleration).
Test 1
- Pull the webbing out of the retractor with a strong jerk.
- No locking action - replace the complete seat belt with buckle.
- If there are faults when extending or retracting the belt, first check whether the position of the retractor has changed.
- The second locking function is triggered by a change in the vehicle's movement (vehicle-dependent locking function).
Test 2

WARNING!
For safety reasons, perform the road test on a route free of traffic so that there is no risk to other road users.
- Fasten the seat belt.
- Accelerate the vehicle to 20 km/h, then perform an emergency stop using the foot brake.
- If the belt is not locked by the blocking device during braking, replace the complete seat belt with buckle.
Buckle visual inspection
- Check the buckle for cracks and chipped areas.
- If damaged, replace the complete seat belt with buckle.
Buckle function test
Check the buckle
- Insert the latch plate into the buckle until it clicks audibly. Pull firmly on the webbing to check that the locking mechanism has engaged.
- If the latch plate does not lock in the buckle even once in at least 5 test runs, replace the complete seat belt with buckle.
Checking the release
- Release the seat belt by pressing the button on the buckle with a finger. With the webbing relaxed, the latch plate must eject from the buckle by itself.
- Perform at least 5 test runs. If the latch plate does not eject even once, replace the complete seat belt with buckle.

WARNING!
Under no circumstances may lubricants be used to eliminate noises or stiffness of the buckle buttons.
Checking the guide fittings and the latch plate
Plastic-coated fittings show fine parallel scoring after load on the belt system (seat belt worn during the accident). (Wear caused by frequent use, on the other hand, is recognized by smooth, streak-free abrasion.)
- Check the plastic for deformation, chipping and cracks.
- If scoring and/or damage is found, replace the complete seat belt with buckle.
Checking the fastening parts and fastening points after an accident
- Buckle latch plate deformed (stretched).
- Height adjuster not functioning.
- Fastening points (seat, pillar, underbody) distorted or threads damaged.
- If damage is found on these parts, replace the complete seat belt with buckle.
- If parts of the seat belt system are removed as a result of an accident, the seat belt system fastening bolts must be replaced.
- Replace the fastening points.

Note
For damage that does not result from an accident, for example wear, replace only the respective damaged part.
Checking the child seat anchorages after an accident
Test points
- The child seat anchorages must be checked for damage and deformation after an accident.
- Child seat anchorages welded or bolted into the body or into the seats or seat backrests must not be repaired or straightened.
- Child seat anchorages bolted into the body or into the seats or seat backrests must be replaced if damaged or deformed.
- The fastening bolts of the child seat anchorages must be replaced if the bracket is damaged.