Parti monouso

Consolle centrale

22passaggi
~132min
4/5difficoltà
010203040509.87N·mlb·ft
Coppia di serraggio indicata in questa pagina
Completati 0 di 22

Contenuto:

Componenti e posizione dei componenti

Componente
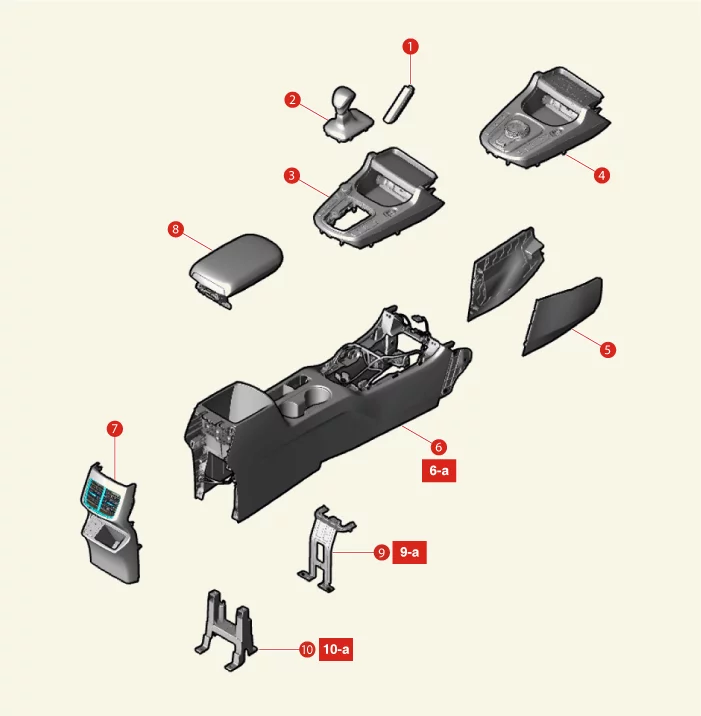
Body (Interior and Exterior) — Floor Console / Components and Components Location / Component illustration
1. Finitura superiore console
2. Gruppo pomello del cambio [Tipo SBC]
3. Copertura superiore console [Tipo SBC]
4. Copertura superiore console [Tipo SBW]
5. Copertura laterale console
6. Gruppo console centrale
6-a. 7.8 - 9.8 N·m
7. Copertura posteriore console
8. Bracciolo della console
9. Staffa di fissaggio centrale console [Tipo SBW]
9-a. 2.9 - 3.9 N·m (0.3 - 0.4 kgf·m, 2.2 - 2.9 lb·ft, 26 - 34.7 lb·in)
10. Staffa di fissaggio posteriore console
10-a. 2.9 - 3.9 N·m (0.3 - 0.4 kgf·m, 2.2 - 2.9 lb·ft, 26 - 34.7 lb·in)

Rimozione e installazione della copertura superiore della console

Rimozione

[Tipo SBC]
  1. Scollegare il terminale negativo (-) della batteria.
  2. Rimuovere la finitura superiore della console (A).
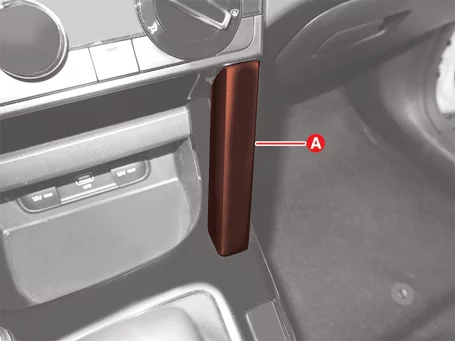
    Body (Interior and Exterior) — Floor Console / Console Upper Cover / Removal and Installation / Removal illustration
    Body (Interior and Exterior) — Floor Console / Console Upper Cover / Removal and Installation / Removal illustration
    Information
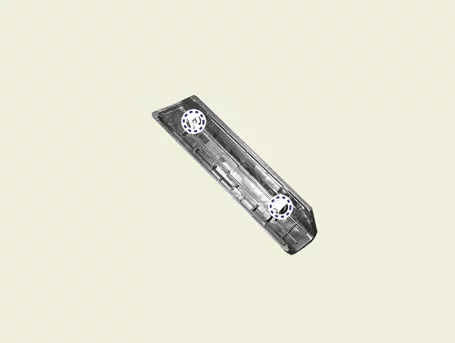
    Posizione delle clip:
    Body (Interior and Exterior) — Floor Console / Console Upper Cover / Removal and Installation / Removal illustration
  3. Rimuovere la finitura posteriore superiore della console (A) dopo aver rimosso le viti.
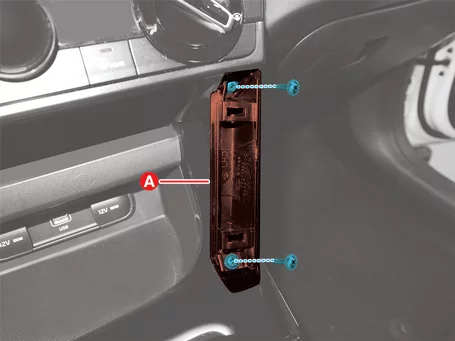
    Body (Interior and Exterior) — Floor Console / Console Upper Cover / Removal and Installation / Removal illustration
  4. Rimuovere il pomello del cambio (A) nella direzione della freccia.
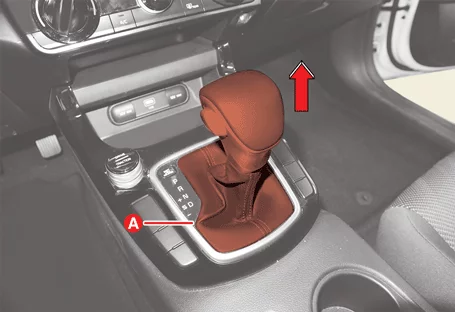
    Body (Interior and Exterior) — Floor Console / Console Upper Cover / Removal and Installation / Removal illustration
  5. Rimuovere il coperchio superiore della consolle (A).
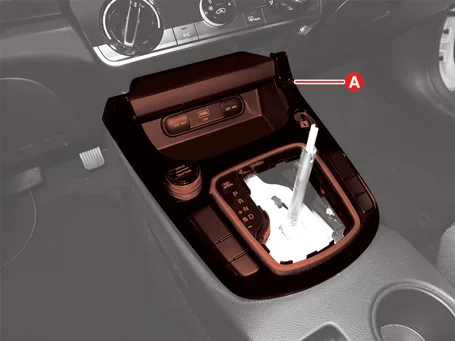
    Body (Interior and Exterior) — Floor Console / Console Upper Cover / Removal and Installation / Removal illustration
    Body (Interior and Exterior) — Floor Console / Console Upper Cover / Removal and Installation / Removal illustration
    Information
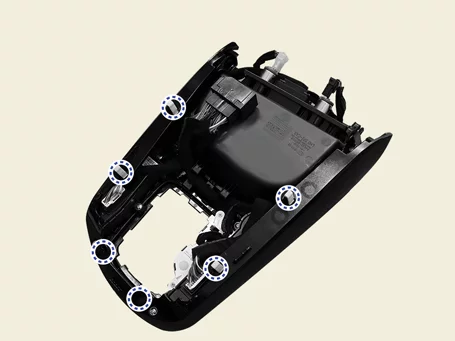
    Posizione delle clip:
    Body (Interior and Exterior) — Floor Console / Console Upper Cover / Removal and Installation / Removal illustration
  6. Scollegare il connettore principale e la presa multimediale (A).
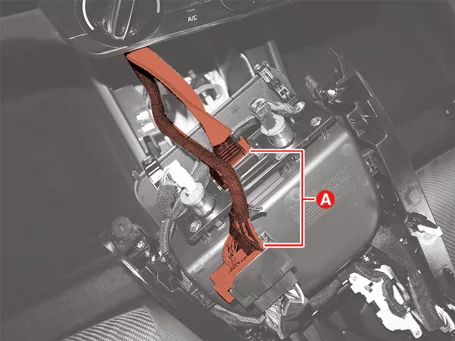
    Body (Interior and Exterior) — Floor Console / Console Upper Cover / Removal and Installation / Removal illustration

Installazione

  1. Installare seguendo la procedura inversa a quella di rimozione.

Rimozione e installazione del gruppo consolle centrale

Rimozione

  1. Rimuovere la copertura superiore della console. (Fare riferimento a Console centrale - "Copertura superiore console")
  2. Scollegare il connettore della console centrale (A).
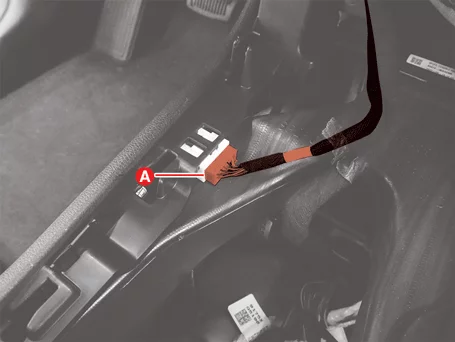
    Body (Interior and Exterior) — Floor Console / Floor Console Assembly / Removal and Installation / Removal illustration
  3. Rimuovere il coperchio laterale della console pavimento (A).
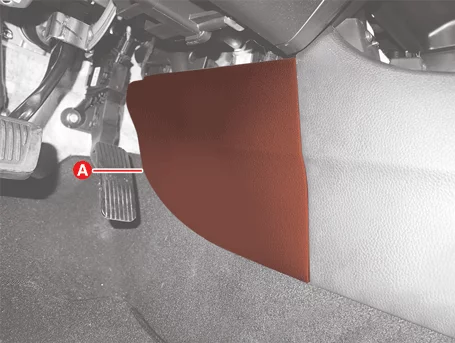
    Body (Interior and Exterior) — Floor Console / Floor Console Assembly / Removal and Installation / Removal illustration
    Body (Interior and Exterior) — Floor Console / Floor Console Assembly / Removal and Installation / Removal illustration
    Information
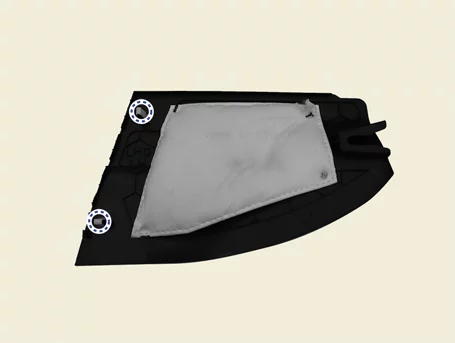
    Posizione delle clip:
    Body (Interior and Exterior) — Floor Console / Floor Console Assembly / Removal and Installation / Removal illustration
  4. Rimuovere la copertura del freno a mano (A).
    Body (Interior and Exterior) — Floor Console / Floor Console Assembly / Removal and Installation / Removal illustration
  5. Rimuovere il rivestimento del vano portaoggetti (A).
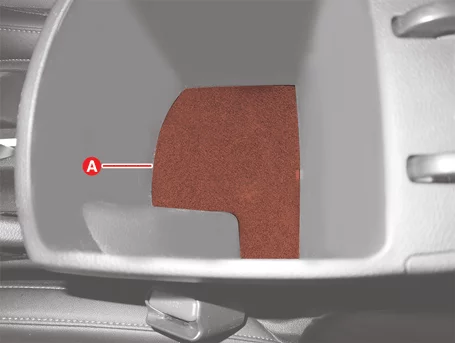
    Body (Interior and Exterior) — Floor Console / Floor Console Assembly / Removal and Installation / Removal illustration
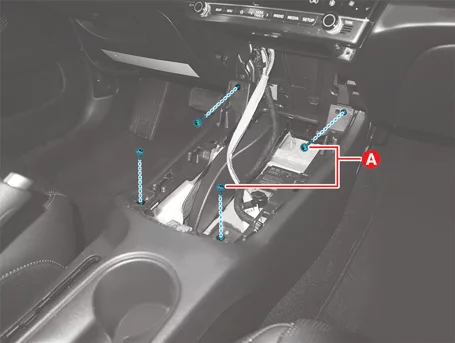
  6. Rimuovere i bulloni del gruppo console (A).

    Coppia di serraggio: 7.8 - 9.8 N·m
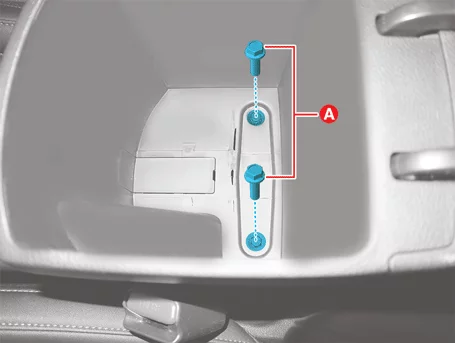
    Body (Interior and Exterior) — Floor Console / Floor Console Assembly / Removal and Installation / Removal illustration
  7. Rimuovere le viti del gruppo console (A).
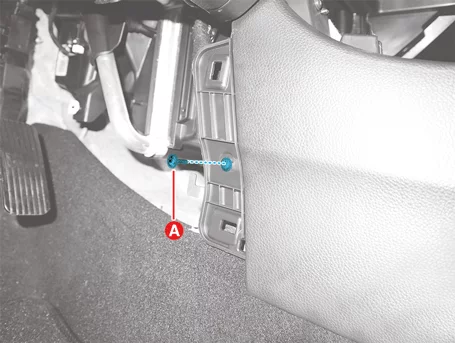
    Body (Interior and Exterior) — Floor Console / Floor Console Assembly / Removal and Installation / Removal illustration
    Body (Interior and Exterior) — Floor Console / Floor Console Assembly / Removal and Installation / Removal illustration
  8. Rimuovere il gruppo consolle centrale (A).
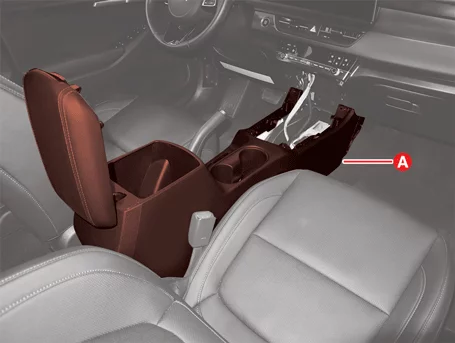
    Body (Interior and Exterior) — Floor Console / Floor Console Assembly / Removal and Installation / Removal illustration
  9. Rimuovere la bocchetta di ventilazione posteriore (A).
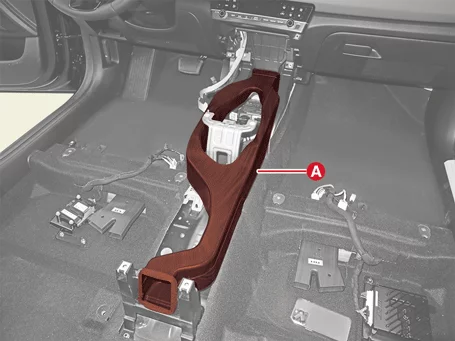
    Body (Interior and Exterior) — Floor Console / Floor Console Assembly / Removal and Installation / Removal illustration
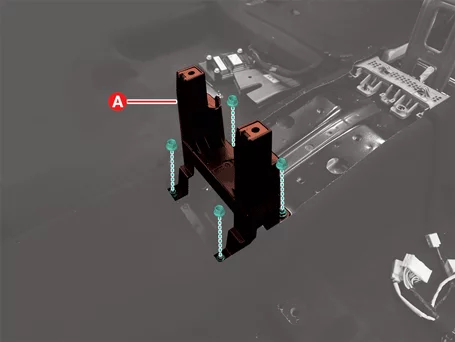
  10. Rimuovere la staffa di fissaggio della console (A). Coppia di serraggio : 2.9 - 3.9 N·m (0.3 - 0.4 kgf·m, 2.2 - 2.9 lb·ft, 26 - 34.7 lb·in)
    Body (Interior and Exterior) — Floor Console / Floor Console Assembly / Removal and Installation / Removal illustration
    Body (Interior and Exterior) — Floor Console / Floor Console Assembly / Removal and Installation / Removal illustration

Installazione

  1. Installare seguendo la procedura inversa a quella di rimozione.

Rimozione e installazione della copertura posteriore della console

Rimozione

  1. Rimuovere il gruppo consolle centrale. (Vedere Consolle centrale - "Gruppo consolle centrale")
  2. Scollegare il connettore del caricatore USB (A).
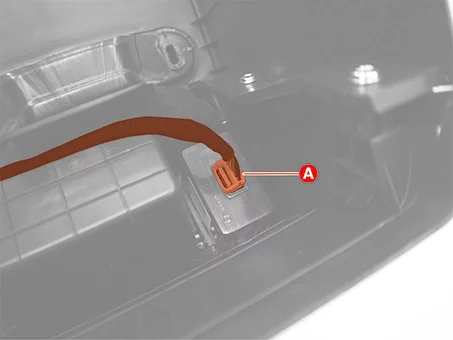
    Body (Interior and Exterior) — Floor Console / Rear Console Cover / Removal and Installation / Removal illustration
  3. Rimuovere le viti di fissaggio (A).
    Body (Interior and Exterior) — Floor Console / Rear Console Cover / Removal and Installation / Removal illustration
  4. Rimuovere la copertura posteriore della console (A).
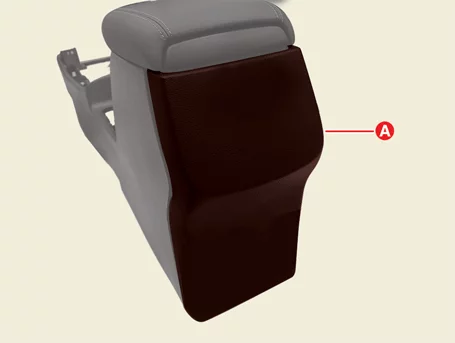
    Body (Interior and Exterior) — Floor Console / Rear Console Cover / Removal and Installation / Removal illustration
    Body (Interior and Exterior) — Floor Console / Rear Console Cover / Removal and Installation / Removal illustration
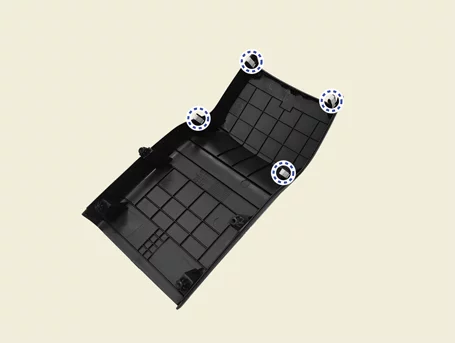
    Information
    Posizione delle clip:
    Body (Interior and Exterior) — Floor Console / Rear Console Cover / Removal and Installation / Removal illustration

Installazione

  1. Installare seguendo la procedura inversa a quella di rimozione.

Rimozione e installazione del bracciolo della console

Rimozione

  1. Rimuovere la copertura posteriore della console. (Fare riferimento a Console centrale - "Copertura posteriore console")
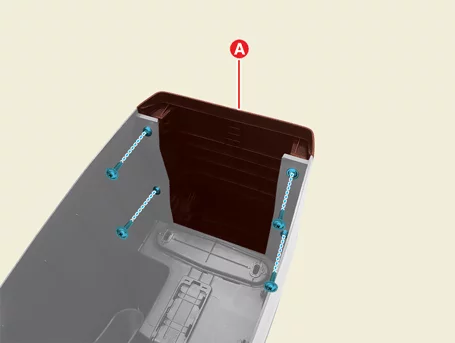
  2. Rimuovere il bracciolo della consolle (A) dopo aver rimosso le viti.
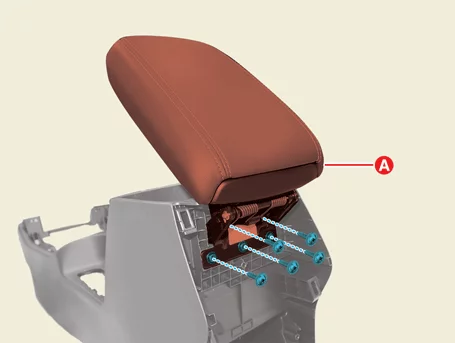
    Body (Interior and Exterior) — Floor Console / Console Armrest / Removal and Installation / Removal illustration

Installazione

  1. Installare seguendo la procedura inversa a quella di rimozione.