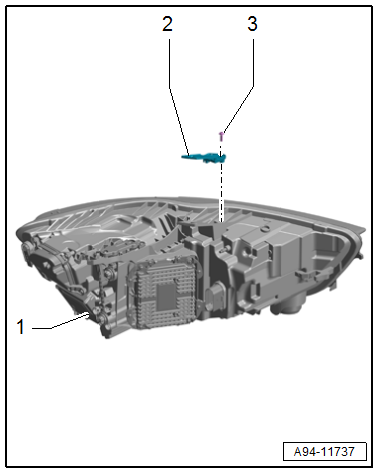
Headlamp Fan, Removing and Installing
Left and Right Headlamp Fan -V407-/-V408-, Removing and Installing, through MY 2014
Special tools and workshop equipment required
- Spark Plug Pliers -VAG1922-
 Caution
Danger of causing damage to the vehicle electronics.
- Requirement: Make sure nothing, especially metal or other light weight particles, can get into the headlamp housing.
- Make sure also no oil, grease, silicone or other such materials can get into an open headlamp, otherwise they can turn into steam and fog up the headlamp.
- Touching electronic circuits with bare hands can lead to migration.
- ESD (electrostatic discharge) protection: Always follow standard DIN EN 613-40-5-1 when handling.
- Do not use any components or electronics that have fallen down.
- ESD Work Surface -VAS6613-. Refer to → Electrical System General Information; Rep. Gr.97; ESD Work Surface VAS6613.
 DANGER!
Damaged high voltage components may produce dangerously high voltage.
Note the following when working near high voltage components and cables:
- Do not use tools that have sharp edges, that are used for cutting or shaping, or that generate heat, such as welding, soldering, hot air or thermal adhesive equipment.
- Inspect the high voltage components in the area where the work will be performed before starting the procedure.
- Perform a visual inspection of the Electric Drive Power and Control Electronics -JX1-, the Electro-Drive Drive Motor -V141-, the Electrical A/C Compressor -V470- and the high voltage cables when working inside the engine compartment.
- Perform a visual inspection of the high voltage cables and the covers when working on the floor panel.
- Perform a visual inspection of the high voltage cables and the electro-box with the High Voltage System Maintenance Connector -TW- when working in the rear of the vehicle.
- Perform a visual inspection of all of the potential equalization cables.
Note the following when performing the visual inspection:
- None of the components may display any exterior damage.
- The high voltage cable insulation and the potential equalization cables may not be damaged.
- The high voltage cables may not be deformed in any way.
- Each high voltage component muss be labeled with a red warning label.
Removing
- On the right: remove the air filter housing. Refer to → 6-Cylinder TDI Common Rail 3.0L 4V Engine; Rep. Gr.23; Air Filter; Air Filter Housing, Removing and Installing or → Rep. Gr.24; Air Filter; Air Filter Housing, Removing and Installing.
- Left: If equipped, remove the resonator with air filter. Refer to → Rep. Gr.26; Secondary Air Injection System; Secondary Air Injection Pump Motor V101, Removing and Installing.
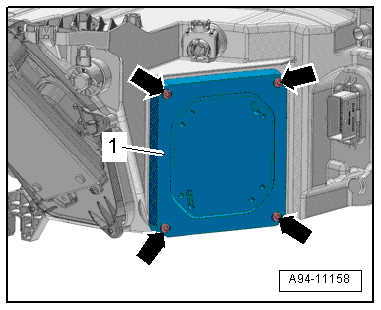
- Remove the bolts -arrows-.
- Remove the housing cover -1-.
- Disconnect the connector -2- on the power output stage by pressing the release buttons in direction of -arrows- using the Spark Plug Pliers -VAG1922-.
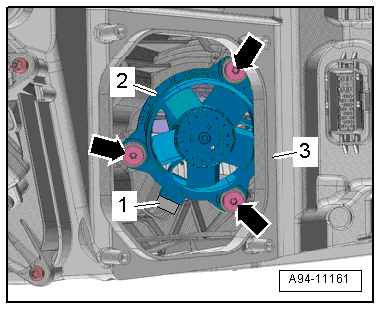
- Remove the housing cover -1-.

- Remove the bolts -arrows-.
- Remove the fan -2- from the headlamp housing -3-.
- Disconnect the connector -1-.
Installing
Install in reverse order of removal. Note the following:
- Close the housing cover and tighten the bolts.
Left/Right Headlamp Fan -V407-/-V408-, Removing and Installing, from MY 2015
Removing
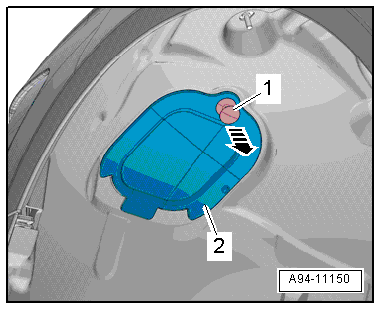
- Loosen the expanding clip -1- and disengage the cap -2- from the front wheel housing liner in direction of -arrow-.
 Note
Depending on the date of manufacture, a bolt may be installed instead of the expanding clip.
- Loosen the front wheel housing liner and move it to the side. Refer to → Body Exterior; Rep. Gr.66; Wheel Housing Liner; Front Wheel Housing Liner, Removing and Installing.
- Remove the bolts -arrows-.
- Remove the housing cover -5-.
- Remove the bolts -2 and 4-.
- Remove the mount -3- and fan from the housing cover -1-.

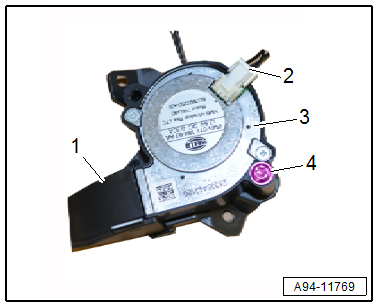
- Press the release button and disconnect the connector -2-.
- Remove the screw -4- and then remove the fan -3- from the mount -1-.
Installing
Install in reverse order of removal. Note the following:
- Close the housing cover and tighten the bolts.
Left/Right Headlamp Fan 2 -V463-/-V464-, Removing and Installing
Removing
- Loosen the expanding clip -1- and disengage the cap -2- from the front wheel housing liner -arrow-.
Note
Depending on the date of manufacture, a bolt may be installed instead of the expanding clip.
- Loosen the front wheel housing liner and move it to the side. Refer to → Body Exterior; Rep. Gr.66; Wheel Housing Liner; Front Wheel Housing Liner, Removing and Installing.
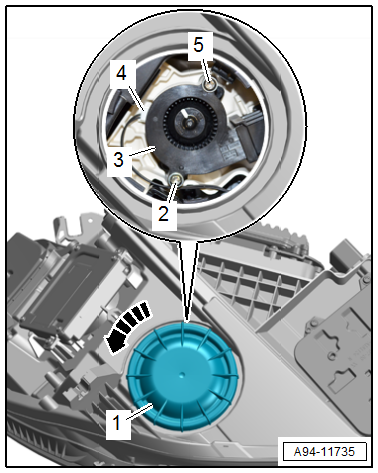
- Turn the housing cover -1- counter-clockwise -arrow- and remove it from the headlamp housing.
- Remove the bolts -2 and 5-.
- Remove the fan -3-.
- Press the release button and disconnect the connector -4-.
Installing
Install in reverse order of removal.
Headlamp Housing Repair Kit, Installing
Headlamp Housing Repair Kit, Installing, HID Headlamp
Note
- Headlamp mounting tabs that have broken off can be replaced by installing the repair set. Completely replacing the headlamp is not necessary.
- There are different repair kits for left and right headlamps. Refer to Parts Catalog.
Procedure
- Remove the headlamp with the broken tabs. Refer to → Chapter "Headlamp Housing, Removing and Installing, HID Headlamp and LED Headlamp from MY 2015".
- Remove the rest of the broken tab on the headlamp housing.
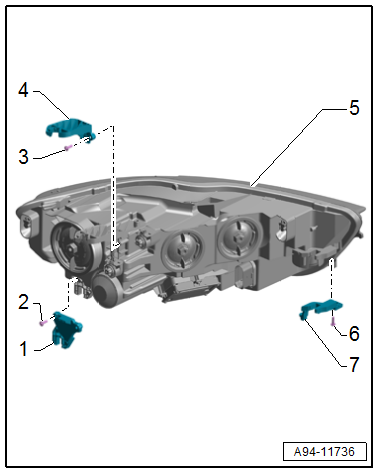
- Install the repair kit mounting tabs -1, 4 and 7- on the headlamp housing -5- and secure the tab with bolts -2, 3 and 6-.
Headlamp Housing Repair Kit, Installing, LED Headlamp
Note
- Headlamp mounting tabs that have broken off can be replaced by installing the repair set. Completely replacing the headlamp is not necessary.
- There are different repair kits for left and right headlamps. Refer to Parts Catalog.
Procedure
- Remove the headlamp with the broken tabs. Refer to → Chapter "Headlamp Housing, Removing and Installing, HID Headlamp and LED Headlamp from MY 2015".
- Remove the rest of the broken tab on the headlamp housing.
- Install the repair kit mounting tab -2- on the headlamp housing -1- and secure the tab with the bolts -2-.