Input Shaft Seal, Replacing
Input Shaft Seal, Replacing, 0BC
Special tools and workshop equipment required
- Puller - Multiple Use -VW391-
- Slide Hammer Set - Adapter 40 - VW771/40- from the Slide Hammer Set - VW771-
- Retainer - Drive Flange - 3028-
- Puller - Unit Injector -T10055-
- -2-Puller - Unit Injector - Adapter 2 -T10055/2-
- Seal Installer - Driveshaft Flange -T40109-
- Seal Installer - Input Shaft - Guide Sleeve -T40222/1-
- Sealing Grease -G 052 128 A1-
- Two M 8 x 30 Bolts
- One M 8 x 45 bolt
Removing
- Rear final drive installed
- Pay attention to the general repair information. Refer to → Chapter "Repair Information".
- Disconnect the exhaust system at the clamping sleeves -1 and 2-.
- Remove the rear section of the exhaust system. Refer to → Rep. Gr.26; Exhaust Pipes/Mufflers; Overview - Muffler.
 Note
A second technician is needed to help remove the rear section of the exhaust system.

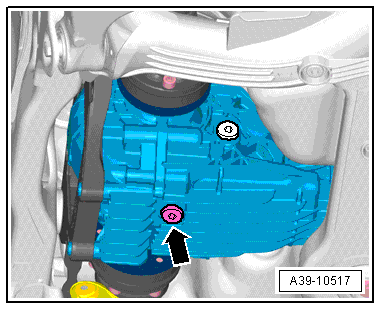
- Open the gear oil drain plug -arrow- and allow approximately 250 ml of gear oil to drain out.
- Install the drain plug -arrow- and tighten it.
- Tightening specification 30 N·m.
- Remove the driveshaft from the rear final drive. Refer to → Chapter "Drive Shaft, Removing and Installing from Rear Final Drive".
Audi A8
- Guide the driveshaft between the fuel tank and the subframe downward toward the rear and attach it on the side.
Audi A4, A5 Coupe/Sportback/Cabrio, Q5
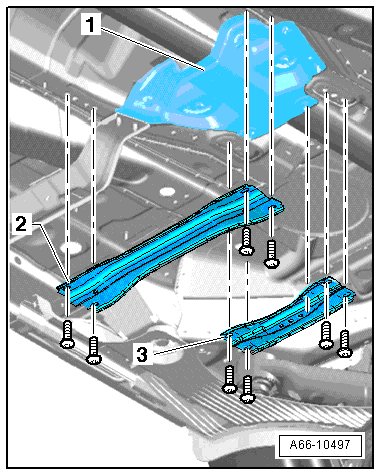
- Remove the front crossmember -2-.
- Remove the rear crossmember -3- and the heat shield -1-.
Audi A6 and A7
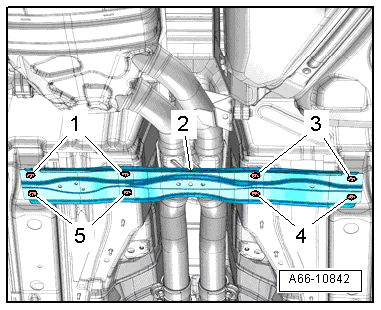
- Remove the crossmember -2-. Refer to → Body Exterior; Rep. Gr.66; Underbody Panel; Overview - Underbody Panels.
Continuation for all vehicles - except Audi A8
- Remove the bolts -arrows- for the driveshaft intermediate bearing.
- Lower the driveshaft at the intermediate bearing.
- Guide the driveshaft between the fuel tank and the subframe downward and toward the rear while doing this.
- Install the intermediate bearing bolts -arrows- by hand.
- Tie the driveshaft to the side.

Continuation for all Vehicles
- Remove the High Temperature Grease in the flange/driveshaft.
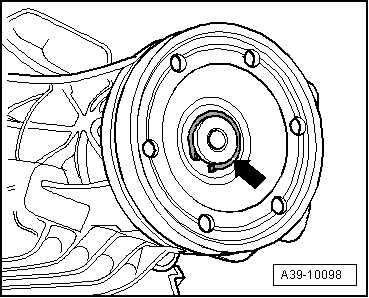
- Remove the circlip -arrow-.
 Caution
Replace the circlip with a new one of the same thickness if it is stretched or damaged. Allocation. Refer to the Parts Catalog.
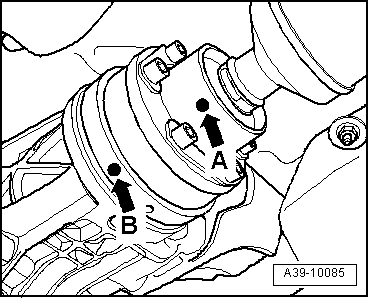
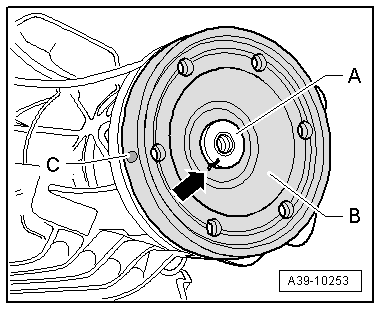
- Mark the position of the flange/driveshaft -B- on the pinion -A--arrow-.
Note
- This marking -arrow- is needed so the colored dot -C- on the outer flange remains in its original position.
- This ensures the imbalance in the rear final drive will be as small as possible.
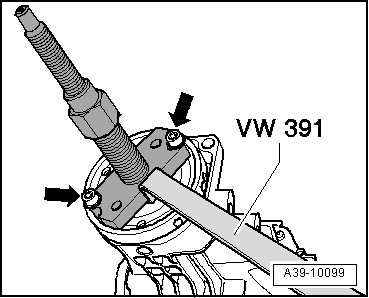
- Install the Two M8 x 30 bolts-arrow- in the flange.
- Remove the flange/driveshaft with the Puller - Multiple Use -VW391-.
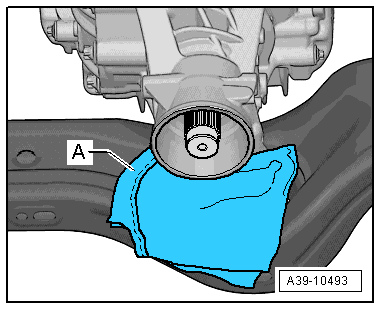
- Lay a super absorbent cloth -A- under the final drive on the subframe.
- Knock through the metal ledge of the shaft seal -A-, for example, with a scriber -B- direction of the -arrow-.
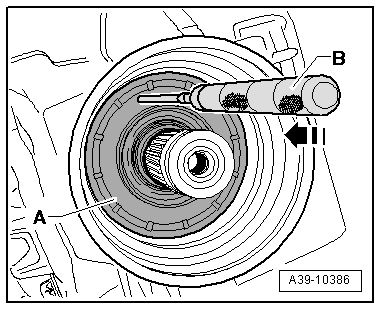
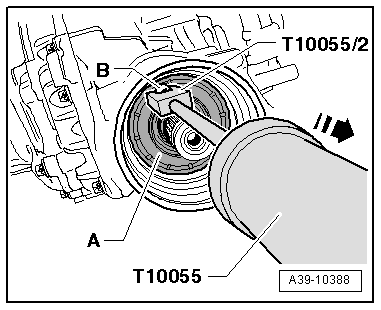
- Then install a bolt -arrow- in this shaft seal opening -A-.

- Remove the flange/driveshaft seal -A- in the direction of the -arrow-.
-B- bolt
Installing
Install in reverse order of removal. Note the following:
- Fill the space between the sealing/dust lip halfway with Sealing Grease -G 052 128 A1-.
- Place the new shaft seal -A- on the Seal Installer - Input Shaft - Guide Sleeve -T40222/1-.
Note
Make sure the shaft seal spring is in its installation position behind the sealing lip.
- Coat outer edge of the seal with gear oil.
- Push the Seal Installer - Input Shaft - Guide Sleeve -T40222/1- and the shaft seal -A- onto the pinion -B-.
- Install the shaft seal -A- all the way in.
- Remove the Seal Installer - Input Shaft - Guide Sleeve -T40222/1-.

- Drive in new shaft seal as far as stop without tilting it.
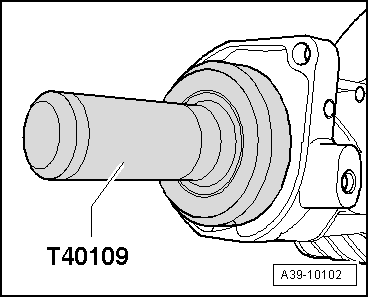
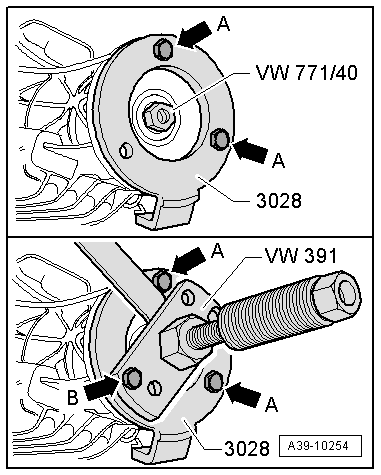
- Position the flange/driveshaft -B- on the pinion -A- so that the marking -arrow- lines up.
- Install the Slide Hammer Set - Adapter 40 - VW771/40- in the threaded hole on the pinion.
- Secure the Retainer - Drive Flange -3028- on the flange/driveshaft using the bolts (M8 x 30) -arrows A-
- Secure the Puller - Multiple Use -VW391- with the bolt (M 8 x 45) -arrow B-. Turn the spindle on the Puller - Multiple Use in the Slide Hammer Set - Adapter 40 - VW771/40-
- Counterhold the spindle on the Puller - Multiple Use -VW391- using a socket wrench and pull the flange/driveshaft all the way in.
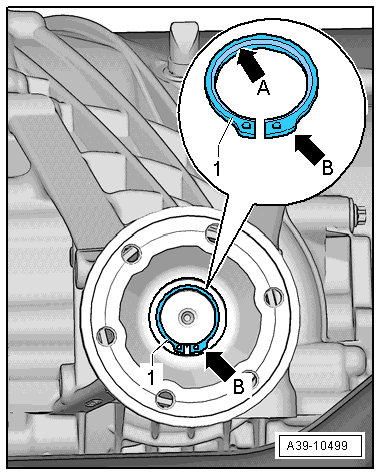
Install the circlip -1- as follows:
- The bevel on the inner diameter of the circlip -arrow A- faces out, toward the driveshaft.
- If present, the wide strap on the circlip -arrow B- must be on the right side, as illustrated.
Note the Following when Replacing the Flange/Driveshaft:
- The locking ring -1- must be determined again.
- For this, determine and insert the thickest locking ring -1- that can still be installed in the groove; for part number see Parts Catalog.
- Install the driveshaft on the rear final drive.
Audi A4, A5 Coupe/Sportback/Cabrio, Q5, A6, A7
- Attach the driveshaft intermediate bearing to the body free of tension. Tightening specification. Refer to -item 9-.
- Install the heat shield and crossmember. Refer to → Body Exterior; Rep. Gr.66; Underbody Trim Panel; Overview - Underbody Trim Panel.
Continuation for all Vehicles
- Check the gear oil in rear final drive. Refer to → Chapter "Gear Oil, Checking Level, 0BC".
- Install the rear section of the exhaust system. Refer to → Rep. Gr.26; Exhaust Pipes/Mufflers; Overview - Muffler.
Input Shaft Seal, Replacing, 0BF
Special tools and workshop equipment required
- Puller - Multiple Use -VW391-
- Puller - Unit Injector -T10055-
- -2-Puller - Unit Injector - Adapter 2 -T10055/2-
- Two M 8 x 30 Bolts
- Seal Installer - Hollow Shaft -T10380-
- Seal Installer - Input Shaft -T40222-
- Seal Installer - Input Shaft - Guide Sleeve -T40222/1-
- Sealing Grease -G 052 128 A1-
- Inductive Heater -VAS6414-
or
- Commercially Available Hot Plate
and
- Digital Thermometer -VAS6519-
Removing
- Rear final drive installed
- Pay attention to the general repair information. Refer to → Chapter "Repair Information".
- Disconnect the exhaust system at the clamping sleeves -1 and 2-.
- Remove the rear section of the exhaust system. Refer to → Rep. Gr.26; Exhaust Pipes/Mufflers; Overview - Muffler.
Note
A second technician is needed to help remove the rear section of the exhaust system.
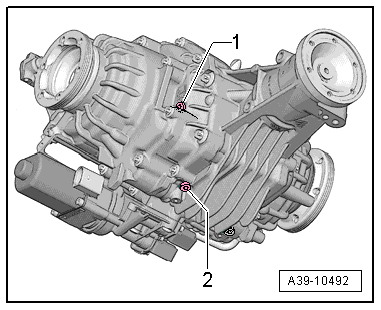
- Open the gear oil drain plug -2- and allow approximately 300 ml of gear oil to drain out.
- Insert the new drain plug -2- and tighten. Tightening Specification. Refer to -item 17-.
- Remove the driveshaft from the rear final drive. Refer to → Chapter "Drive Shaft, Removing and Installing from Rear Final Drive".
Audi A8
- Guide the driveshaft between the fuel tank and the subframe downward toward the rear and attach it on the side.
Audi A4, A5 Coupe/Sportback/Cabrio
- Remove the front crossmember -2-.
- Remove the rear crossmember -3- and the heat shield -1-.
Audi A6 and A7
- Remove the crossmember -2-. Refer to → Body Exterior; Rep. Gr.66; Underbody Trim Panel; Overview - Underbody Trim Panel.
Audi A4, A5 Coupe/Sportback/Cabrio, A6, A7
- Remove the bolts -arrows- for the driveshaft intermediate bearing.
- Lower the driveshaft at the intermediate bearing.
- Guide the driveshaft between the fuel tank and the subframe downward and toward the rear while doing this.
- Install the intermediate bearing bolts -arrows- by hand.
- Tie the driveshaft to the side.
Continuation for all Vehicles
- Remove the High Temperature Grease in the flange/driveshaft.
- Remove the circlip -arrow-.
- Mark the position of the flange/driveshaft -B- on the pinion -A--arrow-.
Note
- This marking -arrow- is needed so the colored dot -C- on the outer flange remains in its original position.
- This ensures the imbalance in the rear final drive will be as small as possible.
- Install the Two M8 x 33 bolts-arrow- in the flange.
- Remove the flange/driveshaft with the Puller - Multiple Use -VW391-.
- Lay a super absorbent cloth -A- under the final drive on the subframe.
- Knock through the metal ledge of the shaft seal -A-, for example, with a scriber -B- direction of the -arrow-.
- Then install a bolt -arrow- in this shaft seal opening -A-.
- Remove the flange/driveshaft seal -A- in the direction of the -arrow-.
-B- bolt
Installing
Install in reverse order of removal. Note the following:
- Fill the space between the sealing/dust lip halfway with Sealing Grease -G 052 128 A1-.
- Place the new shaft seal -A- on the Seal Installer - Input Shaft - Guide Sleeve -T40222/1-.
Note
Make sure the shaft seal spring is in its installation position behind the sealing lip.
- Coat outer edge of the seal with gear oil.
- Push the Seal Installer - Input Shaft - Guide Sleeve -T40222/1- and the shaft seal -A- onto the pinion -B-.
- Install the shaft seal all the way. Be careful not to bend it.
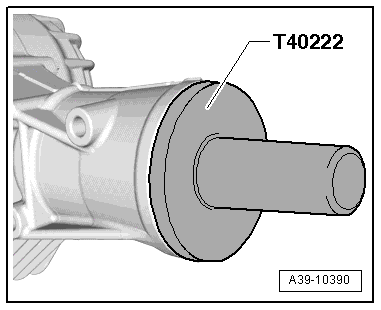
- Warm the flange/driveshaft -B- with a Inductive Heater -VAS6414- or a Heating Plate to 115 ºC.
 WARNING
- Wear safety gloves.
- If using a Heating Plate the temperature must be observed using a Digital Thermometer -VAS6519-.
- Position the flange/driveshaft -B- on the pinion -A- so that the marking -arrow- lines up.
- Install the flange/driveshaft with the Seal Installer - Hollow Shaft -T10380-.

Install the circlip -1- as follows:
- Always replace the circlip -1-.
- The bevel on the inner diameter of the circlip -arrow A- faces out, toward the driveshaft.
- The wide tab on the circlip -arrow B- must be on the right side, as illustrated.
- Measure the thickness of the old circlip -1-.
- Install a new circlip -1- having the same thickness as the old one. Refer to the Parts Catalog.
- Install the new circlip -1-.
Note
- A new circlip -arrow- must be selected when replacing the flange/driveshaft.
- For this, determine and insert the thickest circlip -arrow- that can still be installed in the groove. Refer to the Parts Catalog for the part number.
- Fill the rear final drive gear oil 0BF. Refer to → Chapter "Gear Oil, Filling, 0BF".
- Install the driveshaft on the rear final drive.
Audi A4, A5 Coupe/Sportback/Cabrio, A6, A7
- Attach the driveshaft intermediate bearing to the body free of tension. Tightening specification. Refer to -item 9-.
- Install the heat shield and crossmember. Refer to → Body Exterior; Rep. Gr.66; Underbody Trim Panel; Overview - Underbody Trim Panel.
Continuation for all Vehicles
- Install the rear section of the exhaust system. Refer to → Rep. Gr.26; Exhaust Pipes/Mufflers; Overview - Muffler.