Overview - Front Door Trim Panel
 Note
The driver side front door trim panel is shown in the illustration. The door trim panel on the front passenger side is identical.
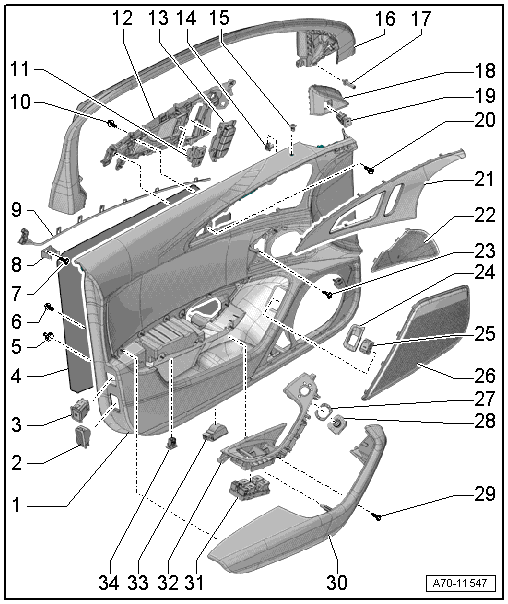
1 - Door Trim Panel
- Removing and installing. Refer to → Chapter "Front Door Trim Panel, Removing and Installing".
- When replacing the door trim panel, a hole for the sleeve -15- must be made in the new panel using the old panel as a sample.
2 - Rear Reflector
- Driver side equipment level: Driver Door Warning Lamp -W30-
- Front passenger side equipment level: Front Passenger Door Warning Lamp -W36-
- Door warning lamps, removing and installing. Refer to → Electrical Equipment; Rep. Gr.96; Lamps; Driver/Front Passenger Door Warning Lamp W30/W36, Removing and Installing.
3 - Alarm System Deactivation Switch -E217-
- Equipment levels
- Removing and installing. Refer to → Electrical Equipment; Rep. Gr.96; Controls; Alarm System Deactivation Switch E217, Removing and Installing.
4 - Insulation
5 - Clip
- With seal
- For door trim
- Quantity: 7 one-piece
- Quantity: 1 two-piece
- Replace any damaged two-piece clips
 WARNING
- For proper crash sensor (pressure sensor) function, ensure door does not leak.
- The door trim clips seal the system. Replace the door trim clips if necessary.
6 - Bolt
- 1,2 N·m
- For pull handle/armrest
- Quantity: 13
7 - Bolt
- 4,5 N·m
8 - Clip
- For door trim
- With door frame bolted together
9 - Driver Door Ambient Lighting Bulb -L164-
- Front passenger side: Front Passenger Door Ambient Lighting Bulb -L165-
- Equipment levels
- Removing and installing. Refer to → Electrical Equipment; Rep. Gr.96; Lamps; Driver and Front Passenger Door Ambient Lighting Bulb L164/L165, Removing and Installing
10 - Bolt
- 1,2 N·m
- For inside door release mechanism
- Quantity: 7
11 - Driver Interior Locking Switch -E150-
- Passenger side: Front Passenger Interior Locking Switch -E198-
- Removing and installing. Refer to → Electrical Equipment; Rep. Gr.96; Controls; Overview - Front Door Controls.
12 - Interior Door Mechanism
- Removing and installing. Refer to → Chapter "Interior Door Mechanism, Removing and Installing".
13 - Driver Memory Seat Control Head -E97-
- Front passenger side: Front Passenger Memory Seat Control Head -E277-
- Equipment levels
- Removing and installing. Refer to → Electrical Equipment; Rep. Gr.96; Controls; Driver/Front Passenger Memory Seat Control Head E97/E277, Removing and Installing.
14 - Central Locking -Safe- Indicator Lamp -K133-
- Driver door only
- Removing and installing. Refer to → Electrical Equipment; Rep. Gr.96; Lamps; Central Locking -SAFE- Indicator Lamp K133, Removing and Installing
15 - Sleeve
- For Central Locking -SAFE- Indicator Lamp -K133-
- Driver door only
- When replacing the door trim panel, a hole for the sleeve must be made in the new panel using the old panel as a sample
16 - Trim Panel
- For the window frame
- Removing and installing. Refer to → Chapter "Window Frame Trim, Removing and Installing".
17 - Stop
- 4,5 N·m
- For door trim
18 - Inner Cover
- Removing and installing. Refer to → Chapter "Mirror Cover Trim, Removing and Installing".
- Clip it into the window frame trim
19 - Lane Change Assistance Button -E530-
- Equipment levels
- Removing and installing. Refer to → Electrical Equipment; Rep. Gr.96; Lane Change Assistance; Lane Change Assistance Button E530, Removing and Installing.
20 - Bolt
- 2,5 N·m
- For door trim
21 - Trim
- For inside door release mechanism
- Removing and installing. Refer to → Chapter "Trim Molding, Removing and Installing".
22 - Speaker Trim
- For midrange speaker
- Removing and installing. Refer to → Chapter "Midrange Speaker Trim, Removing and Installing".
- Insert in the door trim panel and press on it until it engages audibly.
23 - Bolt
- 2,5 N·m
- For door trim
24 - Trim
- For Rear Lid Remote Release Button -E233-
- driver door only
- Removing and installing. Refer to → Electrical Equipment; Rep. Gr.96; Controls; Rear Lid Remote Release Button E233, Removing and Installing.
- Press on until it engages audibly
25 - Rear Lid Remote Release Button -E233-
- Removing and installing. Refer to → Electrical Equipment; Rep. Gr.96; Controls; Rear Lid Remote Release Button E233, Removing and Installing.
26 - Speaker Trim
- For bass speaker
- Removing and installing. Refer to → Chapter "Bass Speaker Trim, Removing and Installing".
- Press on until it engages audibly
27 - Symbol Trim
28 - Mirror Adjusting Switch -E43-
- Vehicles equipped with: Folding Mirror Adjustment Switch -E168-
- Removing and installing. Refer to → Electrical Equipment; Rep. Gr.96; Controls; Overview - Front Door Controls.
29 - Bolt
- 2,5 N·m
- For door trim
30 - Pull Handle/Armrest
- Removing and installing. Refer to → Chapter "Front Armrest, Removing and Installing".
31 - Power Window Control Head in Driver Door -E512-
- Front passenger side: Front Passenger Door Window Regulator Switch -E107-
- Removing and installing. Refer to → Electrical Equipment; Rep. Gr.96; Controls; Power Window Control Head In Driver Door E512, Removing and Installing.
32 - Grip Recess
- With switch mount
- Removing and installing. Refer to → Chapter "Button Trim, Removing and Installing".
33 - Left Front Entry Lamp -W31-
- Front passenger side: Right Front Entry Lamp -W32-.
- Equipment levels
- Removing and installing. Refer to → Electrical Equipment; Rep. Gr.96; Lamps; Left/Right Front Entry Lamp W31/W32, Removing and Installing.
34 - Driver Door Storage Compartment Illumination Bulb -L160-
- Front passenger side: Front Passenger Door Storage Compartment Illumination Bulb -L161-
- Equipment levels
- Removing and installing. Refer to → Electrical Equipment; Rep. Gr.96; Lamps; Driver and Front Passenger Door Storage Compartment Illumination Bulb L160/L161, Removing and Installing.