Lamps and lights
Lights and lamps contribute significantly to the safety of the BMW 5 Series (VII generation). This chapter describes the design of front and rear lights, most of which use modern LED technology. For certain bulb types, such as turn signals or reversing lights, the replacement is described in detail, including removal of trim panels, holders and electrical connectors. Safety notes protect against burns, electrical short circuits and contamination of the glass bulbs. Proper handling of bulbs, warnings about excessive brightness and environmental influences are also covered. A complete guide for anyone who wants to replace defective bulbs themselves.
General
Lamps and lights
Lights and lamps contribute significantly to driving safety.
Some equipment has light-emitting diodes (LEDs) behind a cover as the light source. These LEDs are related to conventional lasers and are classified as Class 1 light-emitting diodes.
The vehicle manufacturer recommends having any defect repaired by a manufacturer service partner, another qualified service partner or a specialist workshop.
A replacement bulb kit is available from a manufacturer service partner, another qualified service partner or a specialist workshop.
Observe the safety notes on page 329.
Headlight lenses
In cool or humid weather, the exterior lights may fog up on the inside. When driving with the lights switched on, the fog disappears after a short time. The headlight lenses do not need to be replaced.
If moisture continues to form inside the headlights despite them being switched on, e.g. water droplets in the light unit, have the headlights checked.
Safety notes
WARNING Bulbs can become hot during operation.
Contact with the bulbs can cause burns. There is a risk of injury.
Only replace bulbs when they have cooled down.
WARNING When working on switched-on lighting systems, short circuits can occur. There is a risk of injury or damage to property. When working on the lighting system, switch off the affected lights. Observe any notes supplied by the bulb manufacturer.
NOTE Contaminated bulbs reduce their service life. There is a risk of damage to property.
Do not touch the glass bulb of new bulbs with bare hands. Use a clean cloth or similar
or hold the bulb by the base.
WARNING Excessive brightness can irritate or damage the retina of the eye. There is a risk of injury. Do not look directly into the headlights or other light sources.
Do not remove the covers of LEDs.
Front lights
Adaptive LED headlights
Observe the safety notes.
All lights use LED technology.
In case of a defect, contact a manufacturer service partner, another qualified service partner or a specialist workshop.
LED headlights
General
Observe the safety notes.
All front lights use LED technology, except for the two turn signals.
In case of a defect, contact a manufacturer service partner, another qualified service partner or a specialist workshop.
Turn signals, bulb replacement
General
Observe the safety notes.
Bulb 21 W, PY21W.
Replacing the bulb
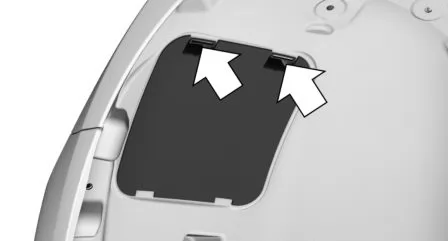
- In the wheel arch, press the two retaining tabs and fold down the cover.
- Unscrew the bulb holder.
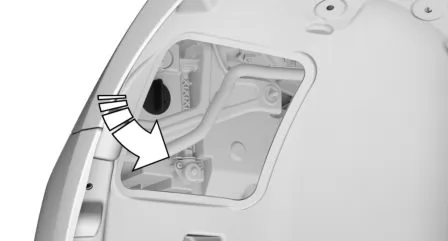
- Press the bulb lightly into the bulb holder and turn it counterclockwise to remove it.
- Insert the new bulb.
- Install the bulb holder.
- Attach the cover.
LED fog lights
Observe the safety notes.
The LED fog lights use LED technology.
In case of a defect, contact a manufacturer service partner, another qualified service partner or a specialist workshop.
Rear lights
General
Observe the safety notes.
All rear lights use LED technology, except for the two reversing lights in the tailgate.
In case of a defect, contact a manufacturer service partner, another qualified service partner or a specialist workshop.
Reversing light, bulb replacement
General
Observe the safety notes.
Bulb 21 W, H21W.
Without warning triangle: remove the cover
- Opening the tailgate.
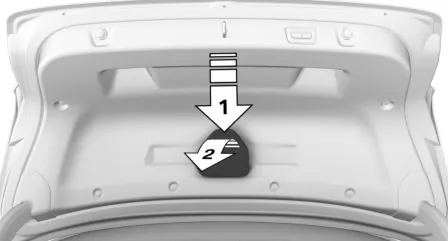
- Press the release, arrow 1, and remove the cover, arrow 2.
With warning triangle: remove the holder
- Opening the tailgate.
- Remove the warning triangle.
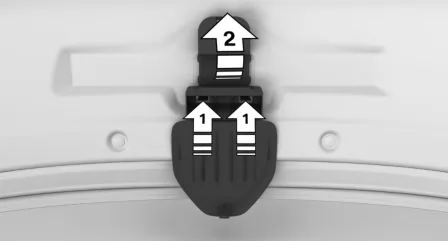
- Press both retaining tabs with the screwdriver from the onboard tool kit in the direction of the arrows, arrows 1, and remove the warning triangle holder, arrow 2.
Remove the hinge cover
- Open the two clips on the hinge cover.
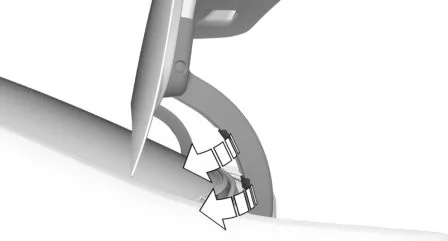
- Carefully pry the inner pin of the expansion rivet out a little with the screwdriver.
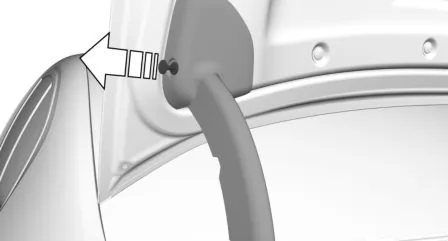
- Carefully lift the hinge cover off the hinge arm, arrow 1, until the retaining pin, arrow 2, releases from behind the trim.
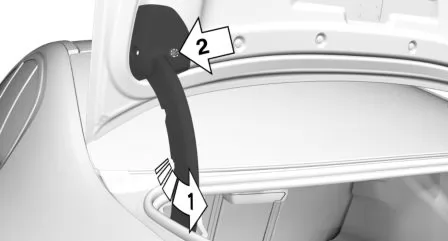
- Pull the hinge cover down.
- Remove the second hinge cover in the same way.
Remove the interior trim panel
- Carefully pry out the eight expansion rivets with the screwdriver. Handle the expansion rivets as described above.
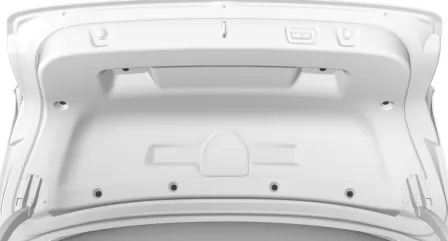
- Reach into the grip recess on one side and carefully pull the interior trim panel back far enough, arrow 1, that the two retaining pins, arrows 2, release from behind the interior trim panel.
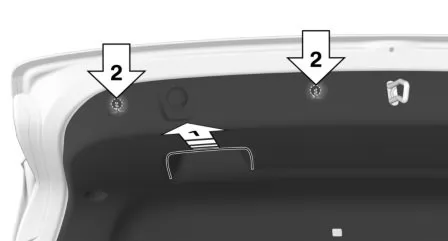
- Proceed in the same way on the other side.
- Carefully detach the interior trim panel from the tailgate, arrow 1, and if necessary, disconnect the cable with the connector from the switch unit, arrow 2.
- Remove the interior trim panel.
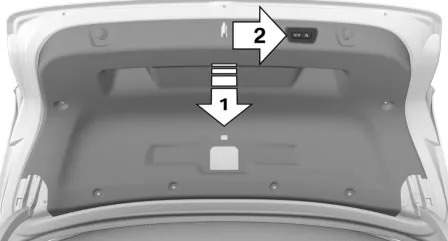
Replacing the reversing light
- Turn the bulb holder in the direction indicated on the reflector and pull it out.
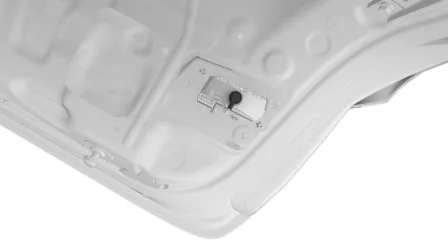
- Press the bulb lightly into the bulb holder and turn it counterclockwise to remove it.
- Install the bulb holder.
Install the interior trim panel
- If necessary, connect the cable to the switch unit.
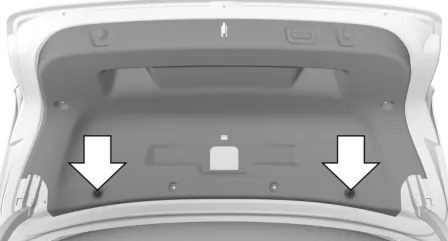
- Press against the interior trim panel in the direction of the arrows so that the four retaining pins engage in the tailgate.
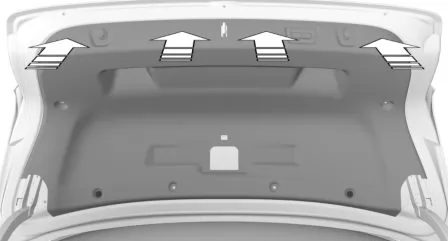
- Secure the interior trim panel with the remaining expansion rivets and press in the pins of the expansion rivets.
- On one side, slide the hinge cover onto the interior trim panel, arrow 1, and fold the hinge cover onto the hinge arm, arrow 2.
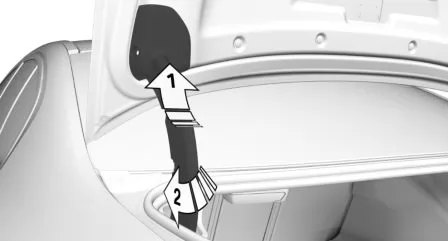
- Secure the hinge cover with the expansion rivet, arrow 1, and press on the hinge cover so that the retaining pin engages in the tailgate, arrow 2.
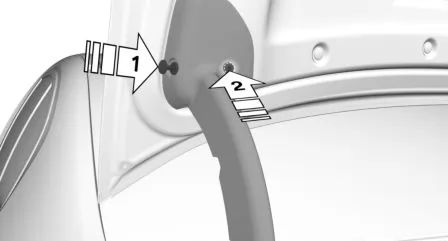
- Close the clips on the hinge cover.
- Install the other hinge cover in the same way.
- Attach the warning triangle holder and the warning triangle, or install the cover.
The unlocking system of the BMW 5 Sedan (model years 2017–2024) is designed to provide access to the vehicle even in exceptional situations. Whether by remote, mechanical key or emergency unlocking, every detail is designed to deliver maximum functionality and security.
The note on automatic relocking if the vehicle is not opened is particularly practical, as is the recommendation to always keep the key and vehicle in view. The clear presentation of the procedures gives the driver confidence and orientation, an important aspect especially in stressful situations.
The BMW 5 Sedan thus shows that comfort and safety are consistently developed down to the last function.
Test yourself
A quick BMW 5 quiz: every answer comes with an explanation and a link to the manual page.