Brakes
Brake Rotor R&R
In this manual: Brakes
34steps
~204min
4/5difficulty
Done 0 of 34
Front
Removal
Caution: Support the brake caliper with heavy mechanic wire, or equivalent, whenever it is separated from its mount and the hydraulic flexible brake hose is still connected. Failure to support the caliper in this manner will cause the flexible brake hose to bear the weight of the caliper, which may cause damage to the brake hose and in turn may cause a brake fluid leak.- Raise and support the vehicle.
- Remove the tire and wheel assembly.
- Remove the brake caliper bracket bolts (1), Fig. 1.
- Without disconnecting the brake caliper hose, remove the brake caliper and bracket assembly and support with heavy mechanics wire or equivalent.
- If installing the original brake rotor, mark the relationship of the rotor to the wheel hub.
- Remove the brake rotor screw (1) and the brake rotor, Fig. 2.
- If the brake rotor is to be machined, check the thickness variation measurement.
Installation
If reusing the caliper bracket bolts the threads of the caliper bracket bolts and the threads of the knuckle mounting holes must be free of residue and debris prior to application of threadlocker in order to ensure proper adhesion and fastener retention.
|
Rear
Removal
Caution: Support the brake caliper with heavy mechanic wire, or equivalent, whenever it is separated from its mount and the hydraulic flexible brake hose is still connected. Failure to support the caliper in this manner will cause the flexible brake hose to bear the weight of the caliper, which may cause damage to the brake hose and in turn may cause a brake fluid leak.- Raise and support the vehicle.
- Remove the tire and wheel assembly.
- Remove the brake caliper bracket bolts (1), Fig. 3.
- Without disconnecting the brake caliper hose, remove the brake caliper and bracket assembly and support with heavy mechanics wire or equivalent.
- If installing the original brake rotor, mark the relationship of the rotor to the wheel hub.
- Remove the brake rotor screw (1) and the brake rotor, Fig. 4.
- If the brake rotor is difficult to remove, remove the park brake shoe adjuster access plug on the face of the brake rotor to gain access to the park brake adjuster. Loosen the park brake shoe adjuster.
- If the brake rotor is to be machined, check the thickness variation measurement.
Installation
If reusing the caliper bracket bolts the threads of the caliper bracket bolts and the threads of the knuckle mounting holes must be free of residue and debris prior to application of threadlocker in order to ensure proper adhesion and fastener retention.
|
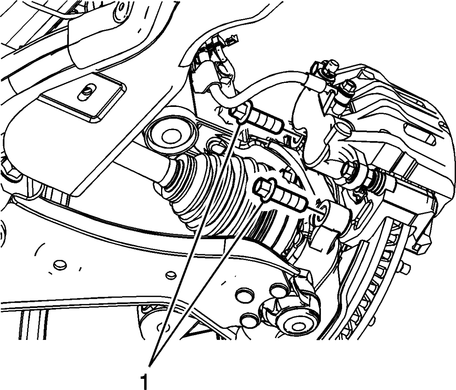
Fig. 1
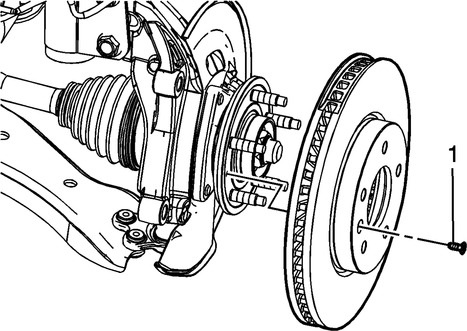
Fig. 2
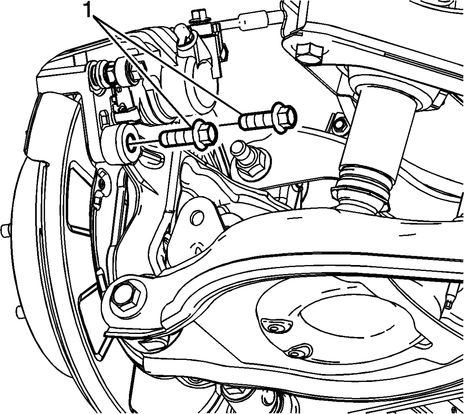
Fig. 3
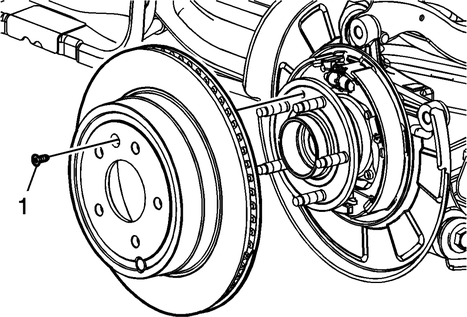
Fig. 4
Test yourself
A quick Chevrolet Captiva quiz: every answer comes with an explanation and a link to the manual page.
Was this page helpful?