Body and Paint

Diagnosis and Testing - Mirrors

~35min read
1special tools

Diagnostic Trouble Code (DTC) Chart

The diagnosis in this manual assumes a certain level of skill and knowledge of Ford-approved diagnostic procedures.
REFER TO: Diagnostic Methods (100-00 General Information, Description and Operation).


Diagnostic Trouble Code Chart


Module Trouble Code Description Action
DDM B1163:11 Driver side heated mirror output: short to ground GO to Pinpoint Test B
DDM B1163:15 Driver side heated mirror output: short to battery or open circuit GO to Pinpoint Test B
DDM B1C09:01 Driver side LH/RH mirror motor: general electrical malfunction GO to Pinpoint Test A
DDM B1C09:13 Driver side LH/RH mirror motor: open circuit GO to Pinpoint Test A
DDM B1C10:01 Driver side mirror up/down motor: general electrical malfunction GO to Pinpoint Test A
DDM B1C10:13 Driver side mirror up/down motor: open circuit GO to Pinpoint Test A
DDM B1C13:12 Driver side mirror up/down motor feedback: short to battery GO to Pinpoint Test C
DDM B1C13:14 Driver side mirror up/down motor feedback: short to ground or open circuit GO to Pinpoint Test C
DDM B1C14:12 Driver side LH/RH mirror motor feedback: short to battery GO to Pinpoint Test C
DDM B1C14:14 Driver side LH/RH mirror motor feedback: short to ground or open circuit GO to Pinpoint Test C
PDM B1164:11 Passenger side heated mirror output: short to ground GO to Pinpoint Test B
PDM B1164:15 Passenger side heated mirror output: short to battery or open circuit GO to Pinpoint Test B
PDM B1C11:01 Passenger side LH/RH mirror motor: general electrical malfunction GO to Pinpoint Test A
PDM B1C11:13 Passenger side LH/RH mirror motor: open circuit GO to Pinpoint Test A
PDM B1C12:01 Passenger side mirror up/down motor: general electrical malfunction GO to Pinpoint Test A
PDM B1C12:13 Passenger side mirror up/down motor: open circuit GO to Pinpoint Test A
PDM B1C15:12 Passenger side mirror up/down motor feedback: short to battery GO to Pinpoint Test C
PDM B1C15:14 Passenger side mirror up/down motor feedback: short to ground or open circuit GO to Pinpoint Test C
PDM B1C16:12 Passenger side LH/RH mirror motor feedback: short to battery GO to Pinpoint Test C
PDM B1C16:14 Passenger side LH/RH mirror motor feedback: short to ground or open circuit GO to Pinpoint Test C

Global Customer Symptom Codes (GCSC) Table

The diagnosis in this manual assumes a certain level of skill and knowledge of Ford-approved diagnostic procedures.
REFER TO: Diagnostic Methods (100-00 General Information, Description and Operation).


Symptom Action
Driver Assistance and Information > Blind Spot (BLIS)/Cross Traffic > Control > Inoperative GO to Pinpoint Test J
Lighting/Glass/Vision > Mirror > Rear View > Appearance GO to Pinpoint Test K
Lighting/Glass/Vision > Mirror > Rear View > Inoperative GO to Pinpoint Test K
Lighting/Glass/Vision > Mirror > Rear View > Loose/Attached GO to Pinpoint Test L
Lighting/Glass/Vision > Mirror > Side > Appearance GO to Pinpoint Test C
Lighting/Glass/Vision > Mirror > Side > Appearance GO to Pinpoint Test D
Lighting/Glass/Vision > Mirror > Side > Appearance GO to Pinpoint Test E
Lighting/Glass/Vision > Mirror > Side > Appearance GO to Pinpoint Test F
Lighting/Glass/Vision > Mirror > Side > Inoperative GO to Pinpoint Test A
Lighting/Glass/Vision > Mirror > Side > Inoperative GO to Pinpoint Test B
Lighting/Glass/Vision > Mirror > Side > Inoperative GO to Pinpoint Test C
Lighting/Glass/Vision > Mirror > Side > Inoperative GO to Pinpoint Test E
Lighting/Glass/Vision > Mirror > Side > Inoperative GO to Pinpoint Test G
Lighting/Glass/Vision > Mirror > Side > Loose/Attached GO to Pinpoint Test D
Lighting/Glass/Vision > Mirror > Side > Loose/Attached GO to Pinpoint Test M
Lighting/Glass/Vision > Mirror > Side > Loose/Attached GO to Pinpoint Test N
Lighting/Glass/Vision > Mirror > Side > Loose/Attached GO TO Pinpoint Test O
Lighting/Glass/Vision > Mirror > Side > Manual Function GO to Pinpoint Test D
Lighting/Glass/Vision > Mirror > Side > Power Function GO to Pinpoint Test A
Lighting/Glass/Vision > Defrost > Mirror > Inoperative GO to Pinpoint Test B
Lighting/Glass/Vision > Defrost > Mirror > Inoperative GO to Pinpoint Test F
Lighting/Glass/Vision > Defrost > Mirror > Stays On GO to Pinpoint Test B
Lighting/Glass/Vision > Exterior Lighting > Turn Signal > Inoperative GO to Pinpoint Test I
Lighting/Glass/Vision > Exterior Lighting > Turn Signal > Remains On GO to Pinpoint Test I
Lighting/Glass/Vision > Exterior Lighting > Puddle > Inoperative GO to Pinpoint Test H
Lighting/Glass/Vision > Exterior Lighting > Puddle > Stays On GO to Pinpoint Test H
Lighting/Glass/Vision > Noise > Mirror > Constant GO TO Pinpoint Test O
Lighting/Glass/Vision > Noise > Mirror > Intermittent GO TO Pinpoint Test O

Symptom Chart

The diagnosis in this manual assumes a certain level of skill and knowledge of Ford-approved diagnostic procedures.
REFER TO: Diagnostic Methods (100-00 General Information, Description and Operation).

Symptom Chart: Rear View Mirrors - Exterior

The diagnosis in this manual assumes a certain level of skill and knowledge of Ford-approved diagnostic procedures.
REFER TO: Diagnostic Methods (100-00 General Information, Description and Operation).

Condition Action
One or both outside mirrors fold inward due to wind pressure GO to Pinpoint Test D
Both outside mirrors inoperative (with or without memory mirrors) GO to Pinpoint Test E
One mirror inoperative/operates incorrectly GO to Pinpoint Test A
Horizontal or vertical operation of one mirror inoperative GO to Pinpoint Test A
Outside mirror memory recall function inoperative/operates incorrectly GO to Pinpoint Test C
One or both heated outside mirrors inoperative or stay on GO to Pinpoint Test B
Left and right heated outside mirrors do not defrost at the same rate GO to Pinpoint Test F
Outside mirror select switch LED inoperative (mirror select switch operates normally) GO to Pinpoint Test G
Rear view mirror illumination lamp inoperative or stays on GO to Pinpoint Test H
Outside mirror turn signal inoperative or always on GO to Pinpoint Test I
BLIS® indicator inoperative or stays on GO to Pinpoint Test J

Symptom Chart: Rear View Mirrors - Interior

The diagnosis in this manual assumes a certain level of skill and knowledge of Ford-approved diagnostic procedures.
REFER TO: Diagnostic Methods (100-00 General Information, Description and Operation).

Condition Action
Interior mirror damaged GO to Pinpoint Test K
Interior mirror vibrates or rattles GO to Pinpoint Test L

Symptom Chart: Rear View Mirrors - Noise, Vibration and Harshness (NVH) - Exterior

The diagnosis in this manual assumes a certain level of skill and knowledge of Ford-approved diagnostic procedures.
REFER TO: Diagnostic Methods (100-00 General Information, Description and Operation).

Condition Action
Outside mirror housing vibrates or rattles GO to Pinpoint Test M
Outside mirror glass vibrates or rattles GO to Pinpoint Test N
Wind Noise GO TO Pinpoint Test O

Pinpoint Tests

One outside mirror does not operate correctly in all directions


For wiring diagrams and connectors, refer to Cell 124 of the Wiring Diagrams.


DIAGNOSTIC TEST A: ONE OUTSIDE MIRROR DOES NOT OPERATE CORRECTLY IN ALL DIRECTIONS

For wiring diagrams and connector information, refer to Cell 124 of the Wiring Diagrams.

Normal Operation and Fault Symptoms

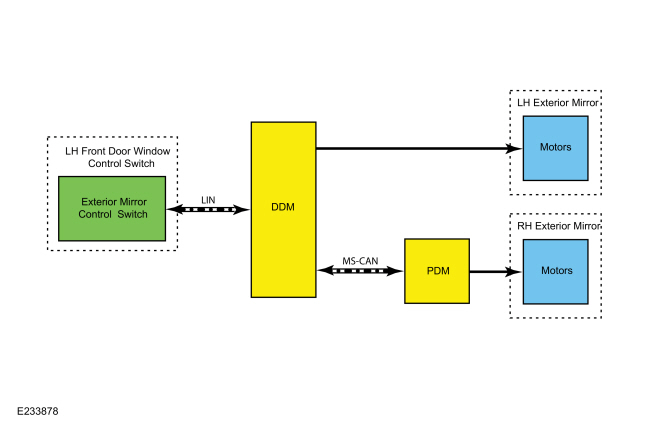
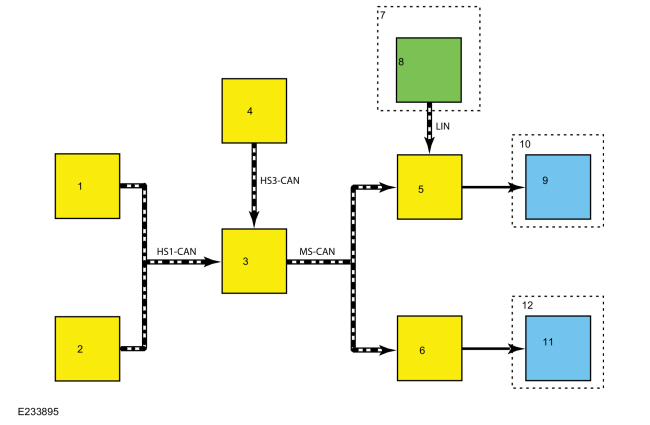
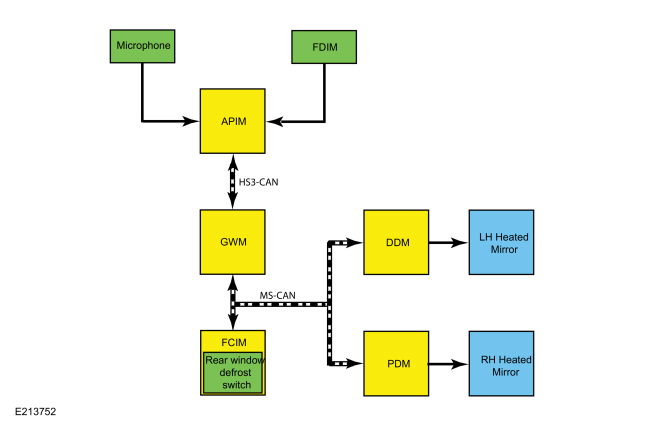
REFER TO: Rear View Mirrors - System Operation and Component Description (501-09 Rear View Mirrors, Description and Operation).

DTC Fault Trigger Conditions

Trouble Code Description Fault Trigger Condition
DDM B1C09:01 Driver side LH/RH mirror motor: general electrical malfunction This continuous memory and on-demand DTC is set if the DDM detects a current consumption higher than expected when voltage is applied to the horizontal mirror motor circuit.
DDM B1C09:13 Driver side LH/RH mirror motor: open circuit This continuous memory and on-demand DTC is set if the DDM detects a current consumption lower than expected when voltage is applied to the horizontal mirror motor circuit.
DDM B1C10:01 Driver side mirror up/down motor: general electrical malfunction This continuous memory and on-demand DTC is set if the DDM detects a current consumption higher than expected when voltage is applied to the vertical mirror motor circuit.
DDM B1C10:13 Driver side mirror up/down motor: open circuit This continuous memory and on-demand DTC is set if the DDM detects a current consumption lower than expected when voltage is applied to the vertical mirror motor circuit.
DDM B1C11:01 Passenger side LH/RH mirror motor: general electrical malfunction This continuous memory and on-demand DTC is set if the PDM detects current consumption higher than expected when voltage is applied to the Horizontal Mirror Motor Circuit.
PDM B1C11:13 Passenger side LH/RH mirror motor: open circuit This continuous memory and on-demand DTC is set if the PDM detects current consumption lower than expected when voltage is applied to the Horizontal Mirror Motor Circuit.
PDM B1C12:01 Passenger side mirror up/down motor: general electrical malfunction This continuous memory and on-demand DTC is set if the PDM detects current consumption higher than expected when voltage is applied to the Vertical Mirror Motor Circuit.
PDM B1C12:13 Passenger side mirror up/down motor: open circuit This continuous memory and on-demand DTC is set if the PDM detects current consumption lower than expected when voltage is applied to the Vertical Mirror Motor Circuit.

Possible Sources

  • Wiring, Terminals or Connectors
  • Outside Mirror Control Switch (integrated in the driver front door window lift switch)
  • Outside Mirror Motor
  • Outside Mirror
  • DDM
  • PDM

Visual Inspection and Pre-checks

  • Inspect the suspect outside mirror for damage or obstructions.

NOTICE: Use the correct probe adapter(s) when making measurements. Using the incorrect probe adapter(s) may cause connector damage. Use only Rotunda Flex probes (NUD105-R025D).

A1 CHECK THE MIRROR MOVEMENT
  • The ignition is on.
  • Move the suspect outside mirror up, down, left and right.

Does the suspect outside mirror operate in any direction?
Yes GO to A2
No GO to Pinpoint Test E
A2 CHECK THE OUTSIDE MIRROR CONTROL SWITCH PARAMETER IDENTIFICATION (PIDS)
  • Using the diagnostic scan tool, view the DDM parameter identifications (PIDs).
  • Using the diagnostic scan tool, view the following DDM mirror control switch parameter identifications (PIDs):
    • L_MIR_SEL
    • R_MIR_SEL
    • MIR_SW_DOWN
    • MIR_SW_UP
    • MIR_SW_L
    • MIR_SW_R
  • While monitoring the parameter identifications (PIDs), press the left mirror select switch and press each direction switch.
  • While monitoring the parameter identifications (PIDs), press the right mirror select switch and press each direction switch.

Do the parameter identifications (PIDs) match the mirror control switch presses?
Yes GO to A3
No INSTALL a new driver front door window lift switch.
REFER TO: Driver Door Window Lift Switch (501-11 Glass, Frames and Mechanisms, Removal and Installation).
A3 CHECK THE VOLTAGE OUTPUT TO THE SUSPECT OUTSIDE MIRROR

NOTICE: The following step uses a test lamp to simulate normal circuit loads. Use only the Rotunda test lamp (SGT27000) or a 250-300 mA incandescent test lamp. To prevent damage to the connector terminals, use the Rotunda Flex Probe kit for the test lamp probe connection to the vehicle. Do not use the test lamp probe directly on any connector.

  • Ignition OFF.
  • Disconnect: suspect outside mirror C521 (left) or C601 (right).
  • The ignition is on.
  • Select the suspect outside mirror by pressing the corresponding outside mirror select switch.
  • Connect:
    Click to display the connectors

    left


    Lead 1 Measurement/Action Lead 2
    C521-4 Ground
    C521-11 Ground

    Click to display the connectors

    Right Side


    Lead 1 Measurement/Action Lead 2
    C601-4 Ground
    C601-11 Ground
  • Press the outside mirror control switch left/right and monitor the indicator lamp.
  • Connect:
    Click to display the connectors

    left


    Lead 1 Measurement/Action Lead 2
    C521-14 Ground
    C521-11 Ground

    Click to display the connectors

    Right Side


    Lead 1 Measurement/Action Lead 2
    C601-14 Ground
    C601-11 Ground
  • Press the outside mirror control switch up/down and monitor the indicator lamp.

Does the indicator lamp illuminate only when the outside mirror control switch is pressed in any direction?
Yes GO to A4
No GO to A5
A4 CHECK THE OUTSIDE MIRROR JUMPER HARNESS
  • Inspect the outside mirror jumper harness between the vehicle wiring harness and the mirror motors for:
    • Open circuit or short circuit
    • Damaged or pushed-out pins
    • Corrosion

Is the harness in good condition?
Yes INSTALL a new outside rearview mirror motor.
REFER TO: Outside Mirror (501-09 Rear View Mirrors, Removal and Installation).
No REPAIR the harness, if necessary. If the harness cannot be repaired, INSTALL a new outside mirror.
REFER TO: Outside Mirror (501-09 Rear View Mirrors, Removal and Installation).
A5 CHECK THE SUSPECT OUTSIDE MIRROR CIRCUITS FOR A SHORT TO VOLTAGE
  • Ignition OFF.
  • Disconnect: DDM C501B (LH) or PDM C652B (RH).
  • The ignition is on.
  • Action:
    Click to display the connectors

    left


    Positive lead Measurement/Action Negative lead
    C521-4 Ground
    C521-11 Ground
    C521-14 Ground

    Click to display the connectors

    Right Side


    Positive lead Measurement/Action Negative lead
    C601-4 Ground
    C601-11 Ground
    C601-14 Ground

Is there voltage present?
Yes REPAIR the faulty circuit.
No GO to A6
A6 CHECK THE SUSPECT OUTSIDE MIRROR CIRCUITS FOR A SHORT TO GROUND
  • Ignition OFF.
  • Action:
    Click to display the connectors

    left


    Positive lead Measurement/Action Negative lead
    C521-4 Ground
    C521-11 Ground
    C521-14 Ground

    Click to display the connectors

    Right Side


    Positive lead Measurement/Action Negative lead
    C601-4 Ground
    C601-11 Ground
    C601-14 Ground

Is the resistance greater than 10000 ohms?
Yes GO to A7
No REPAIR the faulty circuit.
A7 CHECK THE SUSPECT OUTSIDE MIRROR CIRCUITS FOR AN OPEN
  • Action:
    Click to display the connectors

    left


    Positive lead Measurement/Action Negative lead
    C521-4 C501B-16
    C521-11 C501B-17
    C521-14 C501B-15

    Click to display the connectors

    Right Side


    Positive lead Measurement/Action Negative lead
    C601-4 C652B-16
    C601-11 C652B-17
    C601-14 C652B-15

Is the resistance less than 3 ohms?
Yes GO to A8
No REPAIR the faulty circuit.
A8 CHECK THE DDM (DRIVER DOOR MODULE) / PDM (PASSENGER DOOR MODULE) OPERATION
  • Disconnect and inspect all DDM/PDM connectors and the related in-line connectors.
  • Repair:
    • corrosion (install new connector or terminals - clean module pins)
    • damaged or bent terminals/pins - install new terminals/pins
    • pushed-out pins - install new pins as necessary
  • Reconnect the DDM/PDM connectors and the related in-line connectors. Make sure they are installed and fully seated.
  • Operate the system to determine if the concern persists.

Is the concern still present?
Yes CHECK OASIS for any applicable Technical Service Bulletins (TSBs). If a TSB exists for this concern, STOP this test and FOLLOW the TSB instructions. If no TSB applies to this concern, INSTALL a new DDM/PDM.
REFER TO: Driver Door Module (DDM) (419-10 Multifunction Electronic Modules, Removal and Installation).
REFER TO: Passenger Door Module (PDM) (419-10 Multifunction Electronic Modules, Removal and Installation).
No The system is currently operating correctly. The concern may have been caused by module connections. ADDRESS the root cause of any connector or terminal issues.


DIAGNOSTIC TEST B: ONE OR BOTH HEATED OUTSIDE MIRRORS DO NOT OPERATE OR ARE ALWAYS ON (WITHOUT MEMORY MIRRORS)

For wiring diagrams and connector information, refer to Cell 124 of the Wiring Diagrams.

Normal Operation and Fault Symptoms

REFER TO: Rear View Mirrors - System Operation and Component Description (501-09 Rear View Mirrors, Description and Operation).

DTC Fault Trigger Conditions

Trouble Code Description Fault Trigger Condition
DDM B1163:11 Driver side heated mirror output: short to ground This on-demand continuous DTC is set if the DDM detects current consumption higher than expected when voltage is applied to the left outside mirror heater circuit.
DDM B1163:15 Driver side heated mirror output: short to battery or open circuit This on-demand continuous DTC is set if the DDM detects current consumption lower than expected when voltage is applied to the left outside mirror heater circuit.
PDM B1164:11 Passenger side heated mirror output: short to ground This on-demand continuous DTC is set if the PDM detects current consumption higher than expected when voltage is applied to the right outside mirror heater circuit.
PDM B1164:15 Passenger side heated mirror output: short to battery or open circuit This on-demand continuous DTC is set if the PDM detects current consumption lower than expected when voltage is applied to the right outside mirror heater circuit.

Possible Sources

  • Wiring, Terminals or Connectors
  • Outside Mirror Glass
  • Outside Mirror
  • Door Module

Visual Inspection and Pre-checks

  • Inspect the suspect outside mirror housing and glass for damage.
B1 CHECK THE DDM (DRIVER DOOR MODULE) OR PDM (PASSENGER DOOR MODULE) DIAGNOSTIC TROUBLE CODES (DTCS)
  • The ignition is on.
  • Using the diagnostic scan tool, perform the DDM (for left) or PDM (for right) self-test.

Are any diagnostic trouble codes (DTCs) present?
Yes • For DDM DTC B1163:11 or PDM DTC B1164:11, GO to B6
• For DDM DTC B1163:15 or PDM DTC B1164:15, GO to B2
• For information on all other DDM or PDM DTCs, REFER TO the DDM or PDM DTC Chart in this section.
No GO to B2
B2 CHECK THE MIRROR HEATER OUTPUT VOLTAGE AT THE INOPERATIVE OUTSIDE MIRROR

NOTICE: The following step uses a test lamp to simulate normal circuit loads. Use only the Rotunda test lamp (SGT27000) or a 250-300 mA incandescent test lamp. To prevent damage to the connector terminals, use the Rotunda Flex Probe kit for the test lamp probe connection to the vehicle. Do not use the test lamp probe directly on any connector.

  • Ignition OFF.
  • Disconnect the outside mirror (left outside mirror) or (right outside mirror).
  • Start the engine.
  • Connect:
    Click to display the connectors

    LH Outside Mirror


    Lead 1 Measurement/Action Lead 2
    C521-1 C521-16

    Click to display the connectors

    RH Outside Mirror


    Lead 1 Measurement/Action Lead 2
    C601-1 C601-16
  • NOTE: The defrost system is activated for 10 minutes. With the engine running, turn on the rear window defroster.

Does the test lamp only illuminate when the rear window defroster is switched on?
Yes GO to B10
No • If the indicator lamp remains illuminated, GO to B3.
• If the indicator lamp does not illuminate, GO to B4.
B3 CHECK THE HEATER CIRCUIT FOR VOLTAGE AT THE OUTSIDE MIRROR
  • Ignition OFF.
  • Disconnect the DDM (LH concern) or PDM (RH concern).
  • The ignition is on.
  • Action:
    Click to display the connectors

    LH Outside Mirror


    Positive lead Measurement/Action Negative lead
    C521-1 Ground

    Click to display the connectors

    RH Outside Mirror


    Positive lead Measurement/Action Negative lead
    C601-1 Ground

Is there voltage present?
Yes REPAIR the circuit.
No • For the left mirror, GO to B8.
• For the right mirror, GO to B9.
B4 CHECK THE VOLTAGE IN THE HEATER CIRCUIT AT THE OUTSIDE MIRROR

NOTICE: The following step uses a test lamp to simulate normal circuit loads. Use only the Rotunda test lamp (SGT27000) or a 250-300 mA incandescent test lamp. To prevent damage to the connector terminals, use the Rotunda Flex Probe kit for the test lamp probe connection to the vehicle. Do not use the test lamp probe directly on any connector.

  • Turn off the rear window defroster.
  • Connect:
    Click to display the connectors

    LH Outside Mirror


    Lead 1 Measurement/Action Lead 2
    C521-1 Ground

    Click to display the connectors

    RH Outside Mirror


    Lead 1 Measurement/Action Lead 2
    C601-1 Ground
  • NOTE: The defrost system is activated for 10 minutes. With the engine running, turn on the rear window defroster.

Does the test lamp illuminate?
Yes REPAIR the ground circuit.
No GO to B5
B5 CHECK THE HEATER CIRCUIT FOR AN OPEN BETWEEN THE MIRROR AND THE DOOR MODULE
  • Ignition OFF.
  • Disconnect the DDM C501B (LH concern) or PDM C652B (RH concern).
  • Action:
    Click to display the connectors

    LH Outside Mirror


    Positive lead Measurement/Action Negative lead
    C521-1 C501B-19

    Click to display the connectors

    RH Outside Mirror


    Positive lead Measurement/Action Negative lead
    C601-1 C652B-19

Is the resistance less than 3 ohms?
Yes • For the left mirror, GO to B8.
• For the right mirror, GO to B9.
No REPAIR the faulty circuit.
B6 CHECK THE DOOR MODULE DIAGNOSTIC TROUBLE CODES (DTCS) WITH THE OUTSIDE MIRROR DISCONNECTED
  • Ignition OFF.
  • Disconnect the suspect outside mirror C517 (left) or C626 (right).
  • The ignition is on.
  • Using a diagnostic scan tool, clear the DDM or PDM diagnostic trouble codes (DTCs).
  • Using the diagnostic scanner, perform a self-test of the DDM or PDM.

Is DDM DTC B1163:15 or PDM DTC B1164:15 present?
Yes • For LH concerns, GO to B8.
• For RH concerns, GO to B9.
No GO to B7
B7 CHECK THE HEATER CIRCUIT FOR A SHORT TO GROUND AT THE OUTSIDE MIRROR
  • Ignition OFF.
  • Disconnect the DDM C501B (LH concern) or PDM C652B (RH concern).
  • Action:
    Click to display the connectors

    left


    Positive lead Measurement/Action Negative lead
    C521-1 Ground

    Click to display the connectors

    Right Side


    Positive lead Measurement/Action Negative lead
    C601-1 Ground

Is the resistance greater than 10000 Ohms?
Yes GO to B10
No REPAIR the circuit.
B8 CHECK THE DDM (DRIVER DOOR MODULE) OPERATION
  • Ignition OFF.
  • Disconnect and inspect all DDM connectors and the corresponding harness connectors.
  • Repair:
    • corrosion (install new connector or terminals - clean module pins)
    • damaged or bent terminals/pins - install new terminals/pins
    • pushed-out pins - install new pins as necessary
  • Reconnect the DDM connectors and the corresponding harness connectors. Make sure they are installed and locked correctly.
  • Operate the system to determine if the concern persists.

Is the concern still present?
Yes CHECK in OASIS for any applicable Technical Service Bulletins (TSBs). If a TSB exists for this concern, STOP this test and FOLLOW the TSB instructions. If no TSB applies to this concern, INSTALL a new DDM.
No The system is currently operating correctly. The concern may have been caused by module connections. ADDRESS the root cause of any connector or terminal issues.
B9 CHECK THE PDM (PASSENGER DOOR MODULE) OPERATION
  • Ignition OFF.
  • Disconnect and inspect all PDM connectors and the corresponding harness connectors.
  • Repair:
    • corrosion (install new connector or terminals - clean module pins)
    • damaged or bent terminals/pins - install new terminals/pins
    • pushed-out pins - install new pins as necessary
  • Reconnect the PDM connectors and the corresponding harness connectors. Make sure they are installed and locked correctly.
  • Operate the system to determine if the concern persists.

Is the concern still present?
Yes CHECK in OASIS for any applicable Technical Service Bulletins (TSBs). If a TSB exists for this concern, STOP this test and FOLLOW the TSB instructions. If no TSB applies to this concern, INSTALL a new PDM.
No The system is currently operating correctly. The concern may have been caused by module connections. ADDRESS the root cause of any connector or terminal issues.
B10 CHECK THE OUTSIDE MIRROR JUMPER HARNESS
  • Inspect the outside mirror jumper harness between the vehicle wiring harness and the mirror glass for:
    • Open circuit or short circuit
    • Damaged or pushed-out pins
    • Corrosion

Is the harness in good condition?
Yes INSTALL a new outside mirror glass.
No REPAIR the harness, if necessary. If the harness cannot be repaired, INSTALL a new outside mirror.
DIAGNOSTIC TEST C: OUTSIDE MIRROR MEMORY RECALL FUNCTION DOES NOT OPERATE/OPERATES INCORRECTLY

For wiring diagrams and connector information, refer to Cell 124 of the Wiring Diagrams.

Normal Operation and Fault Symptoms

REFER TO: Rear View Mirrors - System Operation and Component Description (501-09 Rear View Mirrors, Description and Operation).

DTC Fault Trigger Conditions

Trouble Code Description Fault Trigger Condition
DDM B1C13:12 Driver side mirror up/down motor feedback: short to battery Continuous DTC on demand, which is set in the DDM when the DDM detects a short to battery in the driver mirror vertical position feedback circuit.
DDM B1C13:14 Driver mirror up/down motor feedback: short to ground or open Continuous DTC on demand, which is set in the DDM when the DDM detects a short to ground or open in the driver mirror vertical position feedback circuit.
DDM B1C14:12 Driver side LH/RH mirror motor feedback: short to battery Continuous DTC on demand, which is set in the DDM when the DDM detects a short to battery in the driver mirror horizontal position feedback circuit.
DDM B1C14:14 Driver side LH/RH mirror motor feedback: short to ground or open circuit Continuous DTC on demand, which is set in the DDM when the DDM detects a short to ground or open in the driver mirror horizontal position feedback circuit.
PDM B1C15:12 Passenger side mirror up/down motor feedback: short to battery Continuous DTC on demand, which is set in the PDM when the PDM detects a short to battery in the vertical position feedback circuit.
PDM B1C15:14 Passenger mirror up/down motor feedback: short to ground or open Continuous DTC on demand, which is set in the PDM when the PDM detects a short to ground or open in the vertical position feedback circuit.
PDM B1C16:12 Passenger side LH/RH mirror motor feedback: short to battery Continuous DTC on demand, which is set in the PDM when the PDM detects a short to battery in the horizontal position feedback circuit.
PDM B1C16:14 Passenger side LH/RH mirror motor feedback: short to ground or open circuit Continuous DTC on demand, which is set in the PDM when the PDM detects a short to ground or open in the horizontal position feedback circuit.

Possible Sources

  • Wiring, Terminals or Connectors
  • Seat Memory System Concern
  • Power Mirror System Concern
  • Outside Mirror Motor
  • Outside Mirror
  • DDM
  • PDM

Visual Inspection and Pre-checks

  • Inspect the suspect outside mirror for damage or obstructions.

NOTICE: Use the correct probe adapter(s) when making measurements. Using the incorrect probe adapter(s) may cause connector damage. Use only Rotunda Flex probes (NUD105-R025D).

C1 CHECK THE SEAT MEMORY OPERATION
  • The ignition is on.
  • Check the operation of the seat memory function.

Does the seat memory function operate?
Yes GO to C2
No CHECK the seat memory system before continuing with the outside mirror memory recall diagnosis.
REFER TO: Front Seats (501-10A Front Seats, Diagnosis and Testing).
C2 CHECK THE POWER MIRROR OPERATION
  • Check the up/down and left/right operation of the suspect power mirror.

Does the suspect mirror operate in all directions?
Yes GO to C3
No GO to Pinpoint Test A
C3 CHECK THE OUTSIDE MIRROR POSITION SENSOR CIRCUITS FOR A SHORT TO VOLTAGE
  • Ignition OFF.
  • Disconnect: suspect outside mirror C521 (left) or C601 (right).
  • Disconnect: DDM C501B (LH) or PDM C652B (RH).
  • The ignition is on.
  • Action:
    Click to display the connectors

    left


    Positive lead Measurement/Action Negative lead
    C521-6 Ground
    C521-9 Ground
    C521-12 Ground
    C521-13 Ground

    Click to display the connectors

    Right Side


    Positive lead Measurement/Action Negative lead
    C601-6 Ground
    C601-9 Ground
    C601-12 Ground
    C601-13 Ground

Is there voltage present?
Yes REPAIR the faulty circuit.
No GO TO C4
C4 CHECK THE OUTSIDE MIRROR POSITION SENSOR CIRCUITS FOR A SHORT TO GROUND
  • Ignition OFF.
  • Action:
    Click to display the connectors

    left


    Positive lead Measurement/Action Negative lead
    C521-6 Ground
    C521-9 Ground
    C521-12 Ground
    C521-13 Ground

    Click to display the connectors

    Right Side


    Positive lead Measurement/Action Negative lead
    C601-6 Ground
    C601-9 Ground
    C601-12 Ground
    C601-13 Ground

Is the resistance greater than 10000 ohms?
Yes GO to C5
No REPAIR the faulty circuit.
C5 CHECK THE SUSPECT OUTSIDE MIRROR POSITION SENSOR CIRCUITS FOR AN OPEN
  • Action:
    Click to display the connectors

    left


    Positive lead Measurement/Action Negative lead
    C521-6 C501B-23
    C521-9 C501B-10
    C521-12 C501B-22
    C521-13 C501B-21

    Click to display the connectors

    Right Side


    Positive lead Measurement/Action Negative lead
    C601-6 C652B-23
    C601-9 C652B-10
    C601-12 C652B-22
    C601-13 C652B-21

Is the resistance less than 3 ohms?
Yes GO to C6
No REPAIR the faulty circuit.
C6 CHECK THE OUTSIDE MIRROR JUMPER WIRE HARNESS
  • Inspect the outside mirror jumper harness between the vehicle wiring harness and the mirror motors for:
    • Open circuit or short circuit
    • Damaged or pushed-out pins
    • Corrosion

Is the harness in good condition?
Yes INSTALL a new outside mirror motor.
REFER TO: Outside Mirror (501-09 Rear View Mirrors, Removal and Installation). CHECK the system for normal operation. If the concern is not resolved, GO to C7.
No REPAIR the harness, if necessary. If the harness cannot be repaired, INSTALL a new outside mirror.
REFER TO: Outside Mirror (501-09 Rear View Mirrors, Removal and Installation).
C7 CHECK DDM (DRIVER DOOR MODULE) / PDM (PASSENGER DOOR MODULE) OPERATION
  • Disconnect and inspect all DDM/PDM connectors and the related in-line connectors.
  • Repair:
    • corrosion (install new connector or terminals - clean module pins)
    • damaged or bent terminals/pins - install new terminals/pins
    • pushed-out pins - install new pins as necessary
  • Reconnect the DDM/PDM connectors and the related in-line connectors. Make sure they are installed and fully seated.
  • Operate the system to determine if the concern persists.

Is the concern still present?
Yes CHECK OASIS for any applicable Technical Service Bulletins (TSBs). If a TSB exists for this concern, STOP this test and FOLLOW the TSB instructions. If no TSB applies to this concern, INSTALL a new DDM/PDM.
REFER TO: Driver Door Module (DDM) (419-10 Multifunction Electronic Modules, Removal and Installation).
REFER TO: Passenger Door Module (PDM) (419-10 Multifunction Electronic Modules, Removal and Installation).
No The system is currently operating correctly. The concern may have been caused by module connections. ADDRESS the root cause of any connector or terminal issues.
DIAGNOSTIC TEST D: ONE OR BOTH OUTSIDE MIRRORS FOLD IN DUE TO WIND PRESSURE

Normal Operation and Fault Symptoms

The power fold mirror feature allows the outside rear view mirrors to be folded and unfolded electronically. The fold mirrors can be activated automatically or by pressing the outside mirror fold switch. If the mirrors fold inward due to wind pressure, this indicates a problem with the mirror.

Possible Sources

  • Mirror structure bracket is damaged.
D1 CHECK OUTSIDE MIRROR OPERATION
  • The ignition is on.
  • Using the diagnostic scan tool, clear the diagnostic trouble codes (DTCs) for the module in question.

Was an obvious cause found?
Yes CHECK the mirror for structural damage. If necessary, INSTALL a new mirror.
REFER TO: Outside Mirror (501-09 Rear View Mirrors, Removal and Installation).
No Repair is complete.
DIAGNOSTIC TEST E: BOTH OUTSIDE MIRRORS DO NOT OPERATE (WITH OR WITHOUT MEMORY MIRRORS)

Normal Operation and Fault Symptoms

The power mirror system allows the outside mirror glass to be electronically positioned. The position of the outside rear view mirror glass is controlled by the outside mirror control switch. The left or right mirror select buttons determine which outside rear view mirror glass is controlled. If all power windows can be operated normally from the left front door window switch, but mirror selection and positioning are not possible, this indicates a concern with the left front door window switch.

Possible Sources

  • Wiring, Terminals or Connectors
  • Power Window Concern
  • Outside mirror control switch (integrated in the left front door window switch)
  • DDM
E1 CHECK OUTSIDE MIRROR OPERATION
  • The ignition is on.
  • Using the diagnostic scan tool, clear the diagnostic trouble codes (DTCs) for the module in question.

Was an obvious cause found?
Yes VERIFY that all power windows can be operated normally using the left front door window switch.
If all power windows operate normally from the left front door window switch, INSTALL a new left front door window switch.
REFER TO: Driver Door Window Switch (501-11 Glass, Frames and Mechanisms, Removal and Installation). If all power windows do not operate normally from the left front door window switch, CHECK the power windows before continuing outside mirror diagnosis.
REFER TO: Glass, Frames and Mechanisms - Vehicles With: One-Touch Front Window Open and Close (501-11 Glass, Frames and Mechanisms, Diagnosis and Testing).
REFER TO: Glass, Frames and Mechanisms - Vehicles With: One-Touch Driver Window Open (501-11 Glass, Frames and Mechanisms, Diagnosis and Testing).
No Repair is complete.
DIAGNOSTIC TEST F: LEFT (LH) AND RIGHT (RH) HEATED OUTSIDE MIRRORS DO NOT DEFROST AT THE SAME RATE

Normal Operation and Fault Symptoms

The outside rear view mirrors may be equipped with heated mirror glass, which heats the mirror glass to remove frost, snow, ice and condensation. The rear window defrost switch controls the operation of the outside mirror heating element. Only the heated outside mirror glass operates when the rear window defrost system is active. If both mirrors do not defrost at the same rate, this indicates a concern with the mirror and DTCs.

Possible Sources

  • Outside Mirror Heater Normal Operation
F1 CHECK OUTSIDE MIRROR OPERATION
  • The ignition is on.
  • Using the diagnostic scan tool, clear the diagnostic trouble codes (DTCs) for the module in question.

Was an obvious cause found?
Yes No action is required, the system is currently operating correctly.
No Repair is complete.
DIAGNOSTIC TEST G: OUTSIDE MIRROR SWITCH LED DOES NOT OPERATE (OUTSIDE MIRROR SWITCH FUNCTIONS NORMALLY)

Normal Operation and Fault Symptoms

The left or right mirror select button determines which outside rear view mirror glass is controlled by the LED illuminated on the selected side. If the mirror select switch operates normally but the LED does not illuminate, this indicates a concern with the left front door window switch.

Possible Sources

  • Outside Mirror Select Switch
G1 CHECK OUTSIDE MIRROR SELECT SWITCH OPERATION
  • The ignition is on.
  • Using the diagnostic scan tool, clear the diagnostic trouble codes (DTCs) for the module in question.

Was an obvious cause found?
Yes INSTALL a new driver front door window lift switch.
REFER TO: Driver Door Window Lift Switch (501-11 Glass, Frames and Mechanisms, Removal and Installation).
No Repair is complete.
DIAGNOSTIC TEST H: OUTSIDE MIRROR LAMP DOES NOT OPERATE OR IS ALWAYS ON

Normal Operation and Fault Symptoms

REFER TO: Rear View Mirrors - System Operation and Component Description (501-09 Rear View Mirrors, Description and Operation).

Possible Sources

  • Interior Lighting
H1 CHECK OUTSIDE MIRROR LAMP OPERATION
  • The ignition is on.
  • Using the diagnostic scan tool, clear the diagnostic trouble codes (DTCs) for the module in question.

Was an obvious cause found?
Yes
REFER TO: Interior Lamps (417-02 Interior Lamps, Diagnosis and Testing).
No Repair is complete.
DIAGNOSTIC TEST I: OUTSIDE MIRROR TURN SIGNAL DOES NOT OPERATE OR IS ALWAYS ON

Normal Operation and Fault Symptoms

The multifunction switch on the steering column operates the outside mirror turn signal. If other functions operate normally from the multifunction switch and the outside mirror turn signal does not operate, this indicates a concern with the multifunction switch or the outside mirror. REFER TO: Exterior Lighting - System Operation and Component Description (417-01 Exterior Lighting, Description and Operation).

Possible Sources

  • Turn Signal and Hazard Warning
I1 CHECK OUTSIDE MIRROR TURN SIGNAL AND HAZARD LAMP OPERATION
  • The ignition is on.
  • Using the diagnostic scan tool, clear the diagnostic trouble codes (DTCs) for the module in question.

Was an obvious cause found?
Yes
REFER TO: Turn Signal and Hazard Warning Lamps (417-01 Exterior Lighting, Diagnosis and Testing).
No Repair is complete.
DIAGNOSTIC TEST J: BLIND SPOT INFORMATION SYSTEM (BLIS)® INDICATOR INOPERATIVE OR ALWAYS ON

Normal Operation and Fault Symptoms

The BLIS ® Light Emitting Diode (LED) outside mirror alerts the driver that a vehicle has been detected. BLIS ® provides alerts when the vehicle is moving forward and vehicle speed is greater than 10 km/h. If the BLIS ® indicator does not operate or remains constantly on, this indicates a concern with the outside mirror or BLIS®. REFER TO: Blind Spot Information System - System Operation and Component Description (419-04 Side and Rear Vision, Description and Operation).

Possible Sources

  • Blind Spot Information System
J1 CHECK BLIND SPOT INFORMATION SYSTEM OPERATION
  • The ignition is on.
  • Using the diagnostic scan tool, clear the diagnostic trouble codes (DTCs) for the module in question.

Was an obvious cause found?
Yes
REFER to: Blind Spot Information System (419-04 Side and Rear Vision, Diagnosis and Testing).
No Repair is complete.
DIAGNOSTIC TEST K: INTERIOR MIRROR LOST

Normal Operation and Fault Symptoms

The interior rear view mirror should allow the driver to see rearward through the vehicle's rear windshield. If the mirror view is not clear, this indicates a concern with the interior mirror.

Possible Sources

  • Interior Mirror Glass/Housing Dirty
K1 CHECK INTERIOR MIRROR
  • The ignition is on.
  • Using the diagnostic scan tool, clear the diagnostic trouble codes (DTCs) for the module in question.

Was an obvious cause found?
Yes CLEAN the affected interior mirror surface.
No Repair is complete.
DIAGNOSTIC TEST L: INTERIOR MIRROR VIBRATES OR IS INACCURATE

Normal Operation and Fault Symptoms

The interior rear view mirror should allow the driver to see rearward through the vehicle's rear windshield. If the mirror mounting is loose, the mirror will begin to vibrate.

Possible Sources

  • Interior Mirror Mounting Loose
L1 CHECK INTERIOR MIRROR MOUNTING
  • The ignition is on.
  • Using the diagnostic scan tool, clear the diagnostic trouble codes (DTCs) for the module in question.

Was an obvious cause found?
Yes If the mirror is still on the windshield, do not remove it. TRY to fully install the mirror first. If the mirror is still loose or vibrates, REMOVE and REINSTALL the mirror. If the condition still exists, INSTALL a new interior rearview mirror.
REFER TO: Interior Rearview Mirror (501-09 Rearview Mirrors, Removal and Installation).
No Repair is complete.
DIAGNOSTIC TEST M: OUTSIDE MIRROR HOUSING VIBRATES OR IS LOOSE

Normal Operation and Fault Symptoms

The outside mirror must allow the driver to see the areas behind and to the sides of the vehicle. When the outside mirror starts to vibrate, this indicates a problem with the outside mirror housing and mounting.

Possible Sources

  • Outside mirror mounting nuts are loose
  • Aftermarket air deflector / rock shields
M1 OUTSIDE MIRROR MOUNTING CHECK
  • The ignition is on.
  • Using the diagnostic scan tool, clear the diagnostic trouble codes (DTCs) for the module in question.

Was an obvious cause found?
Yes TIGHTEN the outside rearview mirror mounting nuts.
REFER TO: Outside Mirror (501-09 Rearview Mirrors, Removal and Installation). If possible, REMOVE the aftermarket parts and DRIVE the vehicle. CHECK the vehicle. If the concern no longer exists, ADVISE the customer that aftermarket components caused the undesirable vibration.
No Repair is complete.
DIAGNOSTIC TEST N: OUTSIDE MIRROR GLASS VIBRATES OR IS LOOSE

Normal Operation and Fault Symptoms

The outside mirror glass allows the driver to see the areas behind and to the sides of the vehicle. When the outside mirror glass starts to vibrate, this indicates a problem with the outside mirror housing and a damaged backing plate.

Possible Sources

  • Outside mirror motor mounting screws are loose
  • Outside mirror glass is loose
N1 OUTSIDE MIRROR MOUNTING CHECK
  • The ignition is on.
  • Using the diagnostic scan tool, clear the diagnostic trouble codes (DTCs) for the module in question.

Was an obvious cause found?
Yes PRESS the center of the outside mirror glass up, down, left and right to make sure the outside mirror glass is correctly seated. If the outside mirror glass is still loose, REMOVE the outside mirror glass. CHECK the outside mirror backing plate for damage. CHECK the outside mirror motor mounting screws and TIGHTEN if necessary. If the outside mirror backing plate is damaged, INSTALL a new outside mirror glass.
REFER TO: Outside Mirror (501-09 Rearview Mirrors, Removal and Installation).
No Repair is complete.
DIAGNOSTIC TEST O: WIND NOISE

Normal Operation and Fault Symptoms

There must be no gaps between the outside mirror and the door. If the foam gasket is incorrectly installed and the mirror mounting is loose, this creates wind noise.

Possible Sources

  • Foam gasket between the outside mirror housing and the door is misaligned or damaged
  • Outside mirror is incorrectly installed on the door
  • Impact damage to the outside mirror
O1 OUTSIDE MIRROR MOUNTING CHECK
  • The ignition is on.
  • Using the diagnostic scan tool, clear the diagnostic trouble codes (DTCs) for the module in question.

Was an obvious cause found?
Yes MAKE SURE the gasket is in good condition. If necessary, INSTALL the gasket between the outside mirror housing and the door. The foam gasket is not serviceable, and if it cannot be repaired, INSTALL a new outside mirror.
REFER TO: Outside Mirror (501-09 Rearview Mirrors, Removal and Installation). CHECK for gaps between the outside mirror and the door. If necessary, loosen the outside mirror mounting nuts and MOVE the outside mirror as required.
REFER TO: Outside Mirror (501-09 Rearview Mirrors, Removal and Installation). INSPECT the outside mirror for damage to the housing or glass.
No Repair is complete.

Test yourself

A quick Ford Escape quiz: every answer comes with an explanation and a link to the manual page.