Front brake disc - inspection, removal and refitting
1 Fully apply the handbrake then loosen the front roadwheel bolts. Raise and support the front of the vehicle on safety stands (see “Jacking and Vehicle Support”) and remove the roadwheel(s). 2 Examine the surface of the disc. If it is deeply grooved or scored or if any small cracks are evident, it must either be refinished or renewed. Any refinishing must not reduce the thickness of the disc to below a certain minimum (see “Specifications”). Light scoring on a brake disc is normal and should be ignored.
3 If disc distortion is suspected, the disc can be checked for run-out using a dial gauge or feeler blades located between its face and a fixed point as the disc is rotated (see illustration).
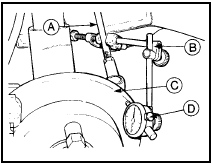
4.3 Checking brake disc run-out
A Steering tie-rod
B Dial gauge
support fixture
C Brake disc
D Dial gauge
5 With the roadwheel removed (see paragraph 1), proceed as follows.
6 To remove a disc, unbolt the caliper anchor bracket, withdraw it and tie it up to the suspension strut to avoid strain on the flexible hose (if necessary, remove the brake pads as described in Section 2) (see illustration).
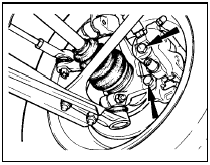
4.6 Caliper anchor bracket-to-hub carrier retaining bolts (arrowed)
7 Extract the small disc retaining screw and pull the disc from the hub (see illustration).
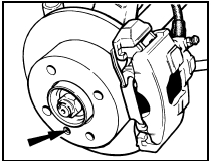
4.7 Brake disc retaining screw location (arrowed) Refitting 8 If a new disc is being installed, clean its surface free from preservative. 9 Fit the disc and tighten the retaining screw.
10 Refit the caliper anchor bracket (and where applicable the brake pads - see Section 2), and the roadwheel and lower the vehicle to the floor.
Test yourself
A quick Ford Escort quiz: every answer comes with an explanation and a link to the manual page.