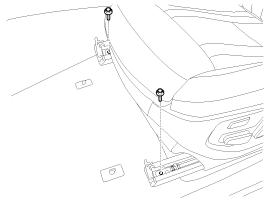
When installing the seat belt, take care not to damage the pretensioner.
Remove the front seat belt anchor (A).
How to Disconnect the Seat Belt Anchor: 1) Expose the red indicator pin (A) by pressing the slot with a pointed tool (1.5 mm), as shown in the figure below.
Be careful not to scratch the anchor cover with a pointed object when pressing the slot.
2) Insert a (-) screwdriver (4 mm) into the latch hole () and turn it clockwise. 3) Remove the connector by pulling the seat belt ( ).
When connecting the anchor connector, secure it firmly until you hear a click.
After opening the seat rail cover and loosening the mounting bolts, remove the front seat assembly.
Tightening Torque: 49.0 ~ 64 N·m
[Front][Rear]
Raise the front seat headrest (A).
Disconnect the front seat integration connector (A).
Install in the reverse order of removal.
Seat Mounting Bolt Installation Sequence
Move the seat to the rear end of the rails and first tighten the front mounting bolts.
Move the seat to the front end of the rails and fully tighten the rear mounting bolts.
Move the seat to the rear end again to fully tighten the front mounting bolts.
Check the seat for smooth operation.
For non-power seats, check that the seat locks securely at each specified mounting position.
When attaching the tongue to the buckle, be careful not to twist the belt.
?
Test yourself
A quick Hyundai Genesis DH quiz: every answer comes with an explanation and a link to the manual page.


 ) and turn it clockwise. 3) Remove the connector by pulling the seat belt (
 ).