Body (Interior and Exterior)
Rear Luggage Compartment Trim Repair Procedures
In this manual: Body (Interior and Exterior)
9steps
~54min
2/5difficulty
Done 0 of 9
Replacement
|

|

- Remove the rear seat cushion assembly. (Refer to Rear Seat - "Rear Seat Assembly")
- Remove the rear seatback assembly. (Refer to Rear Seat - "Rear Seat Assembly")
- Carefully remove the rear door weatherstrip.
- Remove the rear door sill trim. (Refer to Interior Trim - "Door Scuff Trim")
- Remove the rear pillar trim. (Refer to Interior Trim - "Rear Wheel House Trim")
- Remove the rear wheel house trim. (Refer to Interior Trim - "Rear Wheel House Trim")
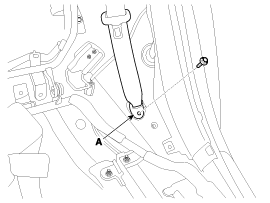
- After loosening the mounting bolt, remove the lower mounting of the rear seat belt (A). [LH, RH]
Tightening torque: 39.2 ~ 54 N·m
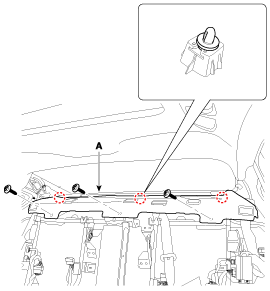
- After loosening the mounting screws, remove the rear parcel shelf garnish (A).
- Install in the reverse order of removal.

- Make sure the connector is properly connected.
- Replace any damaged clips.
Test yourself
A quick Hyundai Genesis DH quiz: every answer comes with an explanation and a link to the manual page.
Was this page helpful?