Restraint
SIDE IMPACT SENSOR (SIS) Repair Procedures
In this manual: Restraint
17steps
~102min
5/5difficulty
Done 0 of 17
DEPOSIT
Side Impact Pressure Sensor
- Disconnect the negative battery cable and wait at least three minutes before starting work.
- Remove the front door trim panel. (Refer to Body - "Front Door Trim")
- Disconnect the pressure-sensing side impact sensor connector (B) and remove the side impact sensor (A).
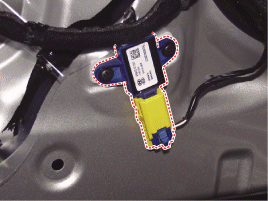
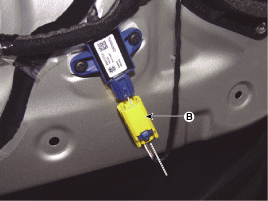
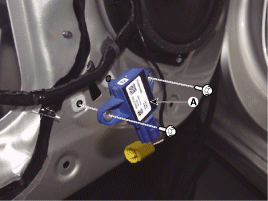
- Disconnect the negative battery cable and wait at least three minutes before starting work.
- Remove the door scuff plate. (Refer to Body group - Interior Trim.)
- Remove the center pillar trim. (Refer to Body group - Interior Trim.)
- Disconnect the side impact sensor connector (B).
- Loosen the side impact sensor mounting bolt and remove the side impact sensor bracket (A).
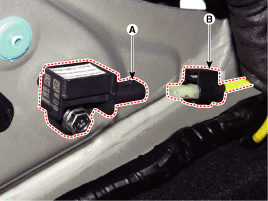
REMEDY
Side Impact Pressure Sensor
- Install a new pressure-sensing side impact sensor with the screws, then connect the connector.
Tightening torque: 8.0 ~ 10 N·m
- Install the front door trim panel. (Refer to Body - "Front Door Trim Panel")
- Connect the battery negative cable.
- After installing the pressure-sensing side impact sensor, check that the system operates properly.
- Turn the ignition switch to ON; the SRS warning lamp should illuminate for approximately six seconds and then go off.
- Install a new side impact sensor using the bolt, then connect the side impact sensor connector.
Tightening torque: 8.0 ~ 10 N·m
- Install the center pillar trim. (Refer to Body group - Interior Trim.)
- Install the door scuff plate. (Refer to Body group - Interior Trim.)
- Connect the battery negative cable.
- After installing the side impact sensor, check that the system operates properly.
- Turn the ignition switch to ON; the SRS warning lamp should illuminate for approximately six seconds and then go off.
Test yourself
A quick Hyundai i20 quiz: every answer comes with an explanation and a link to the manual page.
Was this page helpful?