Automatic Transmission System (A8LF1)
Line Pressure Control Solenoid Valve (LINE_VFS)
In this manual: Automatic Transmission System (A8LF1)
20steps
~120min
4/5difficulty
Done 0 of 20
Description and Operation
Description
- When the TCM supplies current to the solenoid valve, the hydraulic pressure is controlled indirectly by the solenoid valve.
- The Line Pressure Control Solenoid Valve is a Variable Force Solenoid (VFS) type.

Components and Component Location
Component Location
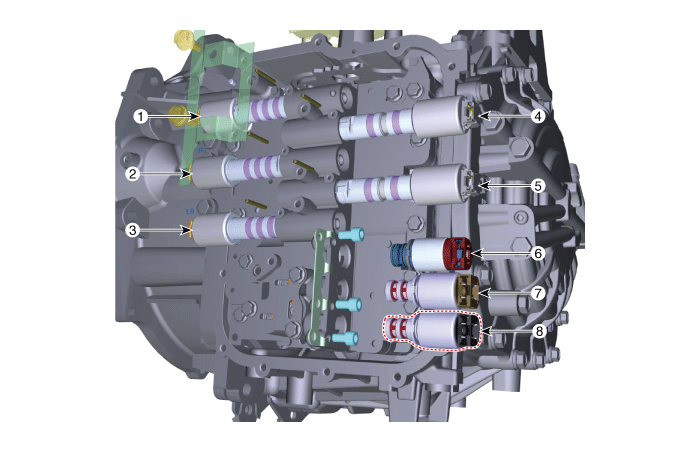
| 1. 28 Brake Control Solenoid Valve (28/B_VFS) 2. 46 Clutch Control Solenoid Valve (46/C_VFS) 3. 37R Clutch Control Solenoid Valve (37R/C_VFS) 4. UD Clutch Control Solenoid Valve (UD/C_VFS) |
5. OD & LR Clutch/Brake Control Solenoid Valve (OD/C and LR/B_VFS) 6. SS-A Solenoid Valve (SS-A_ON/OFF) 7. Torque Converter Control Solenoid Valve (T/CON_VFS) 8. Line Pressure Control Solenoid Valve (LINE_VFS) |
Specifications
Specification
VFS Clutch & Brake Control ▷ Control Type: Normal High| Item | Specification |
| Control Pressure (kPa (kgf/cm², psi)) | 0 - 519,75 (0–5,3, 0–75,38) |
| Current (mA) | 0 - 850 |
| Internal Resistance (ohm) | 5,1 ± 0,3 |
▷ Solenoid Valve Operation
| Separation | Solenoid valve |
| LINE_VFS | |
| P | ◎ |
| R | ◎ |
| N | ◎ |
| 1 | ◎ |
| 2 | ◎ |
| 3 | ◎ |
| 4 | ◎ |
| 5 | ◎ |
| 6 | ◎ |
| 7 | ◎ |
| 8 | ◎ |
| NOTE | ● : Connected |
| ◎ : Variable connected |
Circuit Diagrams
Wiring Diagram

Repair Procedures
Inspection
|

Removal
|

- Turn the ignition switch OFF and disconnect the negative (-) battery cable.
- Remove the battery and battery tray. (Refer to Engine Electrical System - "Battery")
- Remove the air duct and air cleaner assembly. (Refer to Engine Mechanical System - "Air Cleaner")
- Remove the under cover. (Refer to Engine Mechanical System - "Engine Room Under Cover")
- Drain the engine coolant. (If equipped with ATF warmer) (Refer to Cooling System — "Engine Coolant").
- Loosen the drain plug (A) and reinstall it after draining the ATF completely.
Tightening torque: 33.3–43 N·m


- Replace the gasket before reinstalling the drain plug.
- Loosen the bolts (A) and remove the wiring bracket.
Tightening Torque: 9.8–11.8 N·m

- Loosen the bolts (A) and remove the battery wiring bracket.
Tightening Torque: 9.8–11.8 N·m
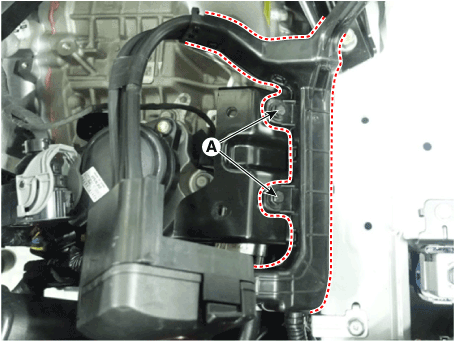
- Remove the ATF cooling hose (A).


- Carefully install the clamp so as not to damage the hose.
- Install the clamp in the correct direction so that it does not interfere with other parts.
- After installation, start the engine and check for leaks from the hose.
- Loosen the upper bolts (A) of the valve body cover.
Tightening torque: 11.8–13.7 N·m

- Loosen the bolts and remove the valve body cover (A).
Tightening torque: 11.8–13.7 N·m

- Be careful when removing the valve body cover, because residual ATF remains in the cover.


- Replace the gasket (A) before reinstalling the valve body cover.
- After installation, start the engine and check for leaks from the valve body cover.

- Loosen the bolts and remove the main harness (A).
Tightening Torque: 9.8–11.8 N·m

- Loosen the mounting bolts of the support bracket (A).
Tightening Torque: 9.8–11.8 N·m

- Remove the support bracket (A).

- Loosen the bolt (A).
Tightening Torque: 9.8–11.8 N·m

- Remove the line pressure control solenoid valve (A).

Installation
- To install, reverse the removal procedure.
- Fill the automatic transmission with fluid and check the fluid level. (Refer to Automatic Transmission System — "Automatic Transmission Fluid").
- Erase diagnostic trouble codes (DTC) using the diagnostic scan tool.

- Even when the negative battery terminal is disconnected, DTCs will not be cleared. Therefore, always clear the diagnostic trouble codes using the diagnostic scan tool.
- To prevent delayed engagement and shift shock during acceleration and start-up, perform TCM learning after replacing the solenoid valve. (Refer to Automatic Transmission Control System – Repair Procedures)

- After checking or replacing the ATF level, be sure to remove any residual ATF from the transmission case. (Pay particular attention to removing residual ATF between the automatic transmission case and the valve body cover.)
Test yourself
A quick Hyundai Palisade quiz: every answer comes with an explanation and a link to the manual page.
Was this page helpful?