Suspension System
Front lower arm
In this manual: Suspension System
14steps
~89min
4/5difficulty
1special tools
Done 0 of 14
Components and Component Location
COMPONENTS

| 1. Ball Joint Assembly 2. Front Lower Arm Assembly |
Repair Procedures
DEPOSIT
- Remove the front wheel and tire assembly (A) from the hub.
Tightening torque: 88.2 - 108 N·m

- Loosen the bolt and nut after removing the pin (A).
Tightening torque: 98.1 ~ 118 N·m

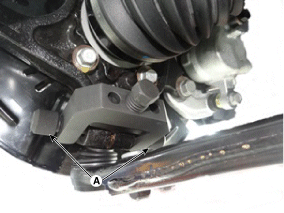
- Disconnect the lower arm from the joint using SST (09568-4R100).
- Insert the bracket bolt (A) into the bolt hole.
- Install the support housing (B) on the front axle.
- Tighten the bolt (C).

- Remove the front lower arm (A) after loosening the bolts and nuts. Tightening torque Front: 117.7 ~ 137 N·m Rear: 156.9 ~ 176 N·m

- To install, perform the removal procedure in reverse order.
- Check the wheel alignment. (Refer to Tires/Wheels – Wheel Alignment)
REPLACEMENT
Replace Lower Arm Ball Joint
- Remove the front wheel and tire assembly (A) from the hub.
Tightening torque: 88.2 - 108 N·m
- Loosen the bolt and nut after removing the pin (A).
Tightening torque: 98.1 ~ 118 N·m
- Disconnect the lower arm from the joint using SST (09568-4R100).
- Insert the bracket bolt (A) into the bolt hole.
- Install the support housing (B) on the front axle.
- Tighten the bolt (C).
- Remove the ball joint after loosening the nut (A).
- Install a new ball joint and tighten the nut (A).
Tightening torque: 98.1 ~ 118 N·m

Inspection
- Make sure that the bushing is not worn or damaged.
- Make sure the front stabilizer bar is not deformed.
- Check all bolts and nuts.
Test yourself
A quick Hyundai Tucson quiz: every answer comes with an explanation and a link to the manual page.
Was this page helpful?